
BMW E92 M3 Intake Install DIY for Turner Motorsport Carbon Fiber Plenum
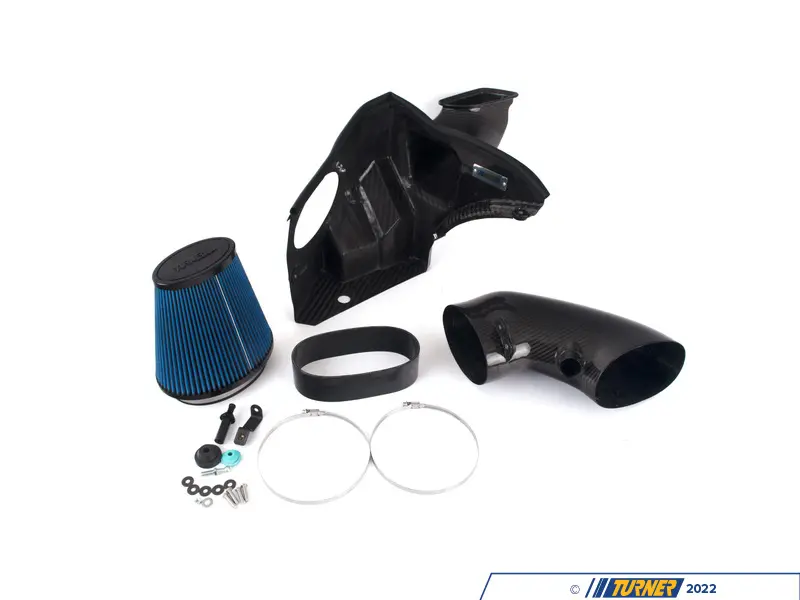
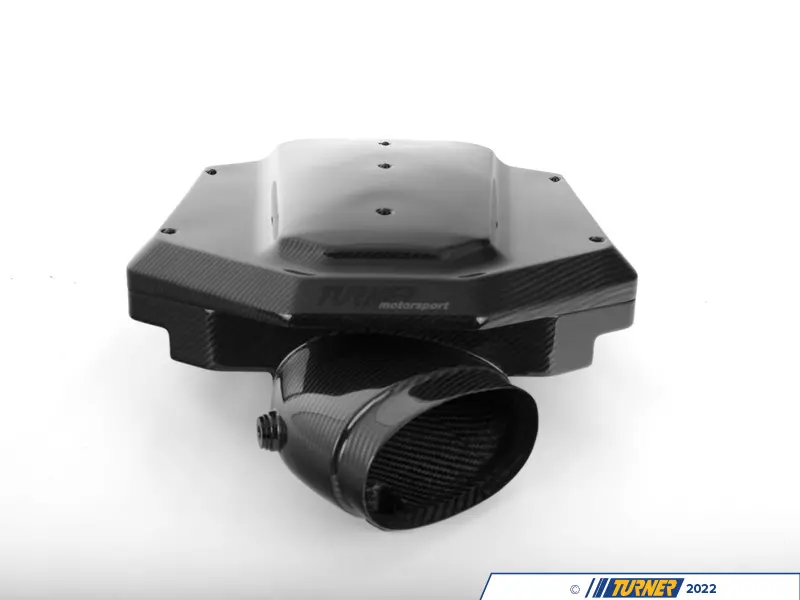
Turner Carbon Fiber Intake & Plenum for E90 E92 E93 M3
The BMW E90 E92 E93 M3 S65 engine can produce additional horsepower with a simple intake install by allowing more air to come into the engine. In addition, the sound can be significantly enhanced with a carbon fiber plenum. The V8 S65 throttle bodies can scream and I wanted to enhance my driving experience with more intake sound, rather than exhaust. I guess I’m getting older.
This guide will walk you through an E92 M3 intake install on my weekend street E92 M3. It’s honestly not that hard at all and probably took about 1 hour to complete the install.
Why Turner Though?
I chose Turner Motorsport’s carbon fiber setup because not only is it the best value in terms of dollar spent ($4,125 for the same setup from Eventuri), but they also recently announced their Turner Lifetime Replacement Program which no other carbon fiber intake manufacturer does for the E9X M3. I have peace of mind knowing that incase anything happens to my intake, I can get it replaced or repaired under warranty – forever!
Turner provides 3 different options: CF Plenum only, CF Intake only and CF Plenum & Intake combo. I opted for both because I wanted the sound enhancement and power gains.
Turner Carbon Intake & Plenum - E9X M3 S65
$3,264.97

Turner Carbon Fiber Intake - E9X M3 S65
$772.71
Turner Carbon Plenum - E9X M3 S65
$2,367.72
Tools Required
- Philips screwdriver
- Ratchet
- Flexible extension
- 10mm socket (including deep socket)
- 8mm socket
- 6mm socket
- T20 torx bit
- 4mm hex bit or allen
- 5/32 hex bit or allen

E90 E92 E93 M3 Intake Installation Instructions
1. Remove factory intake
1.1 Open the hood and start by removing the factory intake scuba scoop using needle node pliers for the 2 plastic rivets and a T20 torx bit for the 2 screws.


1.2 Remove the 7 screws on the factory intake lid using a T20 torx bit.


1.3 Remove factory injection air hose on intake elbow. Squeeze tabs and pull.

1.4 Remove clamps on intake elbow with a 6mm socket.

1.5 Remove the two 10mm hex bolts that hold the intake housing.


1.6 Remove the intake air temperature sensor (IAT) on the plenum by first unclipping the plug followed by a twist and pull of the IAT sensor. Careful not to touch or dirty up the sensor tip. This will be re-used later on in the upcoming steps. Also, keep note of the orientation of the IAT sensor.


1.7 Loosen the 8 hose clamps underneath the factory plenum using a 6mm hex socket. You will need an extension for this procedure.


1.8 Before you remove the factory plenum, disconnect the 2 hoses attached. There is one in the driver side rear and one inn the front right below the intake elbow opening. Squeeze the 2 tabs and pull.


1.9 You can discard all the factory intake components except for the IAT sensor. Get ready for the new Turner intake install.

2. Prep for Turner Intake Install
2.1 Install the supplied black grommet into the bottom of the Turner intake shield (not pictured) and install the supplied ball standoff into the nutsert.

2.2 Install the green grommet onto the body.

2.3 Remove the factory black grommet that sits on the engine rail and replace it with the provided stand off. Use a hex key to tighten the stand off.


3. Install Turner CF Intake
3.1 Insert the Turner intake shield into place. Make sure the 2 grommets accept the stand offs.


3.2 Use the supplied 4mm hex bolt to secure the intake shield into the factory threaded grommet.

3.3 Install the Turner CF plenum by placing it back on the stock rubber intake boots. At this time, make sure to secure the 2 hose clamps underneath the plenum, as shown on step 1.8. Tighten the hose clamps to factory spec.

3.4 Install the intake filter using the provided intake elbow. Secure the elbow using the 2 provided 4mm hex bolts.

3.5 Insert the provided silicone coupler to the plenum and use the 2 provided hose clamps to tighten down.
3.6 Reinstall the air injection hose from Step 1.3.

3.7 Install the IAT sensor into the port with a push. Clock the sensor to factory orientation and plug in the harness.

3.8 Lastly, install the intake filter and use the provided hose clamp to secure.


Buildjournal Race Dash Center Console Install DIY for E46 M3
Do I Need a Race Dashboard?
In this article I will show you a DIY install for our Buildjournal Race Dash Center Console for the E46 M3. This race dash solution allows you to easily convert your center radio & A/C dashboard on the E46 M3 to accommodate a variety of switches, toggles and buttons for race car builds. If you’re planning to reduce weight and thin your wiring harness, you will most likely end up with several factory switches that will no longer be in use and be switched our with your own components. Therefore it is best to remove the unnecessary weight and clean up the center dashboard for a nice functional panel.
E46 M3 Race Dash
Carbon Fiber Panel + Extruded Frame
Tools Required
- 10mm socket
- 10mm wrench
- Ratchet
- Power drill
- 1/4" drill bit
- 3mm hex key / 2.5mm hex key

Race Dash Installation Instructions
1. Remove factory center dash radio and upper A/C vent
1.1 Depending on your factory package, you may have either a full size navigation unit or two separate radio/HVAC controls
1.2 Remove factory Dash Trim

2. Place Dash Panel Frame into center dash

3. Mark holes
3.1 Align the Center Panel Frame with the factory dash and make sure the edges are flush
3.2 Use a pen or paint marker to mark the two bottom holes for drilling
3.3 Use a 1/4″ drill bit to create the 2 bottom holes


3.4 Mark the hole locations on the upper half of the Dash Panel Frame – there is a hole on each side of the panel
3.5 Use a 1/4″ drill bit to create the 2 holes on each side


4. Install hardware
4.1 Use the supplied (4) M6 bolt and (4) M6 locknut to secure the Center Dash Panel

5. Cut/drill your desired holes for the Carbon Fiber Center Dash Panel
5.1 We recommend cutting the Carbon Fiber Dash Panel with a hole saw cutter drill bit

6. Install your toggles/switches

7. Secure the Carbon Fiber Dash Panel
7.1 Use the supplied (4) M4 bolt and (4) M4 washers to secure the Center Dash Panel
7.2 Use 3mm hex head for Titanium bolts or 2.5mm hex head for Black bolts

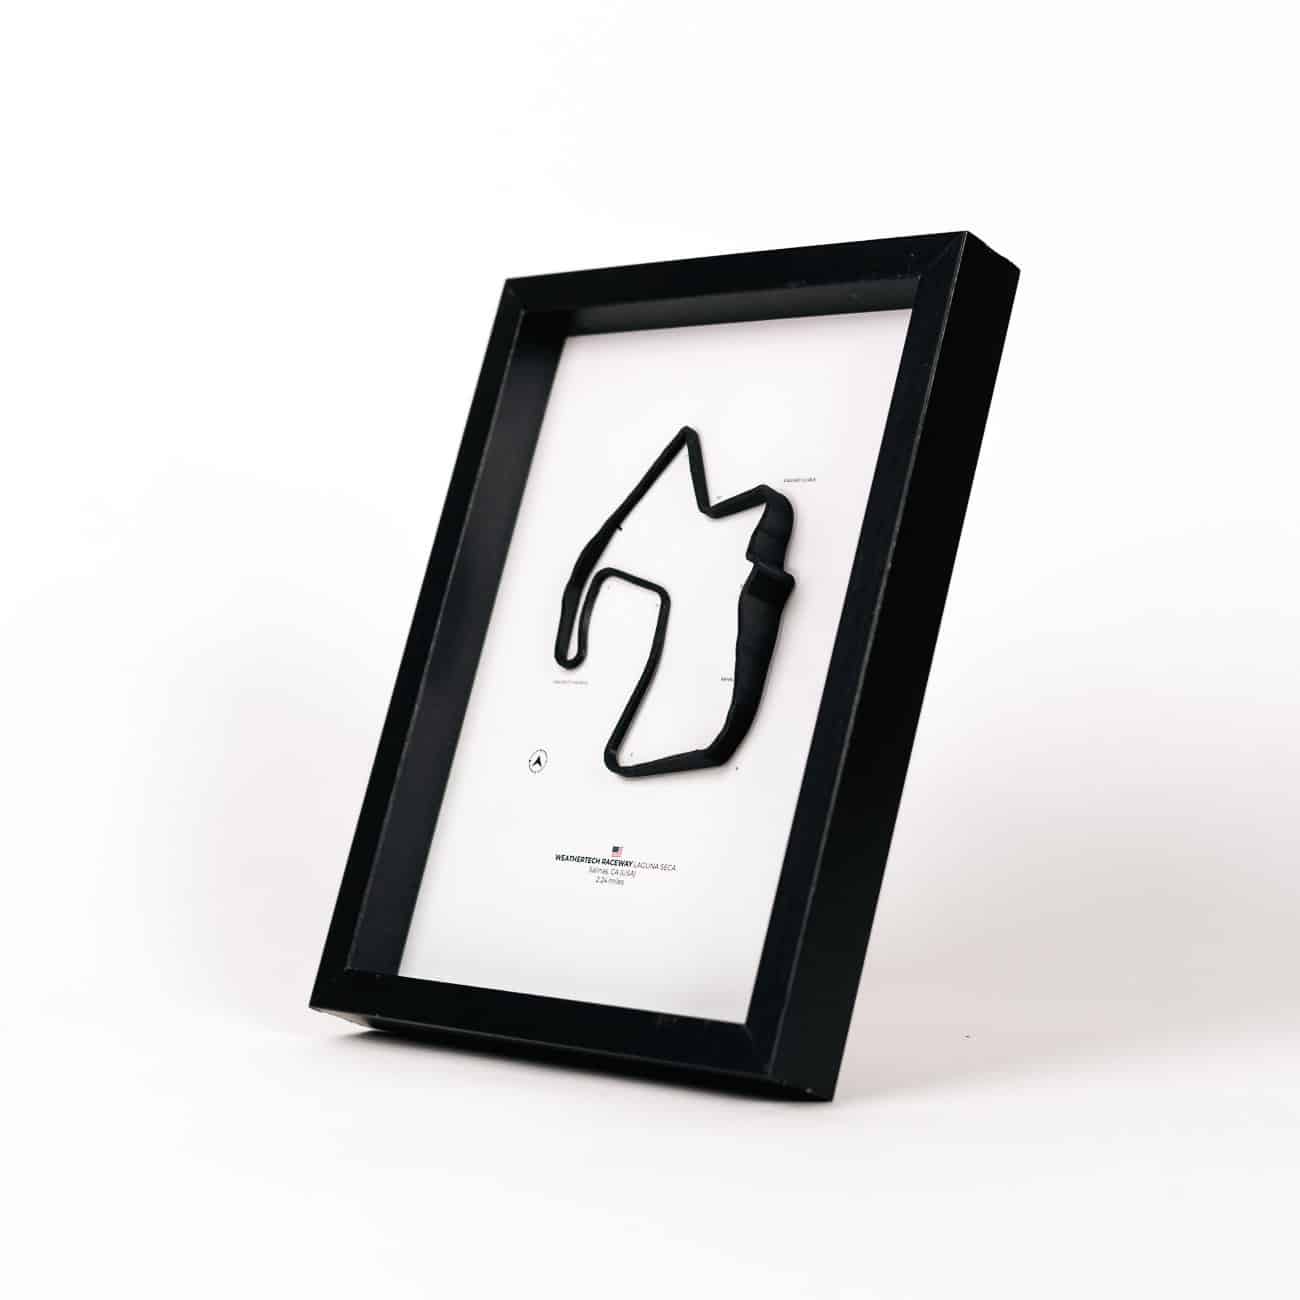
Coming Soon: 3D Race Track Wall Art Frames
3D Track Art Frames
Coming Soon
Bring the track home. Track created with professional FDM 3D printer and displayed on 8″ x 6″ matte photo paper prints with clear acrylic glass. These track frames are carefully hand assembled into shadow box frames and will be available in very limited quantities.


BMW Gear Ratio & Final Drive Compilation - E30 E36 E46 E90 E92
Quick Intro to BMW Gear Ratios
What is a BMW gear ratio? A modern day transmission consists of multiple gears, with different gear ratios, inside the gearbox and the primary purpose is to maximize the energy produced by the engine. If there was no transmission and the power being delivered to the crankshaft was directly connected to the driveshaft to spin the wheels, your maximum speed is only as great as what the engine can provide. However with multiple BMW gear ratio inside a transmission, the engine’s power can be harvested to allow greater top speed without the engine spinning faster, thus being efficient as well.
An S54 E46 M3 engine can produce a maximum of 8,000 RPM to the crankshaft. You can have no transmission and have a top speed of 60 mph at 8,000 RPM or you can add a transmission with different BMW gear ratio to go 155 mph, while still being at 8,000 RPM.
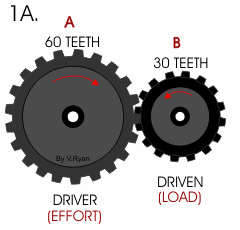
How Do BMW Gear Ratio Work?
You have 2 RC car tires. Tire A has a circumference of 1 inch. Tire B has a circumference of 2 inches. If you roll both tires equally on the ground starting at the same point, Tire A will need to roll two full rotations to cover the same distance as tire B. What does that mean? Tire A has to rotate faster. Take this concept over to gears and you have a gearbox with a 2:1 gear ratio.
Transmission gears have teeth on them to prevent slippage. A BMW gear ratio of 2:1 can have a gear with 60 teeth and 30 teeth. You can also calculate the gear ratio, such as one found in a differential, by dividing the two.
BMW Gear Ratio Table
Below is a compilation of BMW gear ratio found on BMW transmissions and also the final drive ratios on the differential. This is a work in progress and I will continue to spend hours manually scavenging through official BMW brochures to compile. Baseline guides are already out there, but mostly scattered all over the internet so I took the time to compile in one list and also adding new data points for the newer cars such as the 7-speed DCT transmission, etc. If you see any corrections, please comment below.
Differential final drive, separate from transmission gearing, ratios are also listed. A lot of people talk about changing their diff ratio e.g. upgrading to 3.91 or 4.10 on the Getrag 420G 6-speed transmission for E46 M3. Without getting into too much detail, the differential has significant impact on the overall gearing of the transmission and can improve drivability on the streets or track.
| wdt_ID | Model | Chassis | Type | Transmission | I | II | III | IV | V | VI | VII | Reverse | Final Drive | Redline |
|---|---|---|---|---|---|---|---|---|---|---|---|---|---|---|
| 1 | E30 | M3 | Coupe | Manual | 3.83 | 2.20 | 1.40 | 1.00 | 0.81 | - | - | 3.46 | 4.10:1 | 7,250 |
| 2 | E30 | M3 (EU) | Coupe | Manual | 3.72 | 2.40 | 1.77 | 1.26 | 1.00 | - | - | 4.23 | 3.25:1 | 7,250 |
| 3 | E30 | M3 Evo I | Coupe | Manual | 3.72 | 2.40 | 1.77 | 1.26 | 1.00 | - | - | 4.23 | 3.25:1 | 7,250 |
| 4 | E30 | M3 Evo II | Coupe | Manual | 3.72 | 2.40 | 1.77 | 1.26 | 1.00 | - | - | 4.23 | 3.15:1 | 7,250 |
| 5 | E30 | M3 Sport Evo | Coupe | Manual | 3.72 | 2.40 | 1.77 | 1.26 | 1.00 | - | - | 4.23 | 3.15:1 | 7,250 |
| 6 | E36 | 318i | Sedan | Manual | 4.23 | 2.52 | 1.66 | 1.22 | 1.00 | - | - | 4.04 | 3.45:1 | 6,300 |
| 7 | E36 | 318is | Coupe | Manual | 4.23 | 2.52 | 1.66 | 1.22 | 1.00 | - | - | 4.04 | 3.45:1 | 6,300 |
| 8 | E36 | 318ci | Convertible | Manual | 4.23 | 2.52 | 1.66 | 1.22 | 1.00 | - | - | 4.04 | 3.45:1 | 6,300 |
| 9 | E36 | 318ti | Compact | Manual | 4.23 | 2.52 | 1.66 | 1.22 | 1.00 | - | - | 4.04 | 3.45:1 | 6,300 |
| 10 | E36 | 323i | Sedan | Manual | 4.23 | 2.52 | 1.66 | 1.22 | 1.00 | - | - | 4.04 | 2.93:1 | 6,500 |
| 11 | E36 | 323is | Coupe | Manual | 4.23 | 2.52 | 1.66 | 1.22 | 1.00 | - | - | 4.04 | 2.93:1 | 6,500 |
| 12 | E36 | 323ci | Convertible | Manual | 4.23 | 2.52 | 1.66 | 1.22 | 1.00 | - | - | 4.04 | 2.93:1 | 6,500 |
| 13 | E36 | 325i | Sedan | Manual | 4.23 | 2.52 | 1.66 | 1.22 | 1.00 | - | - | 4.04 | 3.15:1 | 6,500 |
| 14 | E36 | 325is | Coupe | Manual | 4.23 | 2.52 | 1.66 | 1.22 | 1.00 | - | - | 4.04 | 3.15:1 | 6,500 |
| 15 | E36 | 325ci | Convertible | Manual | 4.23 | 2.52 | 1.66 | 1.22 | 1.00 | - | - | 4.04 | 3.15:1 | 6,500 |
| 16 | E36 | 328i | Sedan | Manual | 4.20 | 2.49 | 1.66 | 1.24 | 1.00 | - | - | 3.89 | 2.93:1 | 6,500 |
| 17 | E36 | 328is | Coupe | Manual | 4.20 | 2.49 | 1.66 | 1.24 | 1.00 | - | - | 3.89 | 2.93:1 | 6,500 |
| 18 | E36 | 328ci | Convertible | Manual | 4.20 | 2.49 | 1.66 | 1.24 | 1.00 | - | - | 3.89 | 2.93:1 | 6,500 |
| 19 | E36 | M3 (1995) | Coupe | Manual | 4.20 | 2.49 | 1.66 | 1.24 | 1.00 | - | - | 3.89 | 3.15:1 | 6,500 |
| 20 | E36 | M3 | Coupe | Manual | 4.20 | 2.49 | 1.66 | 1.24 | 1.00 | - | - | 3.89 | 3.23:1 | 6,500 |
| 21 | E36 | M3 | Sedan | Manual | 4.20 | 2.49 | 1.66 | 1.24 | 1.00 | - | - | 3.89 | 3.23:1 | 6,500 |
| 22 | E36 | M3 | Convertible | Manual | 4.20 | 2.49 | 1.66 | 1.24 | 1.00 | - | - | 3.89 | 3.23:1 | 6,500 |
| 23 | E36 | 318i | Sedan | Auto | 2.86 | 1.62 | 1.00 | 0.72 | - | - | - | 2.00 | 4.44:1 | 6,300 |
| 24 | E36 | 318is | Coupe | Auto | 2.86 | 1.62 | 1.00 | 0.72 | - | - | - | 2.00 | 4.44:1 | 6,300 |
| 25 | E36 | 318ci | Convertible | Auto | 2.86 | 1.62 | 1.00 | 0.72 | - | - | - | 2.00 | 4.44:1 | 6,300 |
| 26 | E36 | 318ti | Compact | Auto | 2.86 | 1.62 | 1.00 | 0.72 | - | - | - | 2.00 | 4.44:1 | 6,300 |
| 27 | E36 | 323i | Sedan | Auto | 2.86 | 1.62 | 1.00 | 0.72 | - | - | - | 2.00 | 3.91:1 | 6,500 |
| 28 | E36 | 323is | Coupe | Auto | 2.86 | 1.62 | 1.00 | 0.72 | - | - | - | 2.00 | 3.91:1 | 6,500 |
| 29 | E36 | 323ci | Convertible | Auto | 2.86 | 1.62 | 1.00 | 0.72 | - | - | - | 2.00 | 3.91:1 | 6,500 |
| 30 | E36 | 325i | Sedan | Auto | 2.86 | 1.62 | 1.00 | 0.72 | - | - | - | 2.00 | 3.91:1 | 6,500 |
| 31 | E36 | 325is | Coupe | Auto | 2.86 | 1.62 | 1.00 | 0.72 | - | - | - | 2.00 | 3.91:1 | 6,500 |
| 32 | E36 | 325ci | Convertible | Auto | 2.86 | 1.62 | 1.00 | 0.72 | - | - | - | 2.00 | 3.91:1 | 6,500 |
| 33 | E36 | 328i | Sedan | Auto | 2.86 | 1.62 | 1.00 | 0.72 | - | - | - | 2.00 | 3.91:1 | 6,500 |
| 34 | E36 | 328is | Coupe | Auto | 2.86 | 1.62 | 1.00 | 0.72 | - | - | - | 2.00 | 3.91:1 | 6,500 |
| 35 | E36 | 328ci | Convertible | Auto | 2.86 | 1.62 | 1.00 | 0.72 | - | - | - | 2.00 | 3.91:1 | 6,500 |
| 36 | E36 | M3 | Coupe | Auto | 3.67 | 2.00 | 1.41 | 1.00 | 0.74 | - | - | 4.10 | 3.38:1 | 6,500 |
| 37 | E36 | M3 | Sedan | Auto | 3.67 | 2.00 | 1.41 | 1.00 | 0.74 | - | - | 4.10 | 3.38:1 | 6,500 |
| 38 | E36 | M3 | Convertible | Auto | 3.67 | 2.00 | 1.41 | 1.00 | 0.74 | - | - | 4.10 | 3.38:1 | 6,500 |
| 39 | E46 | 323i | Sedan | Manual | 4.23 | 2.52 | 1.66 | 1.22 | 1.00 | - | - | 4.04 | 3.07:1 | 6,500 |
| 40 | E46 | 323ci | Coupe | Manual | 4.23 | 2.52 | 1.66 | 1.22 | 1.00 | - | - | 4.04 | 3.07:1 | 6,500 |
| 41 | E46 | 323cic | Convertible | Manual | 4.23 | 2.52 | 1.66 | 1.22 | 1.00 | - | - | 4.04 | 3.46:1 | 6,500 |
| 42 | E46 | 323iT | Wagon | Manual | 4.23 | 2.52 | 1.66 | 1.22 | 1.00 | - | - | 4.04 | 3.46:1 | 6,500 |
| 43 | E46 | 328i | Sedan | Manual | 4.21 | 2.49 | 1.66 | 1.24 | 1.00 | - | - | 3.85 | 2.93:1 | 6,500 |
| 44 | E46 | 328ci | Coupe | Manual | 4.21 | 2.49 | 1.66 | 1.24 | 1.00 | - | - | 3.85 | 2.93:1 | 6,500 |
| 45 | E46 | 325i | Sedan | Manual | 4.23 | 2.52 | 1.66 | 1.22 | 1.00 | - | - | 4.04 | 3.15:1 | 6,500 |
| 46 | E46 | 325ci | Coupe | Manual | 4.23 | 2.52 | 1.66 | 1.22 | 1.00 | - | - | 4.04 | 3.15:1 | 6,500 |
| 47 | E46 | 325cic | Convertible | Manual | 4.23 | 2.52 | 1.66 | 1.22 | 1.00 | - | - | 4.04 | 3.46:1 | 6,500 |
| 48 | E46 | 325iT | Wagon | Manual | 4.23 | 2.52 | 1.66 | 1.22 | 1.00 | - | - | 4.04 | 3.46:1 | 6,500 |
| 49 | E46 | 325xi | Sedan AWD | Manual | 4.21 | 2.49 | 1.66 | 1.24 | 1.00 | - | - | 3.85 | 3.23:1 | 6,500 |
| 50 | E46 | 325xiT | Wagon AWD | Manual | 4.21 | 2.49 | 1.66 | 1.24 | 1.00 | - | - | 3.85 | 3.23:1 | 6,500 |
| 51 | E46 | 330i | Sedan | Manual | 4.21 | 2.49 | 1.66 | 1.24 | 1.00 | - | - | 3.85 | 2.93:1 | 6,500 |
| 52 | E46 | 330ci | Coupe | Manual | 4.21 | 2.49 | 1.66 | 1.24 | 1.00 | - | - | 3.85 | 2.93:1 | 6,500 |
| 53 | E46 | 330cic | Convertible | Manual | 4.21 | 2.49 | 1.66 | 1.24 | 1.00 | - | - | 3.85 | 3.07:1 | 6,500 |
| 54 | E46 | 330xi | Sedan AWD | Manual | 4.21 | 2.49 | 1.66 | 1.24 | 1.00 | - | - | 3.85 | 3.07:1 | 6,500 |
| 55 | E46 | 330i | Sedan | Manual | 4.35 | 2.50 | 1.66 | 1.23 | 1.00 | 0.85 | - | 3.93 | 2.93:1 | 6,500 |
| 56 | E46 | 330ci | Coupe | Manual | 4.35 | 2.50 | 1.66 | 1.23 | 1.00 | 0.85 | - | 3.93 | 2.93:1 | 6,500 |
| 57 | E46 | 330cic | Convertible | Manual | 4.35 | 2.50 | 1.66 | 1.23 | 1.00 | 0.85 | - | 3.93 | 3.07:1 | 6,500 |
| 58 | E46 | 330xi | Sedan AWD | Manual | 4.35 | 2.50 | 1.66 | 1.23 | 1.00 | 0.85 | - | 3.93 | 3.07:1 | 6,500 |
| 59 | E46 | 330i ZHP | Sedan | Manual | 4.35 | 2.50 | 1.66 | 1.23 | 1.00 | 0.85 | - | 3.93 | 3.07:1 | 6,800 |
| 60 | E46 | 330ci ZHP | Coupe | Manual | 4.35 | 2.50 | 1.66 | 1.23 | 1.00 | 0.85 | - | 3.93 | 3.07:1 | 6,800 |
| 61 | E46 | 330cic ZHP | Convertible | Manual | 4.35 | 2.50 | 1.66 | 1.23 | 1.00 | 0.85 | - | 3.93 | 3.07:1 | 6,800 |
| 62 | E46 | M3 | Coupe | Manual | 4.23 | 2.53 | 1.67 | 1.23 | 1.00 | 0.83 | - | 3.75 | 3.62:1 | 8,000 |
| 63 | E46 | M3 | Convertible | Manual | 4.23 | 2.53 | 1.67 | 1.23 | 1.00 | 0.83 | - | 3.75 | 3.62:1 | 8,000 |
| 64 | E46 | M3 | Coupe | Auto (SMG II) | 4.23 | 2.53 | 1.67 | 1.23 | 1.00 | 0.83 | - | 3.75 | 3.62:1 | 8,000 |
| 65 | E46 | M3 | Convertible | Auto (SMG II) | 4.23 | 2.53 | 1.67 | 1.23 | 1.00 | 0.83 | - | 3.75 | 3.62:1 | 8,000 |
| 66 | E46 | 323i | Sedan | Auto | 3.67 | 2.00 | 1.41 | 1.00 | 0.74 | - | - | 4.10 | 3.46:1 | 6,500 |
| 67 | E46 | 323ci | Coupe | Auto | 3.67 | 2.00 | 1.41 | 1.00 | 0.74 | - | - | 4.10 | 3.46:1 | 6,500 |
| 68 | E46 | 323cic | Convertible | Auto | 3.67 | 2.00 | 1.41 | 1.00 | 0.74 | - | - | 4.10 | 3.46:1 | 6,500 |
| 69 | E46 | 323iT | Wagon | Auto | 3.67 | 2.00 | 1.41 | 1.00 | 0.74 | - | - | 4.10 | 3.46:1 | 6,500 |
| 70 | E46 | 328i | Sedan | Auto | 3.67 | 2.00 | 1.41 | 1.00 | 0.74 | - | - | 4.10 | 3.46:1 | 6,500 |
| 71 | E46 | 328ci | Coupe | Auto | 3.67 | 2.00 | 1.41 | 1.00 | 0.74 | - | - | 4.10 | 3.46:1 | 6,500 |
| 72 | E46 | 325i | Sedan | Auto | 3.67 | 2.00 | 1.41 | 1.00 | 0.74 | - | - | 4.10 | 3.46:1 | 6,500 |
| 73 | E46 | 325ci | Coupe | Auto | 3.67 | 2.00 | 1.41 | 1.00 | 0.74 | - | - | 4.10 | 3.46:1 | 6,500 |
| 74 | E46 | 325cic | Convertible | Auto | 3.67 | 2.00 | 1.41 | 1.00 | 0.74 | - | - | 4.10 | 3.46:1 | 6,500 |
| 75 | E46 | 325iT | Wagon | Auto | 3.67 | 2.00 | 1.41 | 1.00 | 0.74 | - | - | 4.10 | 3.46:1 | 6,500 |
| 76 | E46 | 325xi | Sedan AWD | Auto | 3.45 | 2.21 | 1.59 | 1.00 | 0.76 | - | - | 3.17 | 3.46:1 | 6,500 |
| 77 | E46 | 325xiT | Wagon AWD | Auto | 3.45 | 2.21 | 1.59 | 1.00 | 0.76 | - | - | 3.17 | 3.46:1 | 6,500 |
| 78 | E46 | 330i | Sedan | Auto | 3.45 | 2.21 | 1.23 | 1.00 | 0.76 | - | - | 3.17 | 3.38:1 | 6,500 |
| 79 | E46 | 330ci | Coupe | Auto | 3.45 | 2.21 | 1.23 | 1.00 | 0.76 | - | - | 3.17 | 3.38:1 | 6,500 |
| 80 | E46 | 330cic | Convertible | Auto | 3.45 | 2.21 | 1.23 | 1.00 | 0.76 | - | - | 3.17 | 3.38:1 | 6,500 |
| 81 | E46 | 330xi | Sedan AWD | Auto | 3.42 | 2.22 | 1.60 | 1.00 | 0.75 | - | - | 3.03 | 3.46:1 | 6,500 |
| 82 | E46 | 330i ZHP | Sedan | Auto | 3.45 | 2.21 | 1.23 | 1.00 | 0.76 | - | - | 3.17 | 3.64:1 | 6,800 |
| 83 | E46 | 330ci ZHP | Coupe | Auto | 3.45 | 2.21 | 1.23 | 1.00 | 0.76 | - | - | 3.17 | 3.64:1 | 6,800 |
| 84 | E46 | 330cic ZHP | Convertible | Auto | 3.45 | 2.21 | 1.23 | 1.00 | 0.76 | - | - | 3.17 | 3.64:1 | 6,800 |
| 85 | E82 | 128i | Coupe | Manual | 4.32 | 2.46 | 1.66 | 1.23 | 1.00 | 0.85 | - | 3.94 | 3.23:1 | 7,000 |
| 86 | E82 | 135i | Coupe | Manual | 4.06 | 2.40 | 1.58 | 1.19 | 1.00 | 0.87 | - | 3.68 | 3.08:1 | 7,000 |
| 87 | E82 | 128i | Coupe | Auto | 4.07 | 2.37 | 1.55 | 1.16 | 0.85 | 0.67 | - | 3.20 | 3.73:1 | 7,000 |
| 88 | E82 | 135i | Coupe | Auto | 4.17 | 2.34 | 1.52 | 1.14 | 0.87 | 0.69 | - | 3.40 | 3.46:1 | 7,000 |
| 89 | E85 | Z4 2.5i | Roadster | Manual | 4.23 | 2.52 | 1.66 | 1.22 | 1.00 | - | - | 4.04 | 3.46:1 | 6,500 |
| 90 | E85 | Z4 3.0i | Roadster | Manual | 4.35 | 2.50 | 1.66 | 1.23 | 1.00 | 0.85 | - | 3.93 | 3.07:1 | 6,500 |
| 91 | E85 | Z4 3.0si | Roadster | Manual | 4.35 | 2.50 | 1.66 | 1.23 | 1.00 | 0.85 | - | 3.93 | 3.23:1 | 7,000 |
| 92 | E85 | Z4 3.0i N52 | Roadster | Manual | 4.32 | 2.46 | 1.66 | 1.23 | 1.00 | 0.85 | - | 3.94 | 3.38:1 | 7,000 |
| 93 | E85 | Z4 M3.2 | Roadster | Manual | 4.35 | 2.50 | 1.66 | 1.23 | 1.00 | 0.85 | - | 3.93 | 3.62:1 | 8,000 |
| 94 | E85 | Z4 2.5i | Roadster | Manual | 4.23 | 2.52 | 1.66 | 1.22 | 1.00 | - | - | 4.04 | 3.64:1 | 6,500 |
| 95 | E85 | Z4 3.0i | Roadster | Manual | 4.23 | 2.52 | 1.66 | 1.22 | 1.00 | - | - | 4.04 | 3.46:1 | 6,500 |
| 96 | E85 | Z4 3.0si | Roadster | Manual | 4.17 | 2.34 | 1.52 | 1.14 | 0.87 | 0.69 | - | 3.40 | 3.64:1 | 7,000 |
| 97 | E85 | Z4 3.0i N52 | Roadster | Manual | 4.17 | 2.34 | 1.52 | 1.14 | 0.87 | 0.69 | - | 3.40 | 3.73:1 | 7,000 |
| 98 | E86 | Z4 3.0si | Coupe | Manual | 4.35 | 2.50 | 1.66 | 1.23 | 1.00 | 0.85 | - | 3.93 | 3.46:1 | 7,000 |
| 99 | E86 | Z4 M3.2 | Coupe | Manual | 4.35 | 2.50 | 1.66 | 1.23 | 1.00 | 0.85 | - | 3.93 | 3.62:1 | 8,000 |
| 100 | E86 | Z4 3.0si | Coupe | Auto | 4.17 | 2.34 | 1.52 | 1.14 | 0.87 | 0.69 | - | 3.40 | 3.64:1 | 7,000 |
| 101 | E88 | 128i | Convertible | Manual | 4.32 | 2.46 | 1.66 | 1.23 | 1.00 | 0.85 | - | 3.94 | 3.23:1 | 7,000 |
| 102 | E88 | 135i | Convertible | Manual | 4.06 | 2.40 | 1.58 | 1.19 | 1.00 | 0.87 | - | 3.68 | 3.08:1 | 7,000 |
| 103 | E88 | 128i | Convertible | Auto | 4.07 | 2.37 | 1.55 | 1.16 | 0.85 | 0.67 | - | 3.20 | 3.73:1 | 7,000 |
| 104 | E88 | 135i | Convertible | Auto | 4.17 | 2.34 | 1.52 | 1.14 | 0.87 | 0.69 | - | 3.40 | 3.46:1 | 7,000 |
| 105 | E90 | 325i | Sedan | Manual | 4.32 | 2.46 | 1.66 | 1.23 | 1.00 | 0.85 | - | 3.94 | 3.23:1 | 7,000 |
| 106 | E90 | 325i | xDrive Sedan | Manual | 4.35 | 2.50 | 1.67 | 1.23 | 1.00 | 0.85 | - | 3.93 | 3.38:1 | 7,000 |
| 107 | E90 | 330i | Sedan | Manual | 4.32 | 2.46 | 1.66 | 1.23 | 1.00 | 0.85 | - | 3.93 | 3.15:1 | 7,000 |
| 108 | E90 | 330i | xDrive Sedan | Manual | 4.35 | 2.50 | 1.67 | 1.23 | 1.00 | 0.85 | - | 3.93 | 3.15:1 | 7,000 |
| 109 | E90 | 328i | Sedan | Manual | 4.32 | 2.46 | 1.66 | 1.23 | 1.00 | 0.85 | - | 3.94 | 3.23:1 | 7,000 |
| 110 | E90 | 328i | xDrive Sedan | Manual | 4.35 | 2.50 | 1.67 | 1.23 | 1.00 | 0.85 | - | 3.93 | 3.38:1 | 7,000 |
| 111 | E90 | 335i | Sedan | Manual | 4.06 | 2.40 | 1.58 | 1.19 | 1.00 | 0.87 | - | 3.68 | 3.08:1 | 7,000 |
| 112 | E90 | 335i | xDrive Sedan | Manual | 4.06 | 2.40 | 1.58 | 1.19 | 1.00 | 0.87 | - | 3.68 | 3.08:1 | 7,000 |
| 113 | E90 | M3 | Sedan | Manual | 4.06 | 2.37 | 1.58 | 1.19 | 1.00 | 0.87 | - | 3.68 | 3.85:1 | 8,300 |
| 114 | E90 | M3 | Sedan | Auto (DCT) | 4.78 | 2.93 | 2.15 | 1.68 | 1.39 | 1.20 | 1.00 | 4.45 | 3.15:1 | 8,300 |
| 115 | E90 | 325i | Sedan | Auto | 4.17 | 2.34 | 1.52 | 1.14 | 0.87 | 0.69 | - | 3.40 | 3.73:1 | 7,000 |
| 116 | E90 | 325i | xDrive Sedan | Auto | 4.17 | 2.34 | 1.52 | 1.14 | 0.87 | 0.69 | - | 3.40 | 3.91:1 | 7,000 |
| 117 | E90 | 330i | Sedan | Auto | 4.17 | 2.34 | 1.52 | 1.14 | 0.87 | 0.69 | - | 3.40 | 3.64:1 | 7,000 |
| 118 | E90 | 330i | xDrive Sedan | Auto | 4.17 | 2.34 | 1.52 | 1.14 | 0.87 | 0.69 | - | 3.40 | 3.64:1 | 7,000 |
| 119 | E90 | 328i | Sedan | Auto | 4.07 | 2.37 | 1.55 | 1.16 | 0.85 | 0.67 | - | 3.20 | 3.73:1 | 7,000 |
| 120 | E90 | 328i | xDrive Sedan | Auto | 4.07 | 2.37 | 1.55 | 1.16 | 0.85 | 0.67 | - | 3.20 | 3.91:1 | 7,000 |
| 121 | E90 | 335i | Sedan | Auto | 4.17 | 2.34 | 1.52 | 1.14 | 0.87 | 0.69 | - | 3.40 | 3.46:1 | 7,000 |
| 122 | E90 | 335i | xDrive Sedan | Auto | 4.17 | 2.34 | 1.52 | 1.14 | 0.87 | 0.69 | - | 3.40 | 3.46:1 | 7,000 |
| 123 | E90 | 335d | Sedan | Auto | 4.17 | 2.34 | 1.52 | 1.14 | 0.87 | 0.69 | - | 3.40 | 2.81:1 | 7,000 |
| 124 | E91 | 325i | xDrive Wagon | Manual | 4.35 | 2.50 | 1.67 | 1.23 | 1.00 | 0.85 | - | 3.93 | 3.38:1 | 7,000 |
| 125 | E91 | 328i | Wagon | Manual | 4.32 | 2.46 | 1.66 | 1.23 | 1.00 | 0.85 | - | 3.94 | 3.23:1 | 7,000 |
| 126 | E91 | 328i | xDrive Wagon | Manual | 4.35 | 2.50 | 1.67 | 1.23 | 1.00 | 0.85 | - | 3.93 | 3.38:1 | 7,000 |
| 127 | E91 | 325i | xDrive Wagon | Auto | 4.17 | 2.34 | 1.52 | 1.14 | 0.87 | 0.69 | - | 3.40 | 3.91:1 | 7,000 |
| 128 | E91 | 328i | Wagon | Auto | 4.07 | 2.37 | 1.55 | 1.16 | 0.85 | 0.67 | - | 3.20 | 3.73:1 | 7,000 |
| 129 | E91 | 328i | xDrive Wagon | Auto | 4.07 | 2.37 | 1.55 | 1.16 | 0.85 | 0.67 | - | 3.20 | 3.91:1 | 7,000 |
| 130 | E92 | 328i | Coupe | Manual | 4.32 | 2.46 | 1.66 | 1.23 | 1.00 | 0.85 | - | 3.94 | 3.23:1 | 7,000 |
| 131 | E92 | 328i | xDrive Coupe | Manual | 4.35 | 2.50 | 1.67 | 1.23 | 1.00 | 0.85 | - | 3.93 | 3.38:1 | 7,000 |
| 132 | E92 | 335i | Coupe | Manual | 4.06 | 2.40 | 1.58 | 1.19 | 1.00 | 0.87 | - | 3.68 | 3.08:1 | 7,000 |
| 133 | E92 | 335i | xDrive Coupe | Manual | 4.06 | 2.40 | 1.58 | 1.19 | 1.00 | 0.87 | - | 3.68 | 3.08:1 | 7,000 |
| 134 | E92 | M3 | Coupe | Manual | 4.06 | 2.40 | 1.58 | 1.19 | 1.00 | 0.87 | - | 3.68 | 3.85:1 | 8,300 |
| 135 | E92 | M3 | Coupe | Auto (DCT) | 4.78 | 2.93 | 2.15 | 1.68 | 1.39 | 1.20 | 1.00 | 4.45 | 3.15:1 | 8,300 |
| 136 | E92 | 328i | Coupe | Auto | 4.07 | 2.37 | 1.55 | 1.16 | 0.85 | 0.67 | - | 3.20 | 3.73:1 | 7,000 |
| 137 | E92 | 328i | xDrive Coupe | Auto | 4.07 | 2.37 | 1.55 | 1.16 | 0.85 | 0.67 | - | 3.20 | 3.91:1 | 7,000 |
| 138 | E92 | 335i | Coupe | Auto | 4.17 | 2.34 | 1.52 | 1.14 | 0.87 | 0.69 | - | 3.40 | 3.46:1 | 7,000 |
| 139 | E92 | 335i | xDrive Coupe | Auto | 4.17 | 2.34 | 1.52 | 1.14 | 0.87 | 0.69 | - | 3.40 | 3.46:1 | 7,000 |
| 140 | E93 | 328i | Convertible | Manual | 4.32 | 2.46 | 1.66 | 1.23 | 1.00 | 0.85 | - | 3.94 | 3.38:1 | 7,000 |
| 141 | E93 | 335i | Convertible | Manual | 4.06 | 2.40 | 1.58 | 1.19 | 1.00 | 0.87 | - | 3.68 | 3.08:1 | 7,000 |
| 142 | E93 | M3 | Convertible | Manual | 4.06 | 2.40 | 1.58 | 1.19 | 1.00 | 0.87 | - | 3.68 | 3.85:1 | 8,300 |
| 143 | E93 | M3 | Convertible | Auto (DCT) | 4.78 | 2.93 | 2.15 | 1.68 | 1.39 | 1.20 | 1.00 | 4.45 | 3.15:1 | 8,300 |
| 144 | E93 | 328i | Convertible | Auto | 4.07 | 2.37 | 1.55 | 1.16 | 0.85 | 0.67 | - | 3.20 | 3.91:1 | 7,000 |
| 145 | E93 | 335i | Convertible | Auto | 4.17 | 2.34 | 1.52 | 1.14 | 0.87 | 0.69 | - | 3.40 | 3.46:1 | 7,000 |
Should I Upgrade My Differential Final Drive?
A higher ratio final drive will provide more torque at the wheels and faster acceleration, but a lower top speed – and vice versa for lower final drive. The final drive itself is usually cheaper than the install. Installation requires you to drop your differential and open up the case so that’s where a lot of the money is spent. I would estimate around $2,200 for parts and labor for final drive swap on an E46 M3.
Is it worth it? I don’t think it’s worth it unless you feel like you maximized your potential on track. On track, the final drive is more about shifting and power band optimization more than it is for quicker acceleration. Another thing you can try before a final drive swap is to get shorter profile or smaller diameter tires. That allows a full rotation to happen faster on the car, so same principles as getting a shorter final drive. We list the differential/gearing upgrade for hardcore track enthusiasts in our Essential E46 M3 Track Day Mods.
Sources:

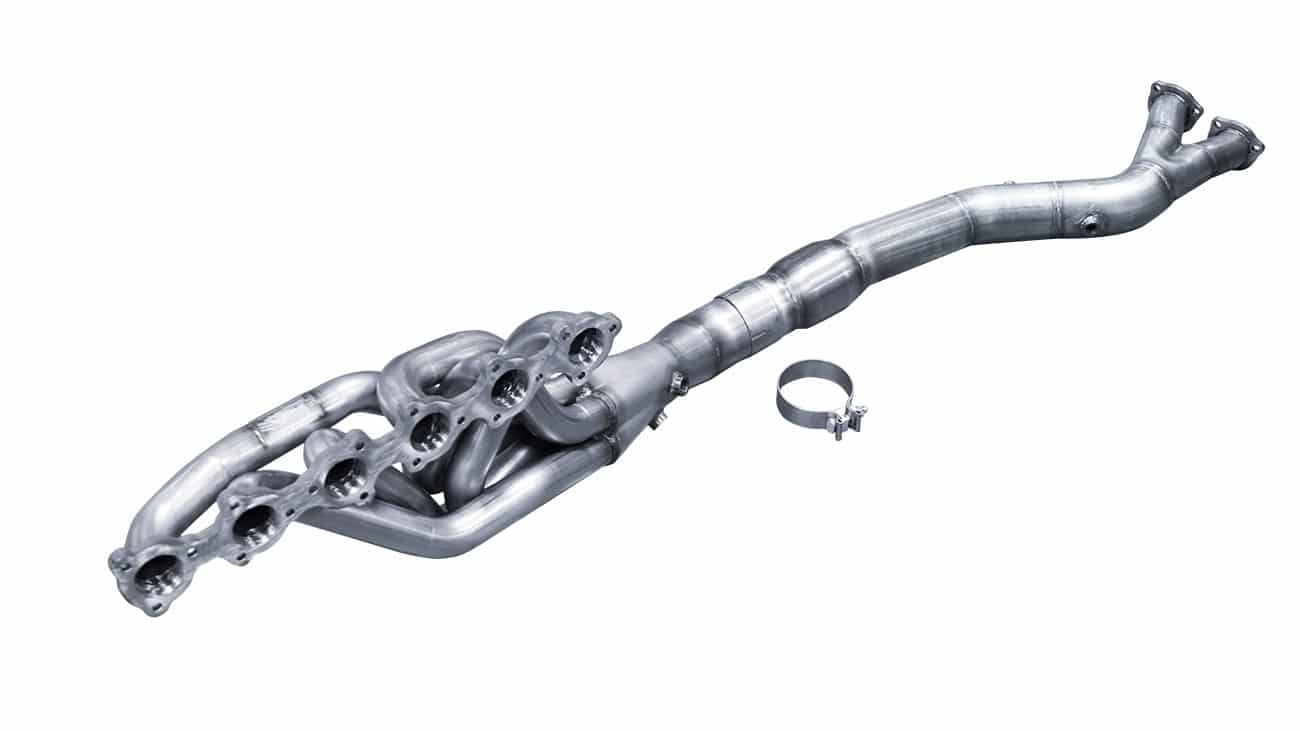
ARH E46 M3 Headers Dyno Results and Review
E46 M3 Headers
One of the best mods for the E46 M3 S54 engine are headers and it’s hard to argue it. Not only does it bring out an aggressive tone in the sound department, but it also has one of the best horsepower per dollar figures. I put together an E46 M3 Header Guide article a few years back that compiles some of the more popular header options in the market and I’ve always been curious about power results among the brands. Does it really make a difference? Luckily, I have lots of data of my runs on the same dyno at European Auto Source so whatever I test, I’ll have data to compare against a lot of different setups. And guess what? Recently I just got some ARH E46 M3 headers.
Do stepped headers make more power? Does the Supersprint enlarged diameter really produce the most horsepower? There’s a header not on that list because at the time I wrote it, the product didn’t exist. Welcome the American Racing Headers (ARH), the first 6 into 1 mass produced header, to the picture.
Quick Jump
I. ARH Background
II. Horsepower Claims
III. ARH Dyno Results
IV. Why Torque Loss Doesn’t Matter
V. Takeaways
ARH Background
Who or what is American Racing Headers? They’re an American brand (you guessed right) that takes a lot of pride in making high performance, quality exhaust systems right here in the USA – 100% of it. They focus mostly on domestic vehicles, but offer a small line of products for foreign OEM’s like Lexus and BMW. Out of nowhere, they started producing special ARH E46 M3 headers which is 6 into 1 long tube header design for the S54. It consists of six individual 1.75″ primaries mating to one 3.5″ section 1 all made in T304 stainless steel with .049 wall. What does that do? The idea is that unlike the traditional 2-piece header, a 6 into 1 with their “patented rotational firing” design will optimize airflow (even more than the traditional headers) to produce significant power on the S54.
Oh yeah and also, sound! The design of the 6 into 1 should alter the sound ever so slightly, but in a way that it replicates the sound of a V8. We’ve all seen that mysterious video uploaded on YouTube in 2007 titled “Custom M3 Headers” right? I think it’s still a mystery to what exhaust setup it is, but apparently it is a 6 into 1 like the ARH.
Horsepower Claims
ARH E46 M3 Headers Test Results
Okay let’s move onto some numbers. American Racing Headers conducted their own tests comparing a stock E46 M3 S54, traditional header setup and ARH header setup. Both header setups include an intake and tune. They published the following results:
- 65 whp gain vs stock
- 15 whp gain vs 'traditional' header
- Dyno graph shows linear horsepower and torque gains without any significant dips, especially in the low end RPM range
So when you put the data in a table, it looks something like this below. Delta (Δ) is comparing against stock run file.
| Setup | WHP | Δ (WHP) | WTQ | Δ (WTQ) |
|---|---|---|---|---|
| Stock | ~270 | - | N/A | - |
| Traditional Header | 320.00 | 50.00 | 246.60 | N/A |
| ARH Header | 335.30 | 65.30 | 248.40 | N/A |
Community Results
I know going into this ARH setup, I knew I was going to most likely see a dip in torque – especially the low end of the RPM range. I knew this because I talked to 2 other owners and did a bunch of digging to set expectations before I pulled the trigger on the ARH. All the users I talked to and all the research I found led to strong signs of torque loss, but I still pulled through because…well I’ll tell you why exactly at the bottom of the read.
ARH E46 M3 Headers Dyno Results
Tuned ARH Results
Onto my own results. I’m running the ARH headers, Bimmerworld ‘street/track’ section 2 mated to a Bimmerworld Race 3.5″ section 3. Supporting engine mods include a Turner Motorsport CSL Airbox and Kassel Performance MAP sensor all controlled by the MSS54HP ECU with a HTE custom dyno tune. Unfortunately no off-the-shelf tune will work with this setup and Hassan has a lot of experience tuning these headers so I chose him to tune this beast. Results below:
- Red line = baseline run (no tune) on 91 octane
- Blue line = tuned on 91 octane
- Green line = tuned on E30 ethanol blend (APE Flex Fuel kit)
Summary
- 64.31 whp / 15.17 wtq against stock running 91 octane
- 68.25 whp / 17.66 wtq against stock running E30 blend
So in terms of max power, it did great! It was actually on par with the ARH claim of 65 whp over stock as I made 64 whp over stock on 91 octane. I also made more than my previous Evosport ‘traditional’ header setup so all good right? Can’t answer that yet until we look a little further. Max horsepower is just a vanity number. What you really need to see is the dyno graph and how much of that power is sustained throughout the RPM range.

Here are the max numbers in a table view. I also added in my stock tune run file with only exhaust and intake. No headers. Delta (Δ) is comparing against stock run file.
| Setup | WHP | Δ (WHP) | WTQ | Δ (WTQ) |
|---|---|---|---|---|
| Stock | 286.37 | - | 245.43 | - |
| ARH Baseline Run (91 octane) | 328.62 | 42.25 | 244.34 | -1.09 |
| ARH Tuned Run (91 octane) | 350.68 | 64.31 | 260.60 | 15.17 |
| ARH Tuned Run (E30 ethanol) | 354.62 | 68.25 | 263.09 | 17.66 |
Tuned ARH vs Evosport 'Traditional' Header Results
This section of the article is now supportive of what the community claims have been: torque loss. I overlaid my previous setup with Evosport ‘traditional’ headers and E30 ethanol. All the others supporting mods are the same e.g. CSL airbox, Bimmerworld race exhaust, E30 ethanol, etc.
- Red line = American Racing headers
- Blue line = Evosport ‘traditional’ headers
Summary
- At 4k RPM we are seeing a ~34 wtq loss and ~26 whp loss with ARH
- We are also seeing a significant drop in torque from 3.2k-5k RPMs with ARH
- After 6.2k RPM we see a steady 1-6 whp gain and 1-4 wtq gain with ARH
- 11.72 whp more than Evosport setup (ARH claim was 15 whp)

Here are the max numbers in a table view. I also added in my stock tune run file with only exhaust and intake. No headers. Delta (Δ) is comparing against stock run file.
| WHP | Δ (WHP) | WTQ | Δ (WTQ) | |
|---|---|---|---|---|
| Stock | 286.37 | - | 245.43 | - |
| ARH Headers (E30 ethanol) | 354.62 | 68.25 | 263.09 | 17.66 |
| Evosport Headers (E30 ethanol) | 342.90 | 56.53 | 264.88 | 19.45 |
You Said Torque Loss Doesn't Matter, Why?
The loss in torque isn’t a major concern for me because this is a track-only vehicle where it lives in the 5k+ RPM range on track. This is my use case. For yours, it might be different. If you’re just mostly street driving then you’ll definitely feel a difference in power down low if you’re coming from a traditional style header setup.
So back to my track use-case. According to the dyno results, I’ll see significant torque loss if I am below 5k RPM and even if I do dip down I don’t believe it will have significant impact on my lap times. For the areas of the track where I am dipping down to the low RPM range, I can also try shifting one gear higher to keep the car in higher power range. Also worth to note, I am running shorter 3.91 gears so naturally the car wants to be in a higher RPM range which helps.
I just recently took this ARH E46 M3 headers setup to the track to see real world results and the data shows I am mostly in the 5k+ RPM range. The car pulls hard up top and I do think it’s faster than the previous traditional setup. Sacrifice low end torque, that I’m rarely in, for high end horsepower. Even when driving mindlessly around the track there wasn’t a section where I felt down on torque. Actually didn’t come across my mind at all on track even during the 2 slowest parts of the track where I leave it in a lower gear normally. This thing pulls hard all the way to redline.
Overall Takeaways
At first when I saw the dyno results I had second thoughts about sending it back to EAS and telling them to put my old headers back on. But I had to give it a shot on track. Yes, the torque just disappears down low. Yes, even with a tune the low end torque is unrecoverable. However, after actually driving it on track I am very happy and will not go back. This ARH is here to stay.
Lastly, another reason why I am keeping it. The sound! I think it sounds so much better. I mean, part of modifying is not only just to go faster but a balance of form and function. You’re not going to get this type of sound with any other traditional header so that alone makes a car so much more unique. Take a listen for yourself below and if you have these headers, please share a link down below in the comments so I can hear other setups!
Pros
- Lots of horsepower potential after 5k+ RPM, more than traditional style headers
- Unique exhaust note throughout the entire RPM range
- Mates to OEM style section 2 for bolt-on connection
- Built with high quality T304 SS
Cons
- Loss of torque below 5k RPM
- Expensive
- Tight clearance to install, may require hoisting engine in the air
- Requires custom tune to restore as much torque as possible

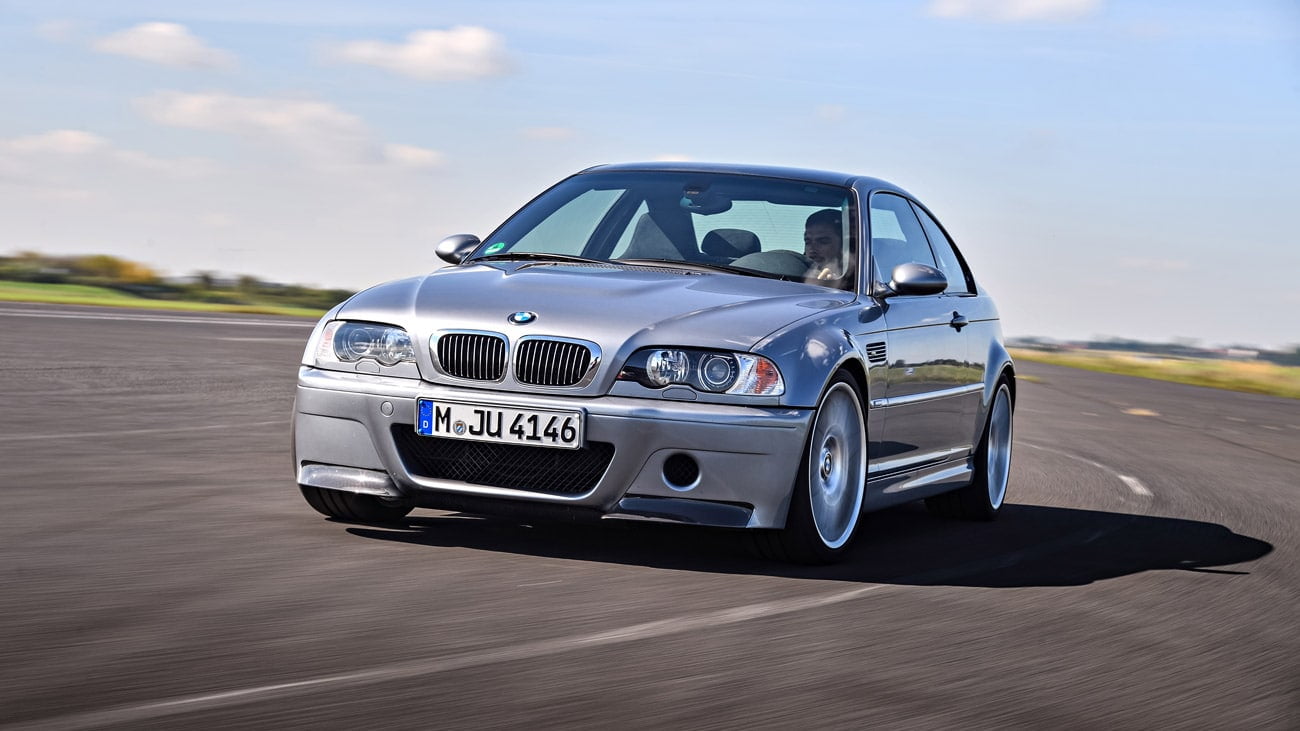
Ultimate BMW E90 E92 E93 M3 Maintenance Guide
E90 E92 E93 M3: What you need to know
The S65 V8 power unit found in the E9X M3 chassis is the successor to the almighty inline six S54 found in the previous generation E46 M3 – and it’s a lot more powerful. The naturally aspirated engine is also the latest and probably the last of the NA engines in BMW’s M heritage as they moved on to forced induction-based power units. If you are a owner, you have one of the best sounding BMW M3’s ever built and with proper maintenance, the S65 isn’t all that bad to maintain.
We did a complete maintenance guide for the E46 M3 a while ago and we’re going to do the same guide for the E9X M3. If you have an E46 M3, you might want to bookmark this page: E46 M3 Ultimate Maintenance Guide and Schedule
Reset On-Board Computer
The on-board computer controls and displays several service features for your E90 E92 E92 M3. It is a secondary display that cross-functions with the DME to read out values but also can be used to change some settings such as resetting service intervals. There’s even a “hidden menu” that you can access! The mileage logged on the OBC determines when to flash a service warning at you via iDrive or gauge cluster lights.
Follow the procedure below to reset your service intervals on the OBC:
- Insert key fob or use Comfort Access then press "Start" once - do not start engine
- Depress brake pedal and hold the odometer reset button on the bottom left of your gauge cluster until the yellow triangle appears on the mini display
- Use the scroll wheel on the left hand turn stalk and select an icon to reset e.g. oil icon for oil service internal reset
- Press the "BC" button on the same turn signal stalk
- Click "BC" to choose Reset
- Press and hold "BC" for a few seconds

E90 E92 E93 Basic Maintenance Schedule
The factory recommended service interval from BMW is listed below, however it is very important to note the factory oil change interval of 15,000 is considered pretty long and most owners change their oil a lot sooner. We’ll detail more below why it’s important to change the oil sooner, but long story short, the S65 has the same rod bearing tolerance and wear issues as the S54 so oil degradation can cause premature failure to your rod bearings especially if not driven after proper warm up procedures.
We recommend changing the oil every 7,500 miles or even 5,000 miles as your mileage gets higher towards the rod bearing service interval. So with that said, you can follow your own maintenance procedures for the engine oil and filter. Keep in mind, the harder to drive, the faster you should replace. Especially if your engine sees a lot of track time.
| Miles | Engine Oil & Filter | Diff Fluid | Trans Fluid (MT) | Microfilter | Spark Plug | Coil Packs | Intake Filter | Brake Fluid | Power Steering Fluid | O2 Sensor | Vehicle Check |
|---|---|---|---|---|---|---|---|---|---|---|---|
| 1,200 | X | X | X | ||||||||
| 7,500 | X | ||||||||||
| 15,000 | X | X | X | X | X | ||||||
| 22,500 | X | ||||||||||
| 30,000 | X | X | X | X | |||||||
| 36,000 | X | ||||||||||
| 37,500 | X | ||||||||||
| 45,000 | X | X | X | X | X | ||||||
| 52,500 | X | ||||||||||
| 60,000 | X | X | X | X | X | ||||||
| 67,500 | X | ||||||||||
| 72,000 | X | ||||||||||
| 75,000 | X | X | X | X | X | ||||||
| 82,500 | X | ||||||||||
| 90,000 | X | X | X | X | |||||||
| 97,500 | |||||||||||
| 105,000 | X | X | X | X | X | ||||||
| 108,000 | X | ||||||||||
| 112,500 | X | ||||||||||
| 120,000 | X | X | X | X | X | X | |||||
| 127,500 | X | ||||||||||
| 135,000 | X | X | X | X | X | ||||||
| 142,500 | X | ||||||||||
| 144,000 | X | ||||||||||
| 150,000 | X | X | X | X | |||||||
| 157,500 | |||||||||||
| 165,000 | X | X | X | X | X | ||||||
| 172,500 | X | ||||||||||
| 180,000 | X | X | X | X | X | X | |||||
| 187,500 | |||||||||||
| 195,000 | X | X | X | X | X | ||||||
| 202,500 | |||||||||||
| 210,000 | X | X | X | X | |||||||
| 216,000 | X | ||||||||||
| 217,500 | X | ||||||||||
| 225,000 | X | X | X | X | X | ||||||
| 232,500 | X | ||||||||||
| 240,000 | X | X | X | X | X | X | |||||
| 247,500 | X |
Recommended Parts for Regular Maintenance
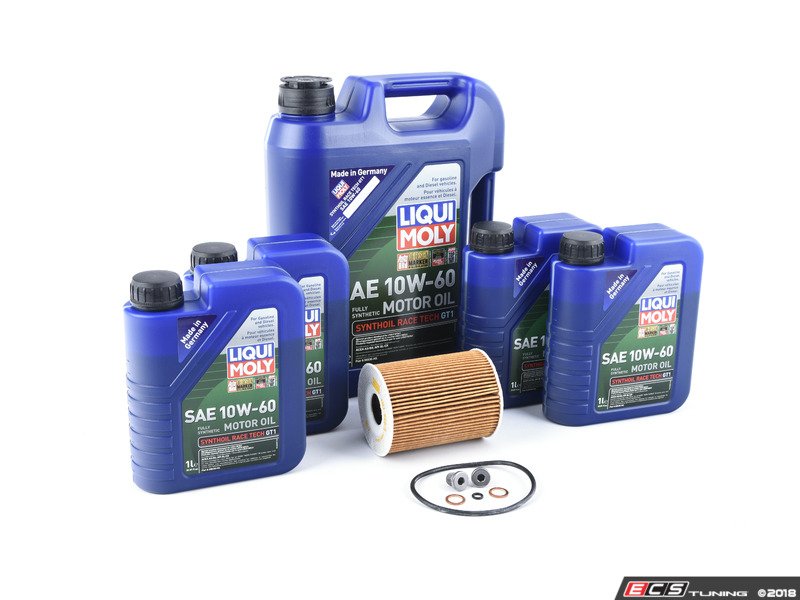
Oil Change Kit
Priority: ❗❗❗❗❗
LIQUI MOLY 10W-60 OIL CHANGE KIT
I use the LIQUI MOLY Synthoil Race Tech GT1 10W-60 on both my S65 E92 M3 and S54 E46 M3. You’re gonna hear a lot of mixed reviews about this product, but I’ll tell you I have 190k miles on my E46 M3 with a lot of hard track miles and my engine is still running very strong.
Oil Additives
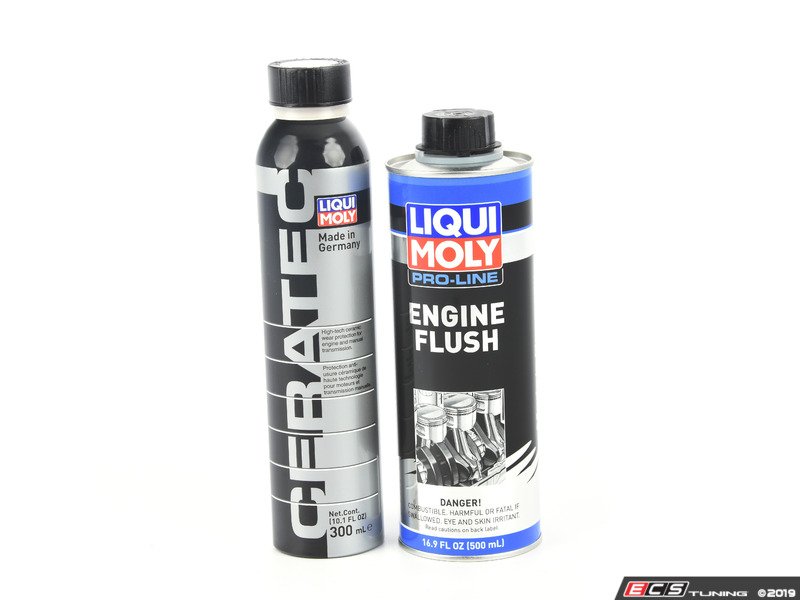
Priority: ❗❗❕❕❕
LIQUI MOLY CERATEC & ENGINE FLUSH
To be used occasionally during oil changes, CERATEC is a friction modifier which helps our rod bearings stay lubricated. Especially important because the S65 does have rod bearing issues similar tot he S54 on the E46 M3. Before your next oil change, pour in the ENGINE FLUSH, idle and drain the oil, do the oil change, then finally top off the engine with some CERATEC. Check out our review we did with the LIQUI MOLY MoS2 friction modifier.
Spark Plugs
Priority: ❗❗❗❕❕
This is the spark plug I use on my S65 E92 M3 even with the ESS Tuning G1 supercharger kit. They are a reputable company and this is a direct replacement for the Bosch spark plugs (BMW P/N 12120032273) that come from factory. They come pre-gapped and allows you to retain the factory knock sensor system which is very important.

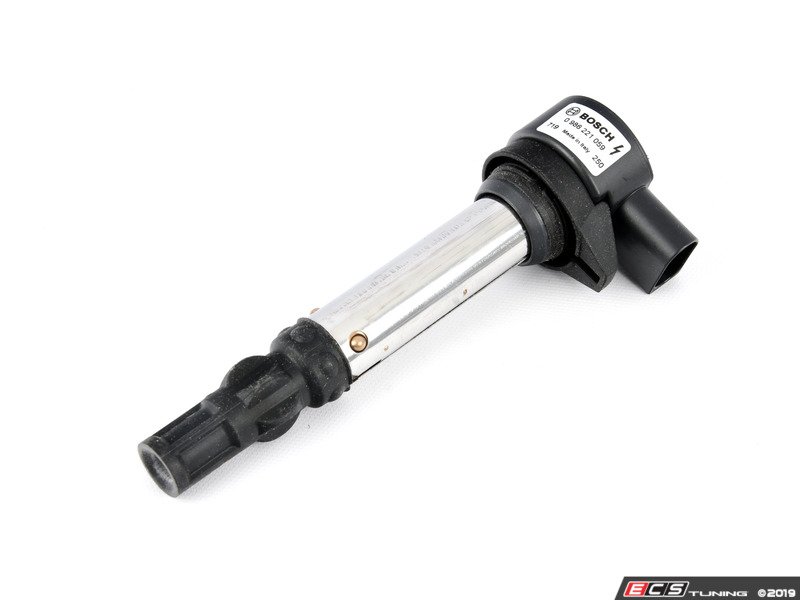
Ignition Coil Packs
Priority: ❗❗❗❕❕
Bad coil packs will cause cylinder misfire followed by CEL codes. Why? Coil packs are responsible for delivering power to ignite your spark plugs. These are recommended to replace around 60k miles of use. If you’re getting codes for misfire, before you automatically go to replace your spark plugs, try moving around the coil packs from the problem bank to another to see if the code follows. If it does, you know it’s the coil packs.
Differential Oil
Priority: ❗❗❕❕❕
CASTROL SYNTRAX LIMITED SLIP 75W140
Same as the Castrol “SAF-XJ” differential fluid and includes a friction modifier. Name of the product was rebranded to Syntrax. You’re probably asking me, don’t I need the FM booster? Let me clear this up as brief as possible. The “SAF-XJ+FM” has been a subject brought up all over the forums and internet because of users complaining about grinding sounds on full lock so BMW made the SAF-XJ+FM which just has more of the same friction modifier that the old one had. This pleases 90% of the street driven customers, however, this also causes problems on the track because too much friction modifier or “FM” can cause LSD to slip which is what a performance LSD should not be doing. TLDR: try the Syntrax, if you really don’t like grinding noises add a bit of off-the-shelf friction modifier. If you track, Syntrax will be just fine.

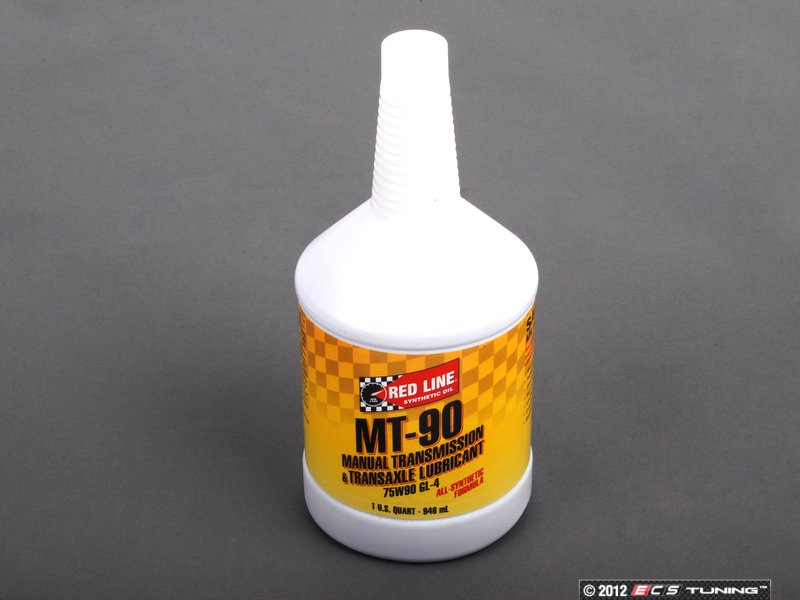
Transmission Fluid
Priority: ❗❗❕❕❕
So far I’ve only done one transmission fluid change on the E92 M3 6 speed and I used the Red Line MT-90 which is a little thicker than the Red Line MTL but so far no issues even at cold startups. Every gear shifts super crisp. I’m very happy and haven’t thought about replacing the fluid.
Recommended Parts for Mandatory Maintenance
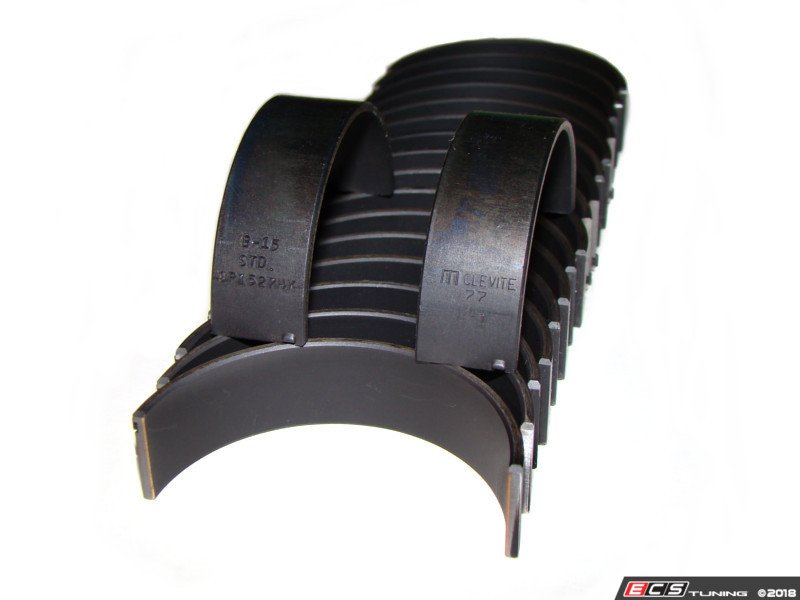
Rod Bearing
Priority: ❗❗❗❗❗
You know this was coming. This can not be treated lightly and must be done as a preventative maintenance, not a reactive maintenance, because your engine can detonate. There’s no documented life expectancy from BMW because it highly depends on how you maintain and drive your car, but the community best practice is to shoot for the 80k mile mark. There’s a lot of debate on which type of bearings to get, but if it were me I would get BE simply because it has around .0024″ tolerance which is slightly larger than OEM spec. Is that the root cause of the issue? No one knows. The one thing I can tell you is that oil change and maintenance is the most important part. Which ever bearing you get, they will all wear. Do frequent oil changes, no cold start high revs, and make sure your installer knows how to properly install and torque the rod bolts to spec. Oh yeah, BE also is made with industry standard lead-copper so you can track wear with oil analysis samples.
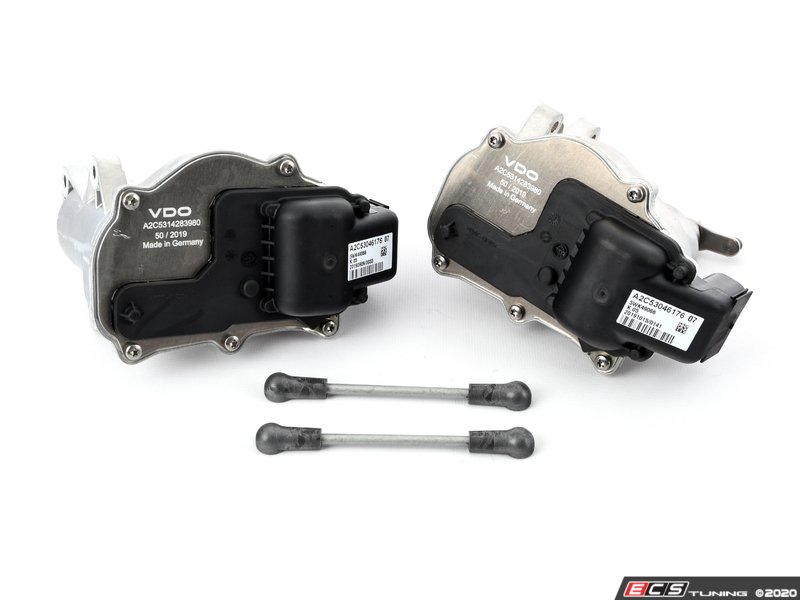
Throttle Actuators
Priority: ❗❗❗❗❕
Throttle Actuators are responsible for mechanically opening and closing the throttle so if it’s broken, you’re gonna be left stranded and on a flat bed back to a shop. The weak point inside the actuator are 2 things: plastic gears and electronics. The most common are the weak plastic gears which break over time. There are solutions to go with metal gears, however there is still a chance that your electronics are going to fail so it’s always recommended to replace the entire unit – both sides. We recommend the factory-supplier VDO for replacement actuators.


Does Your Windshield Trim Moulding Look Like This?
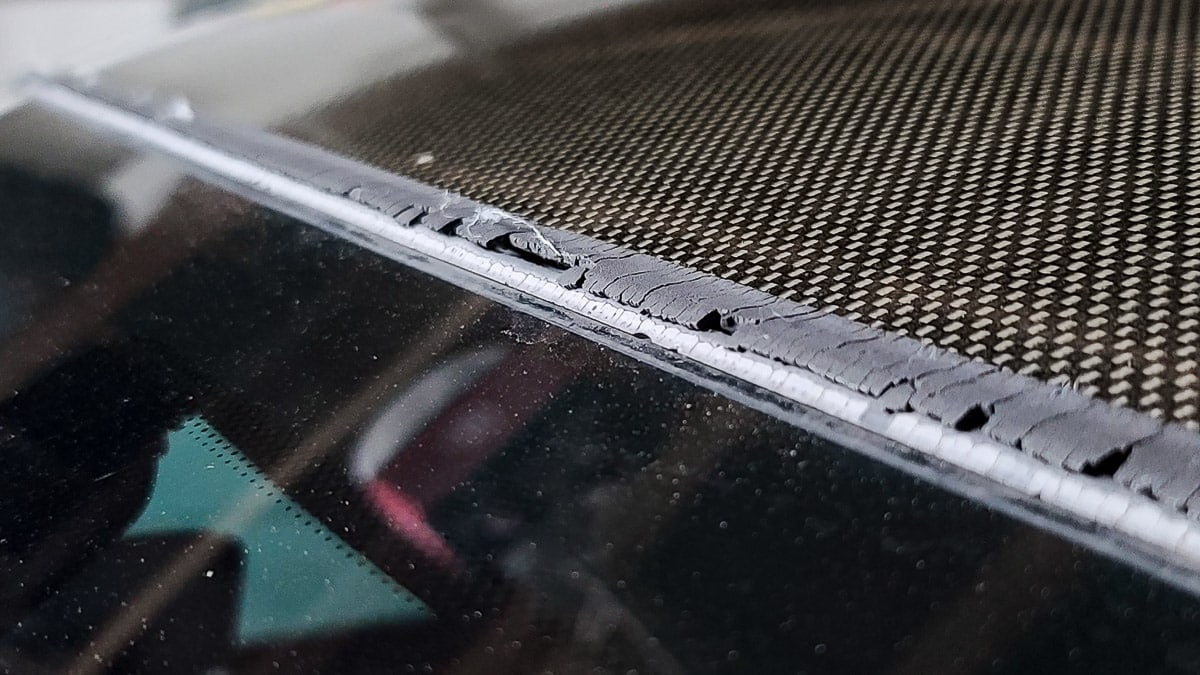
Replace Your Weathered Windshield Trim Moulding
Overtime the rubber material around the windshield begins to dry out and crack. It gets real ugly. Once it gets to my level, pictures below, it’s also harder to remove because the strip chunks off in pieces instead of just removing it as one long piece. So before it get’s really bad, I highly recommend you replace the windshield gasket as soon as it starts to show signs of dryness. You can check visually or physically. Easiest way is to just touch the moulding out lip and see if it’s brittle. Be careful when testing because it may just chunk off.
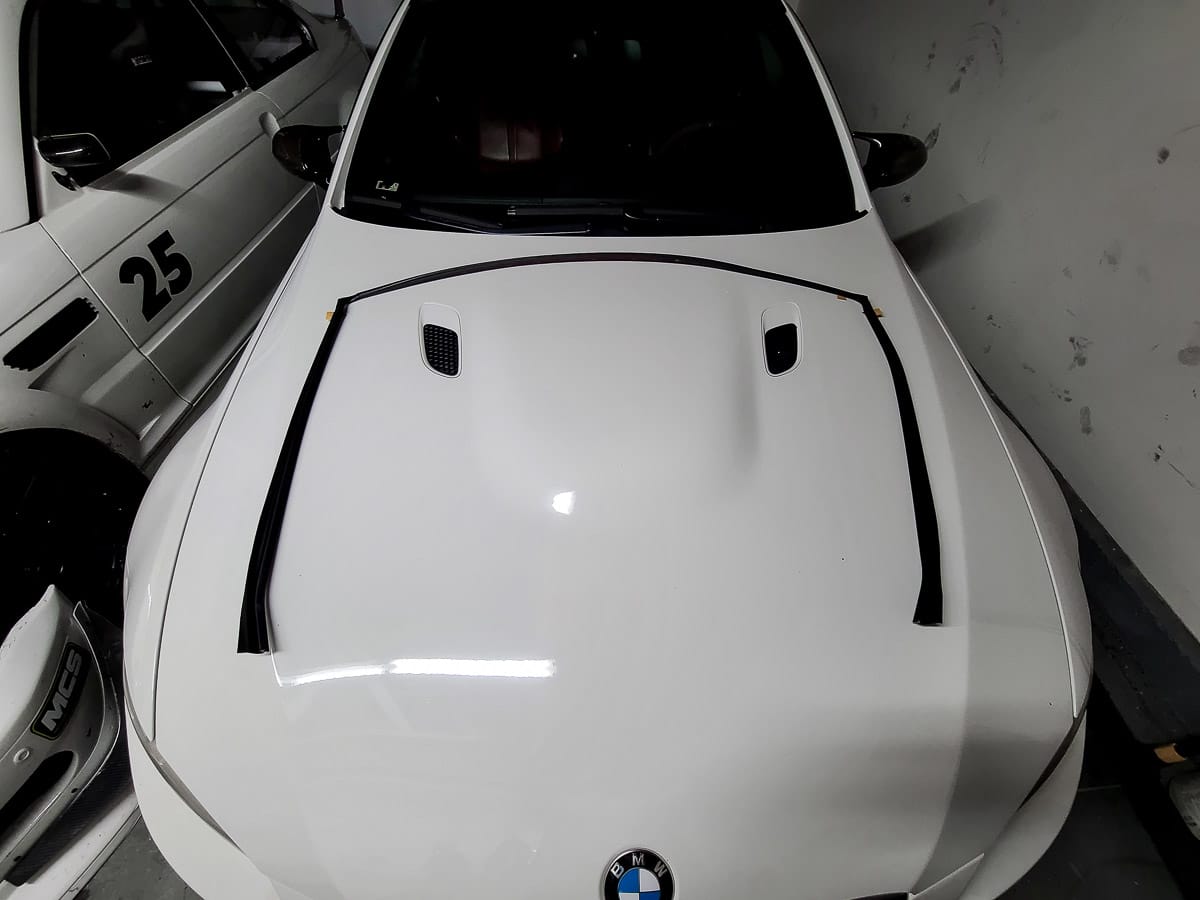
In my case, I’m replacing the windshield moulding on my E92 M3 Coupe. Part numbers are different for different body styles so make sure you get the right part number which I will also provide down below.


For E92 Coupe
- Windshield Moulding - Upper - 51317119711
- Windshield Moulding - Lower - 51137133292
For E93 Vert
- Windshield Moulding - Upper - 51317150646
- Windshield Moulding - Lower - 51137133292
Tools Required
- Goo Gone
- Rubbing alcohol
- Plastic scraper
- Flat head screwdriver or pry tool
30-60
Minutes
1/5
Difficulty
Install Directions
1. Lift old windshield moulding by prying up corners. You may need a flathead or pry tool to start the removal. The moulding has a metal u-channel that slots over the windshield.

My moulding was so bad that it was breaking off in pieces! Super annoying to remove piece by piece, but a little plastic scraper helped speed things up.

The top portion was a bit tricky to get started. It’s a tighter fit than the sides so I had to use a flat head to pry up the moudling.

2. Once the old moulding is removed, clean up the body free of dust. Use Goo Gone or adhesive remover to get all the old adhesive off.

3. Install new windshield moulding trim. DO NOT REMOVE THE DOUBLE ADHESIVE TAPE JUST YET.
Once the moulding is installed in place, then remove the double sided adhesive by pulling on the yellow tabs.

The new moulding should also have a u-channel to slot the windshield. Fitment might be tight, but it will go down.

Now you’re done!


E46 M3 Buildjournal Radiator Duct Install
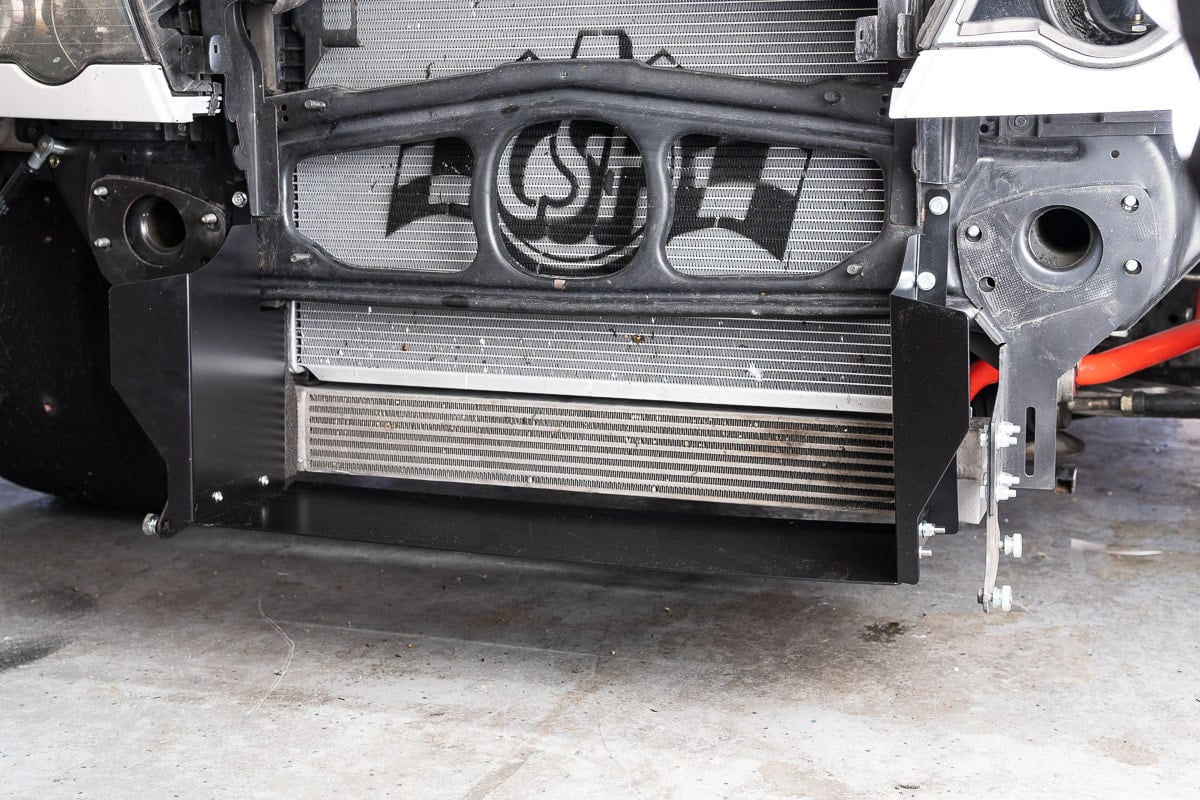
Is Your E46 M3 Overheating?
The E46 M3 front air intake duct works just fine, but overtime the plastic gets brittle and the bottom portion of the duct tends to bow. This causes air to slip past the oil cooler and radiator limiting the maximum air for cooling. In addition, you do not want air to escape past the cooler/radiator as this will cause unwanted lift. Without getting too technical on aerodynamics, you want to keep faster moving air below the bumper and slower moving air on top.
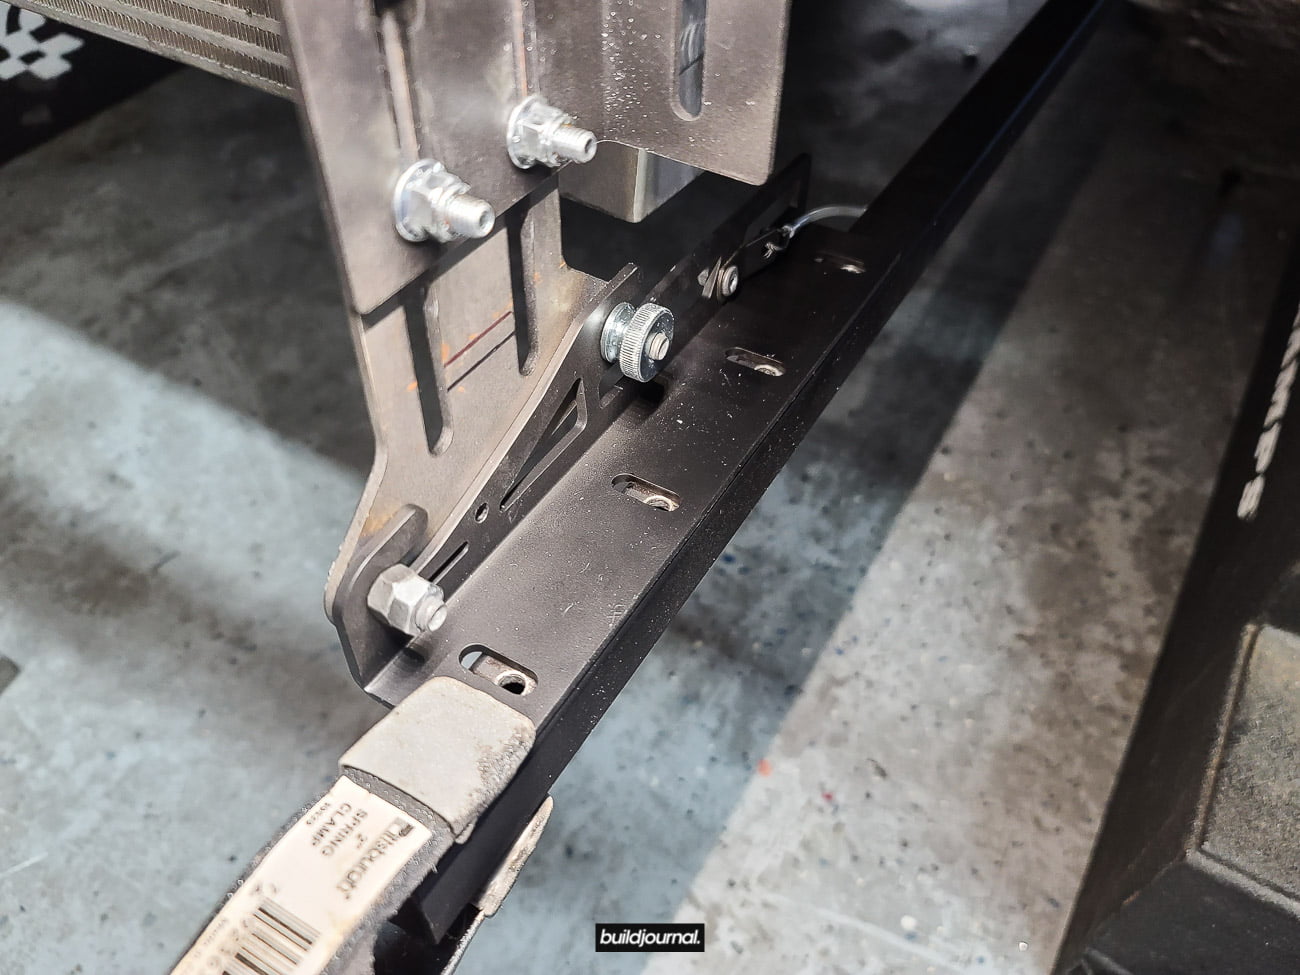
Our Buildjournal Radiator Duct for the E46 M3 is an all-aluminum piece to avoid any future bowing due to wear and tear. It’s also lightweight at just 3 lbs. The install is also super easy. We’ll show you how to install it.
Parts List
- (2) End plates
- (1) Bottom plate
- (4) M6 Nutserts
- (4) M6 Hex Head Bolts
- (4) M6 Button Head Bolts
- (4) M6 Nylon Nuts
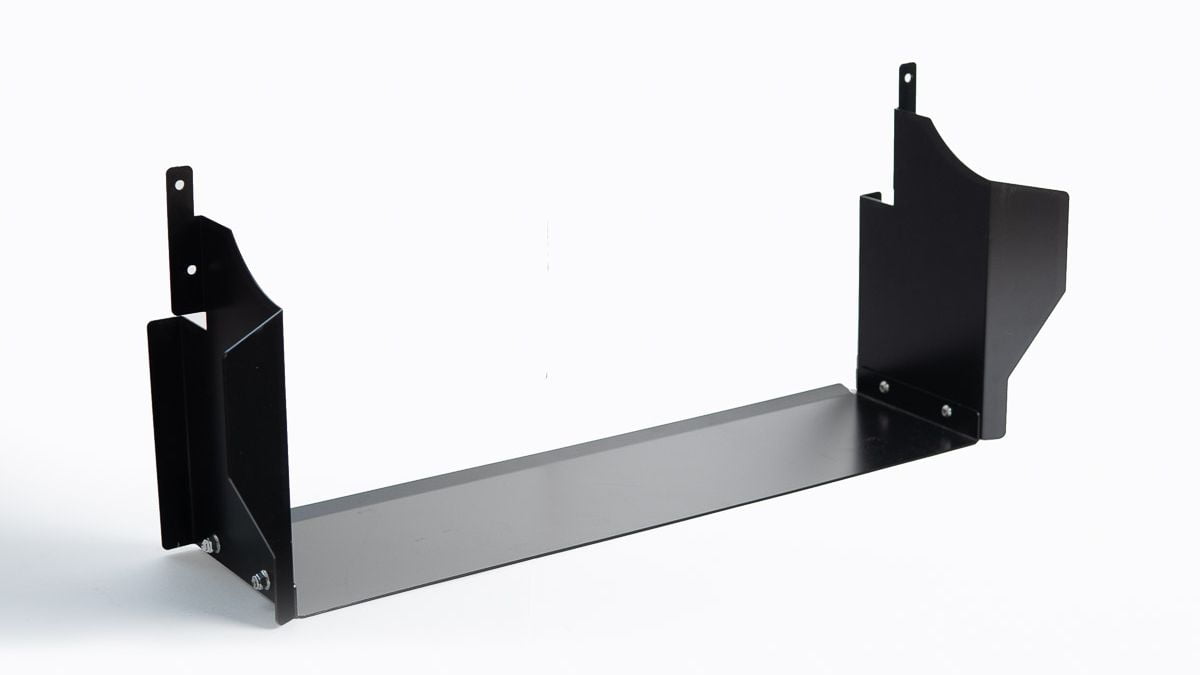
Tools Required
- 10mm socket/wrench
- 4mm allen key
- Nutsert tool
- 9mm or 23/64" drill bit
2
Hours
2/5
Difficulty
Install Directions
1. Remove Bumper

2. Remove bumper reinforcement beam/bar

3. Remove OEM radiator shroud
4. Find the (4) OEM holes on the radiator support bracket and drill using a 9mm or 23/64″ drill bit – there are 2 on each side

5. Install the provided M6 nutserts


6. Install the radiator duct using the supplied (4) M6 hex head bolts
Also watch Ride with Kee‘s step-by-step install video for our Radiator Duct!
Special thanks to Kee and Stefan for putting together this video!


E46 M3 For Sale Market Price Tracker
How much are E46 M3's going for?
Are you looking for an E46 M3 for sale? Or are you just curious to see how much your E46 M3 is worth? Even just a few years ago we’d see 100k mile E46 M3’s going for around $15k on the used marketplace and it seems like nowadays those are hard to find. Even 100k+ mile E46 M3’s are going for $20k+. It makes you wonder, are we really going to see an uptrend in market value? We’ve done a little research into the actual sales values of E46 M3’s and put together a visualization of what’s going on in the market for the past few years.
Methodology: We built a database with sales records from multiple resources including eBay, Bring a Trailer, forums, etc. Our database contains sales values from confirmed listings.
E46 M3 for Sale (Actual Sales Data)
E46 M3 - Sales by Mileage
E46 M3 - Average Sales Price by Year Sold
We can definitely say there is an uptrend with E46 M3 for sales values. These are completed listings. So all of the incomplete bids, auctions or listings are omitted. Even with mileage going up on these cars sold, the price is still going up. If you have a mint condition, low mileage E46 M3 maybe you should garage it more. For more information on how to take care of your car check out our Ultimate E46 M3 Maintenance Guide.
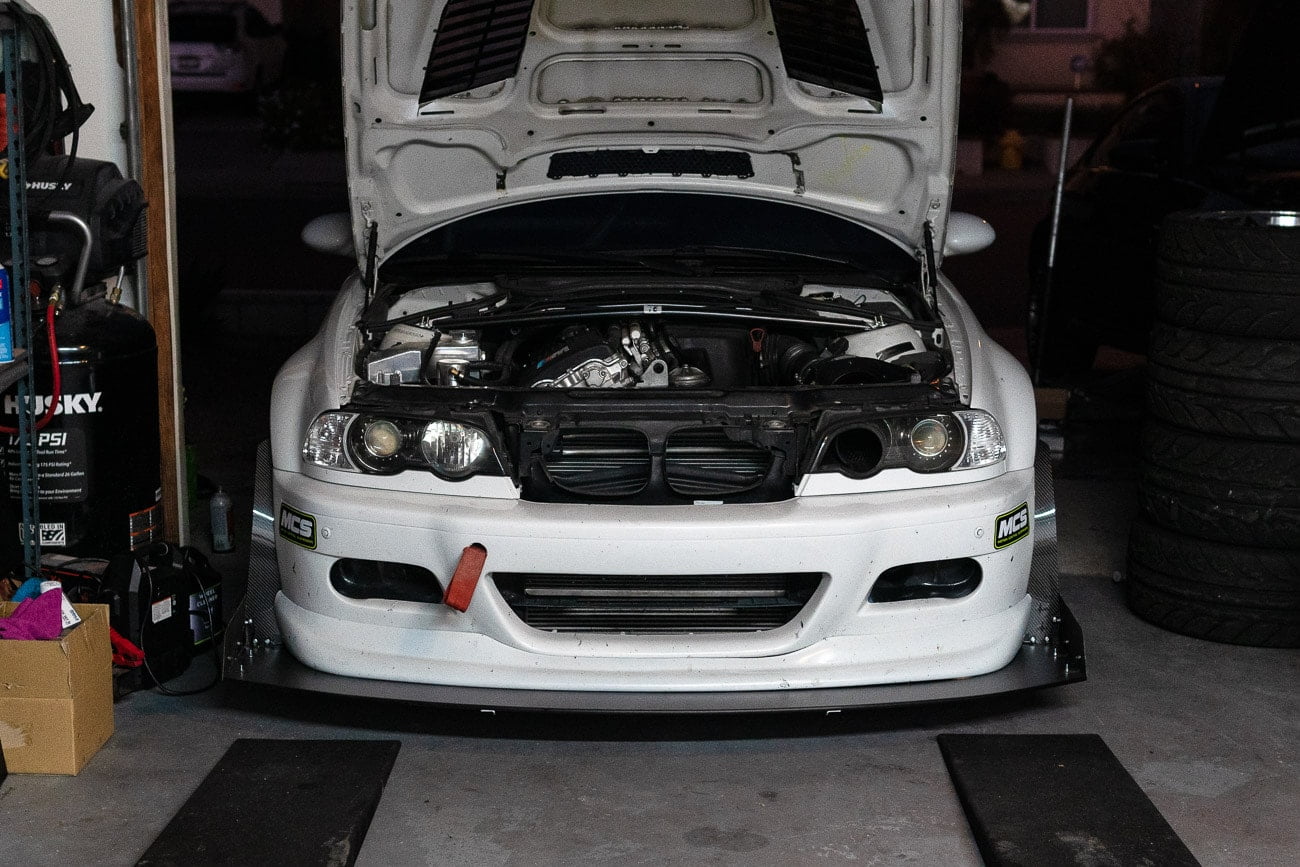
Chase Bays E46 M3 Power Steering Kit Install DIY
Upgrade your power steering
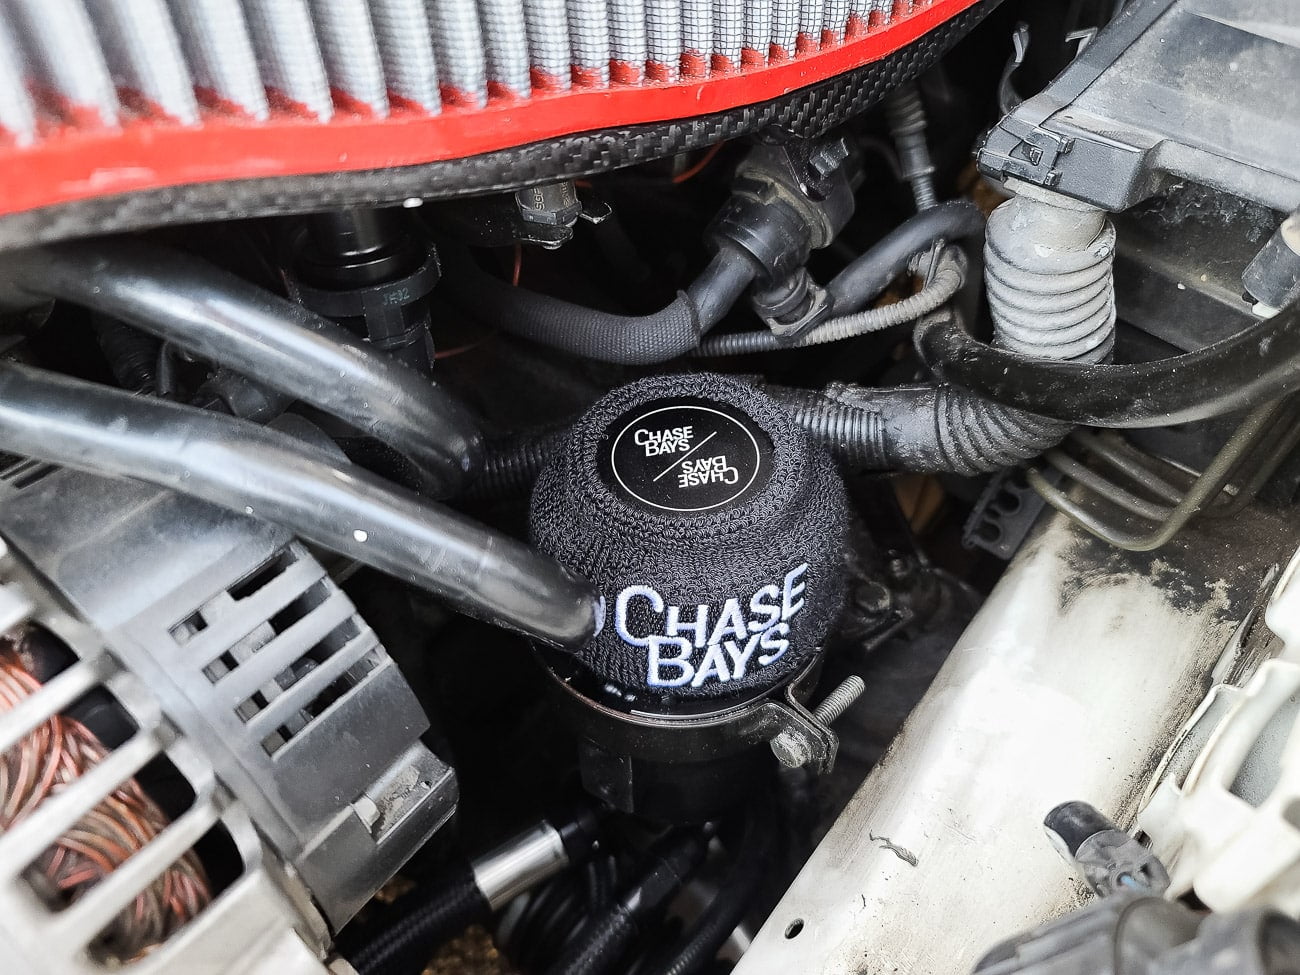
I got the revised version of the Chase Bays Power Steering Kit for the E46 M3 (S54) because I was tired of my OEM hoses seeping with fluid. I had to replace my power steering expansion hose twice already and my OEM reservoir twice as well because of leaks and cracks. Well, it was leaking somewhere again and most of my hoses were soiled so I decided to get stainless steel lines with AN fittings.
I said revised version because I’ve been talking to Ryan from Chase Bays to improve the power steering kit. They’ve made some changes to the fittings to optimize delivery of the fluid. This includes a check valve on the rack and a smaller AN fitting on the reservoir side to replicate OEM fluid movement. I’ve been testing the changes at the track under hard conditions and I just came back from testing the setup a few days ago and there were no issues. I will continue to test and give feedback to the team at CB if any.
Is there something wrong with OEM? Not really. The OEM unit can last for a long time and it’s not a super common thing for these power steering pumps to fail either. However it is highly likely that your stock reservoir is going to crack sometime. When that happens, you might want to think about replacing the system to not have cracking issues ever again.
Chase Bays E46 M3 Power Steering Kit
Parts List
- Triple Baffled Power Steering Reservoir w/ Bracket
- Heatsink Cooler
- Cooler Brackets
- -6AN stainless steel high-pressure hose
- -6AN stainless steel reservoir to cooler hose
- -6AN stainless steel cooler to rack hose
- -10AN stainless steel reservoir to pump
- Various AN fittings

Tools Required
- 10mm socket
- 12mm socket
- Shorty wrenches or AN wrenches
- Wobbles
- Extensions
- Jack + stands
- 1L ATF fluid
- Funnel
6
Hours
2/5
Difficulty
Chase Bays Power Steering Install
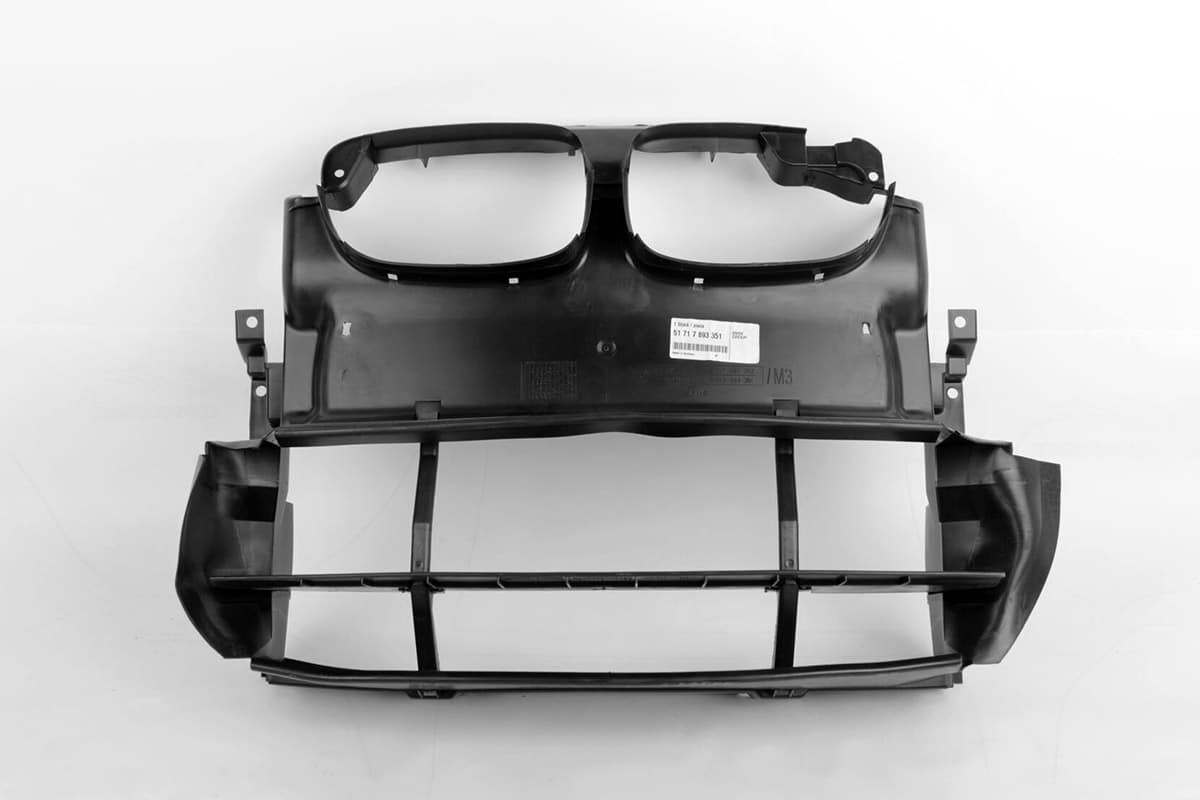
Remove Intake Plenum
1.1 Remove 4 nuts holding front strut bar.
1.2 Remove 4 torx screws holding cabin filter housing, remove filter.

1.3 Remove intake including the nut for the oil dipstick.

1.4 Remove crankcase vent hose.

1.5 Remove vent hose grommet to give some more slack in the line when you take out the airbox.

1.6 Remove the throttle body hose clamps. There’s not much grip and clearance so I had to use angled needle-nose pliers and locking pliers to squeeze the rivets together and with a flat head pry out the clamp simultaneously. Basically in the bottom picture below, I pry the two rivets together to alleviate clamping force and then used a small flat head to pry out the end of the clamp pictured on top.


1.7 Remove the (2) two nuts holding the bottom of the intake box. Detach plug grommet between the two nuts.

1.10 This part is a little tricky (any is the part everyone talks about breaking) so pay attention! Before the airbox comes out, you have to unclick the (small) vent hose below the intake box, but because the clearance is so small you have to wiggle the box out a little to slide your hand in. Be gentle because this part is fragile and if you break this hose, it’s going to be an annoying trip to the dealership.
The best thing to do is slightly pull the airbox halfway out and then unclip the (small) vent hose.
Here is a picture showing the underside of the airbox.


1.8 Unclip the (large) vent hose on the bottom of the intake box. Here is a better view of the (large) lower vent hose and the 2 nuts holding the airbox.


1.9 Unclip the holder for the smaller vent hose on the side of the intake box – the small highlighted tab has to be pressed down and the plastic holder will slide up. (not away from box)


2. Drain Power Steering Fluid
2.1 Locate the power steering hose that runs from the reservoir to the power steering pump.
2.2 Remove the hose OEM hose clamp using a flat head and drain the fluid into a disposable container.

3. Remove OEM Power Steering
3.1 Remove the high pressure power steering hose underneath the car by the front sway bar. The hose is secured to a 10mm hex head bolt holding the bracket in. Remove the entire bracket from the steering rack.

3.2 There are two ends coming from the high pressure hose. One is connected to the steering rack (upper) with a M14 banjo bolt.

3.3 The other is a M16 banjo bolt on the pump.

3.4 Disconnect the two hose from the stock cooling coil. One is coming from steering rack (lower) and the other is coming from the reservoir. Push in the white plastic tab first and then pull down. I decided to entirely remove my cooling coil as it won’t be needed since I have the CB cooler.

3.5 Loosen the 10mm hex bolt on the clamp holding down the reservoir. You can now pull the entire reservoir out from the top.

4. Install Chase Bays Power Steering Kit
4.1 Get familiar with the hose diagram. The install is actually really easy. The only challenge is tightening down the AN fittings because the clearance is not much for large wrenches. Shorty wrenches FTW. Or get proper AN wrenches.

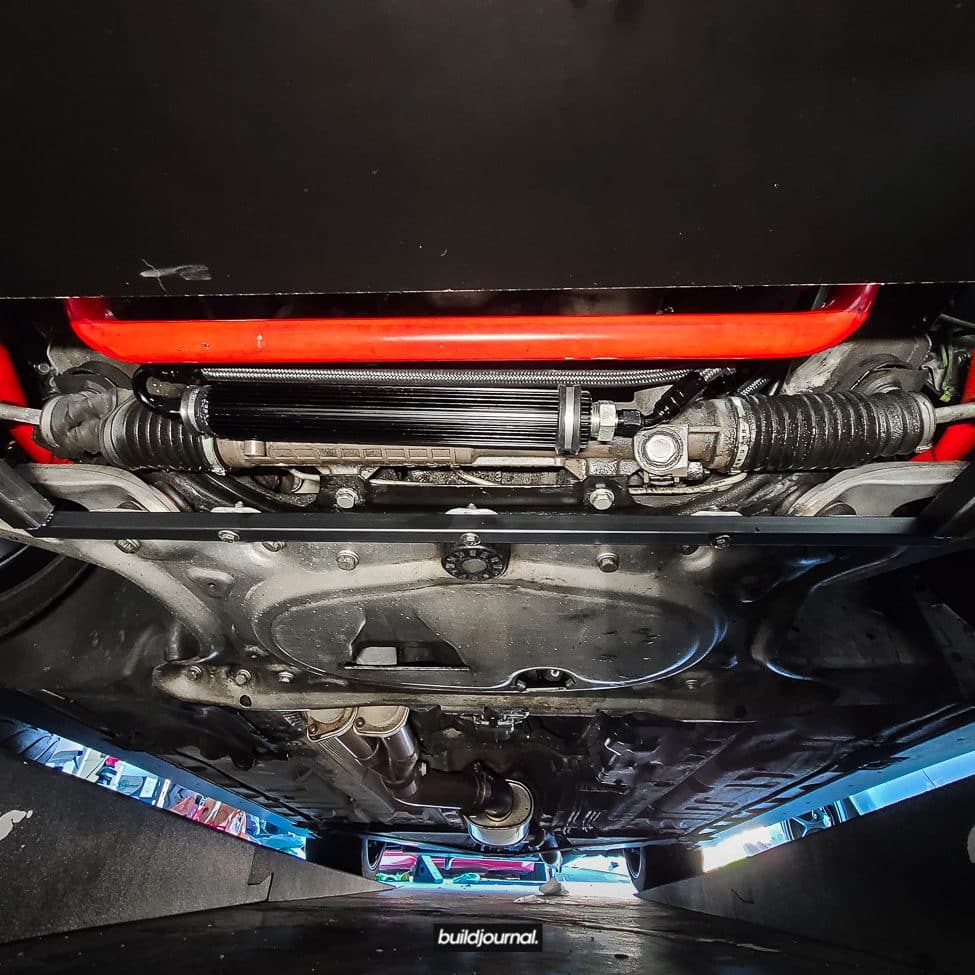
4.2 Install CB cooler using the supplied rubber clamps. The shorter clamp goes on the passenger side of the cooler. I have a ZCP (Yellow Tag) steering rack and it has 2 M6 mounting locations pre-threaded. OEM should as well.


I actually had some new bolts laying around. If you want new bolts, they are M6 10mm bolts.

4.4 Install the cooler hose from the passenger end to the CB reservoir. You can leave the CB reservoir sitting in the clamp, but loose since it’s a bit of a struggle to tighten it down in there.

4.4 Install the other end of the CB cooler hose into the steering rack (lower). Make sure your banjo bolts have crush washers on both sides of the banjo bolt!


4.5 Now install the high pressure line going from the pump to the steering rack (upper). Use the supplied male-male AN fitting on the pump, then fit the female AN. You do not need to use Teflon or sealant for any of the AN fittings.

4.6 Install the other end of the high pressure hose into the steering rack (upper). Again, make sure you have 2 washers sandwiching the banjo bolt. Make sure the hard lines are not touching any of the suspension components.

4.7 Your last hose is the reservoir to pump. The pump end attaches with the supplied hose clamp.

4.8 Tidy up your lines and secure the fittings on the CB reservoir. Now you can tighten the reservoir clamp down using the supplied bracket.

5. Fill Fluid and Test for Leaks
5.1 Follow the directions as stated by Chase Bays to properly bleed the power steering system. You can use any ATF fluid. I used 1L of Pentosin ATF 1.
- With the the car jacked up, fill the Chase Bays Reservoir to halfway full.
- Turn the wheel back and forth to lock five times with the car off. This will allow some fluid to get into the Rack and Pump while the car is off so the system doesn't start completely dry. Add fluid if needed to keep it at half way full.
- With the car still in the air, start it up. Let it idle for 3-5 minutes while checking for leaks at all the connections. If there are no leaks turn the wheel back and forth to lock five times.
- Put it on the ground and start it up. Turn the wheel back and forth to lock five times. Now take it for a test drive. Drive around for 15-20 minutes and take note of how it sounds/feels in the beginning compared to the end. We have seen great results from this install process, combined with letting the car sit for an hour after the initial drive.
- Check for leaks one last time, if everything is good you're ready to rock!

Quick-Release Splitter DIY Install Guide - E46 / M3
How To Mount Splitter Using Quick-Release Splitter Brackets
This splitter DIY guide will walk you through the install process using our Buildjournal Quick-Release Splitter Brackets for the E46 / M3. Splitter mounting to your chassis can be difficult, but not anymore. We’ve developed a 100% bolt-on chassis mounted bracket that uses a skeleton frame to support the rear of the splitter, which is new for our latest version enhancement. Quick-release is even quicker now. A huge evolution over our old V1 brackets.
If you have your own rear mounting solution we also offer the front brackets by itself without the skeleton brace. This splitter DIY will cover the installation for the Full Kit with Rear Support.

Tools Required
- 10mm socket
- 10mm wrench
- 5/32 hex drive
- Q-tip
- Permanent marker
- Power drill
- 1/4" drill bit
- Jack + stands

Splitter & Bracket Installation Instructions
1. Install Rear Splitter Bracket
1.1 Jack up the car.
1.2 Remove and discard the OEM plastic undertray.
1.3 Locate the 3 factory holes located on the front reinforcement plate which holds the plastic undertray.

1.4 Using the supplied hardware, mount the rear bracket to the 3 holes on the front reinforcement plate – hex bolt side down. Do not tighten it down just yet. This will help with the splitter alignment in the next steps.


2. Assemble Front Brackets
2.1 Use the picture here to assemble the bracket. Each side of the bracket is made with 3 main parts: main bracket, adjustment plate, splitter feet. It’s important the orientation is set correctly otherwise you will have alignment issues with the skeleton brace and rear bracket. Pictured on left is the left/driver side.

3. Install Front Splitter Bracket
3.1 Remove your front bumper and Kevlar/aluminum bumper beam. If you have the aluminum bar, you need to also remove the bumper shocks. For now, leave the bar and bumper off. Notice how the splitter feet lines up with the rear bracket.
3.2 Use the OEM nuts to hold the front brackets in place, but do not tighten all the way down. This will help with the splitter alignment in the next steps.

4. Align Brackets & Set Height
4.1 Insert the quick-release pin into the feet/adjustment plate and tighten down the thumb screws. This is important for the alignment. Your front brackets, adjustment plates and rear bracket should be loose.
4.2 Temporarily install your bumper back on to set the the splitter height.
4.3 Rest the jack on your splitter and jack up to the desired height. Make sure the frame is in place.

4.4 Once the splitter height is set, carefully remove the bumper.
4.5 Tighten the front brackets and adjustment plate. Your front brackets are now set.
4.6 Secure the frame to the feet with the holes aligned and use a clamp to hold it in place while you adjust the rear bracket.
4.7 Make sure the rear bracket and frame are in contact with each other or else you’ll experience some back and forth deflection. Tighten down the rear bracket. Now your frame should be all set. Test for any play and adjust if necessary.
5. Align Splitter
5.1 With the splitter still in position, mount the bumper back on and visually align the splitter to where you want it to mount.
5.2 Remove bumper once splitter position is set.

5.3 With the feet aligned with the frame holes, mark your drill points on the splitter. I put some ink on a Q-tip and marked the holes straight down using the first and last holes on the feet. Splitter mounting requires a minimum 4 mounting points from the feet to the splitter.


5.5 Drill the marked holes using a 1/4″ bit.

6. Install Splitter
6.1 Use the supplied hardware to mount the splitter through the frame and onto the feet.

6.2 If you are using our Splitter Brace, you can install that during this step. This brace adds support for the front of the splitter for those not wanting to run splitter rods outside on the exterior of the car. It also doubles as a splitter skid plate.

6.3 If you are using our Splitter Rods with Shocks, you can install them now.

6.4 Your install is complete. Check for play and adjust if necessary.
Buildjournal Splitter Bracket with Quick-Release
E46 M3