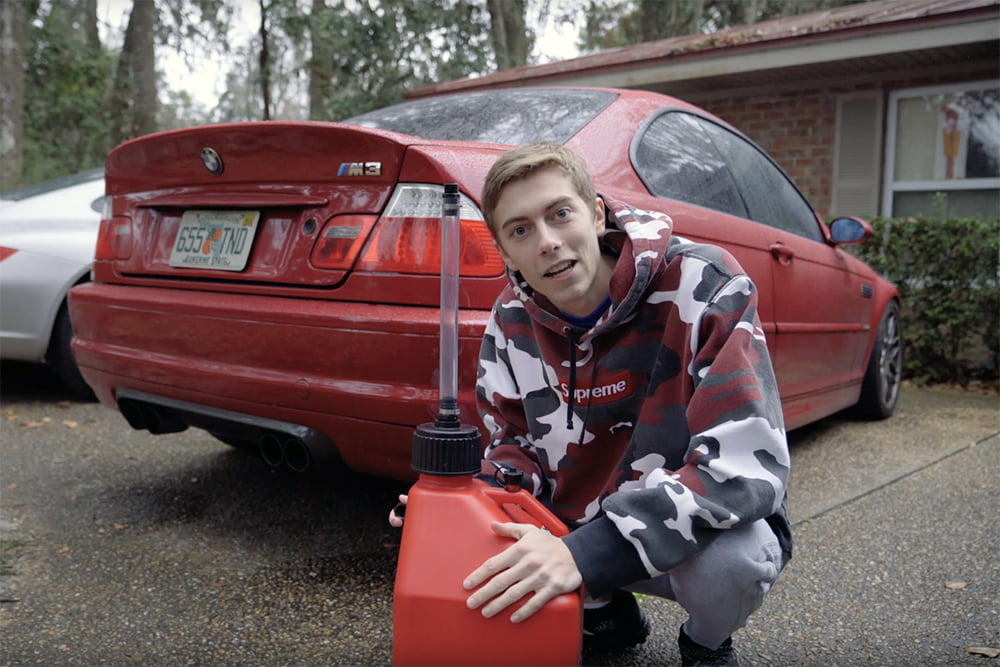
Twinline Garage Runs E85 On His B-Spec Tune E46 M3
We love to see that more E46 M3 owners are getting our Buildjournal B-Spec Tune and we were super pumped to see that Twinline Garage wanted to try our tune as well. He picked which features he wanted on our site and then we sent him the tune. We also even gave him our Launch Control feature which isn't currently out yet. The best part though? We've never really tested our tune on E85 and since he has the E85 kit on his car, he was willing to test it out for us! Check out the video below to see what he had to say about our B-Spec Tune.
[tg_youtube width="1920" height="1080" video_id="_nkqEHDArcs"]

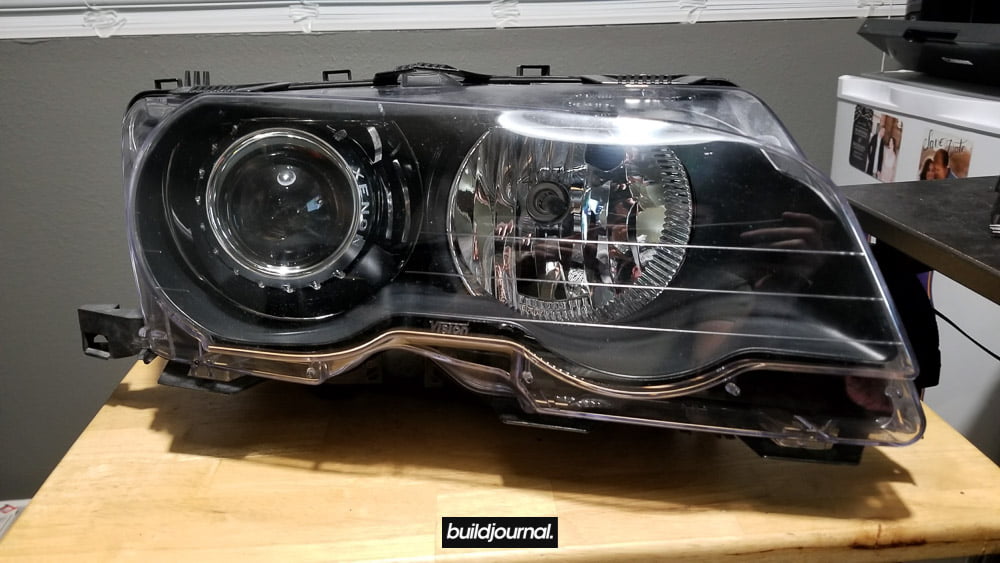
DIY: Bosch E46 M3 HID Projector Retrofit With G5-R Brackets
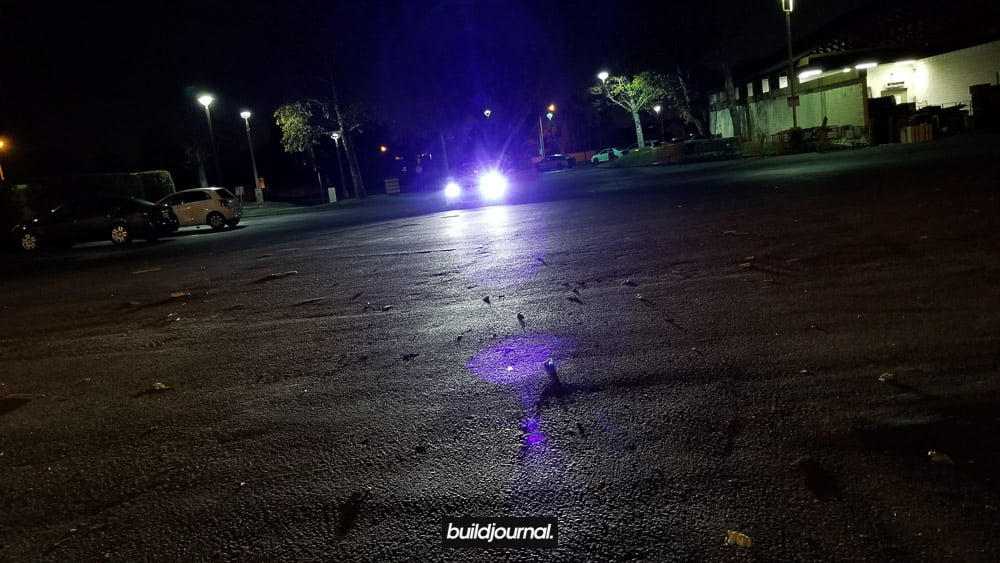
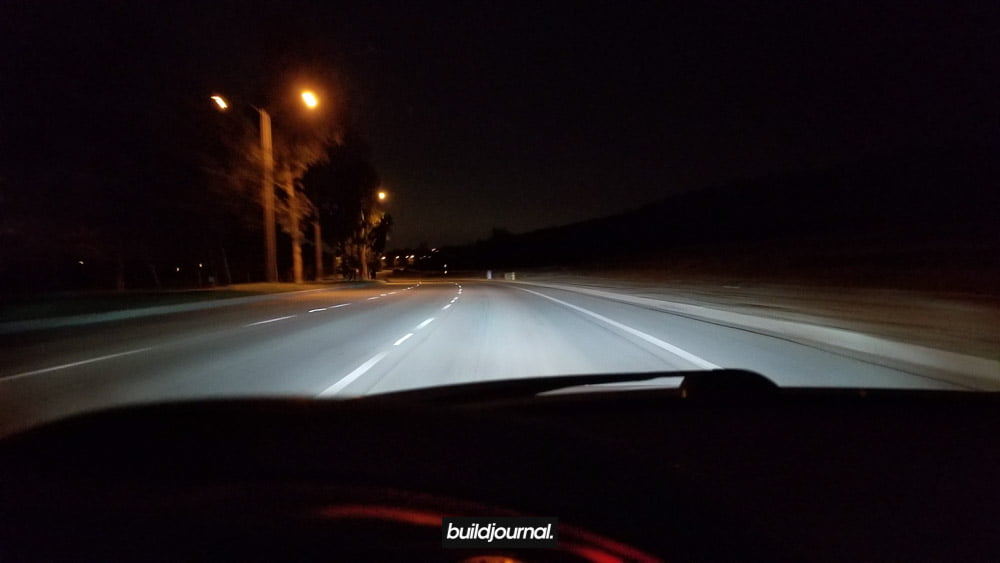
The stock E46 (including M3) headlight output can be improved drastically by doing a HID projector retrofit. Why is it important? Because you’ll have better visibility at night making it much easier to spot potential danger ahead of time. It really enhances your night driving experience. And as an added bonus, it also gives your car that exotic look that modern day luxury cars have. Project retrofits aren’t really common because of the extensive customization required to “hack” a headlight assembly, but things have changed recently.
A few years back I did a custom Lexus RX300 projector retrofit which required a lot of dremeling, JB Weld’ing and such but nowadays things are a lot easier with the help of retrofit brackets from Lightwerkz. Brackets. That is the game changer. The install is almost 100% plug and play thanks to the wonderful brackets from Lightwerkz. The following instructions below will guide you through a projector retrofit on a Bosch/AL “E46” headlight assembly using a G5-R projectors.


Do I have Bosch/AL or ZKW headlights?
First thing you need to determine is if you have Bosch/AL headlights because this kit will not work with ZKW. Check out Retrofitlab.com as they do a good job explaining the differences between the two. Below is a list of car models with the different projector manufacturers.
| Model | Manufacturer | Type |
|---|---|---|
| E46 compact (all years) | AL | Halogen H7 |
| E46 compact (all years) | AL | Bi-xenon D2S |
| E46 saloon/wagon/ coupe/convertible Pre-facelift (1998-2001) | AL | Halogen H7 |
| E46 saloon/wagon/ coupe/convertible Pre-facelift (1998-2001) | AL | Single xenon D2S |
| E46 saloon/wagon/ coupe/convertible Pre-facelift (1998-2001) | AL | Bi-xenon D2S |
| E46 saloon/wagon Facelift (2001-2005) | AL | Halogen H7 |
| E46 saloon/wagon Facelift (2001-2005) | ZKW | Halogen H7 |
| E46 saloon/wagon Facelift (2001-2005) | AL | Single xenon D2S |
| E46 saloon/wagon Facelift (2001-2005) | ZKW | Bi-xenon D2S |
| E46 saloon/wagon Facelift (2001-2005) | AL | Bi-xenon D2S |
| E46 coupe Facelift (2003-2006) | AL | Halogen H7 |
| E46 coupe Facelift (2003-2006) | AL | Bi-xenon |
Source: retrofitlab.com
What do I need for the retrofit?
Once you’ve determined you have the Bosch/AL headlights, you can start piecing the things needed for the HID projector retrofit.
- Bosch “E46” Headlight Brackets & G5-R projector – Buy
- Dremel kit
- Security torx bits
- Hex bits
- 3M double side adhesive
- (6) Quick splice wire taps (18-22 gauge)
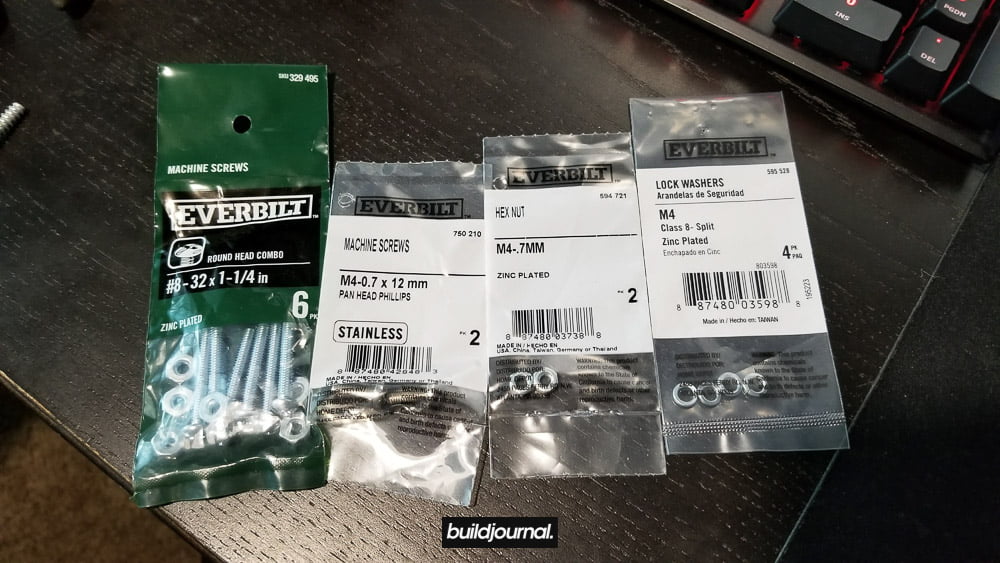
- (6) #8 – 32×1-1/4 in screws + nuts
- (6) #8 washers (I used M4 washers)
- (8) M4-0.7x12mm screws + nuts
- (8) M4 lock washers
- Basic tools
HID retrofit installation
I’m not going to show exactly how to remove the headlight assembly from the car, but you can easily find a guide on removing them. The basic direction is you remove the lower headlight trim, remove the bolts on the headlight/ballast and then unplug 3-4 connectors on each side.
1. Uninstall and remove headlight assembly
1.1, remove the clear lens by unclipping the tabs around the outer housing. There should be 7 tabs.
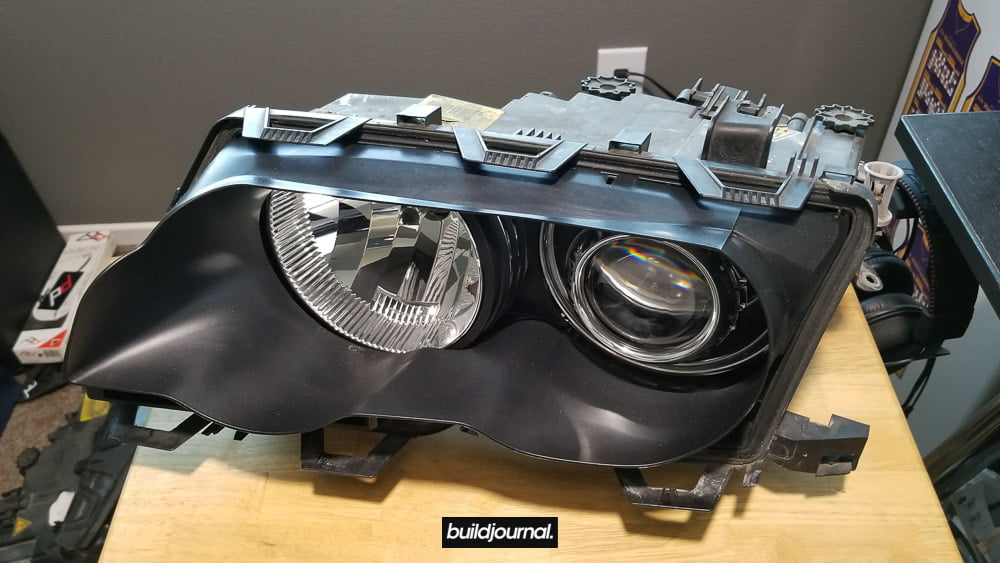
1.2, remove the black housing insert. Start by pulling one corner at a time until all 4 corners are out.

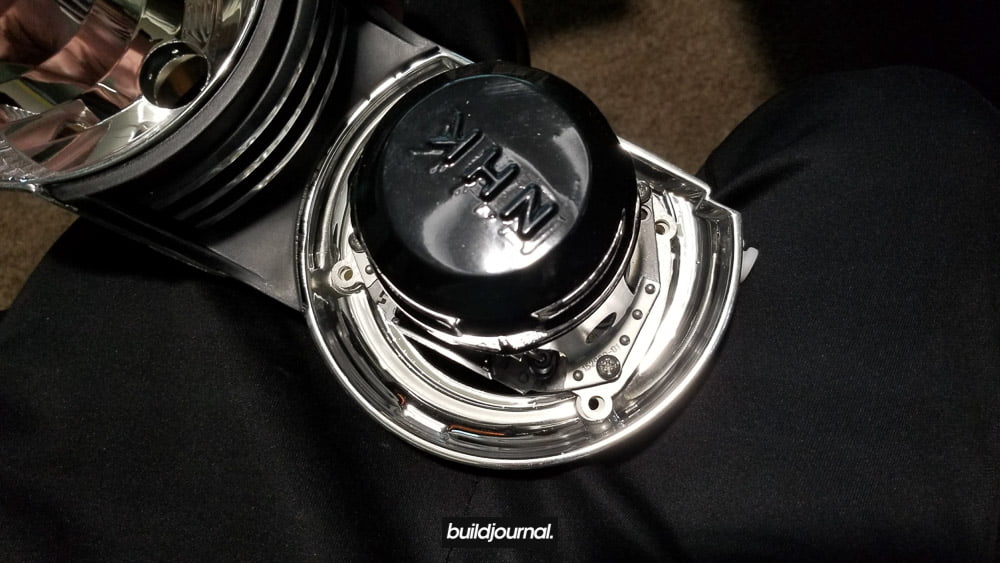
1.3, remove the housing cap and hi-beam bulb, set aside. Disconnect D2S bulb and remove bulb.
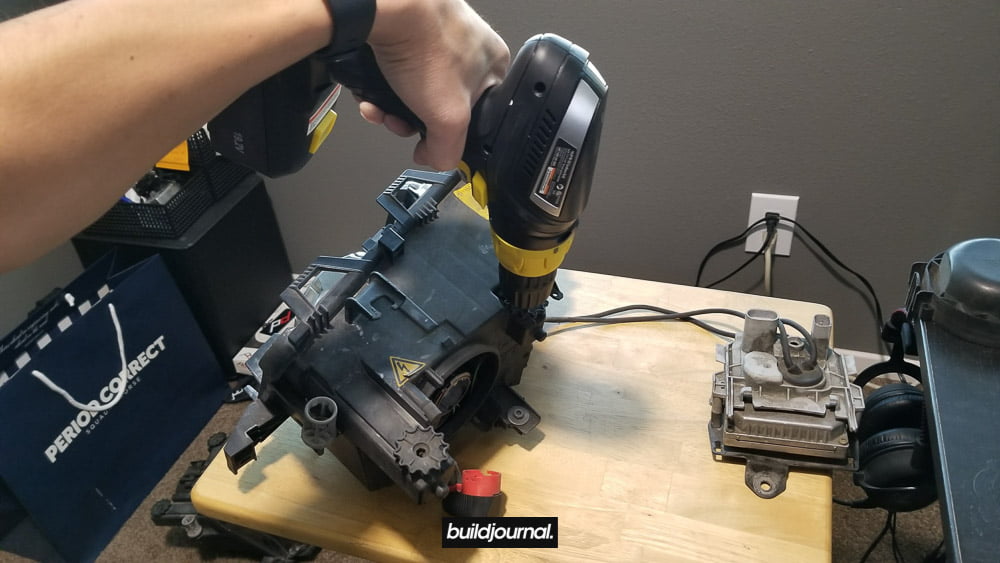
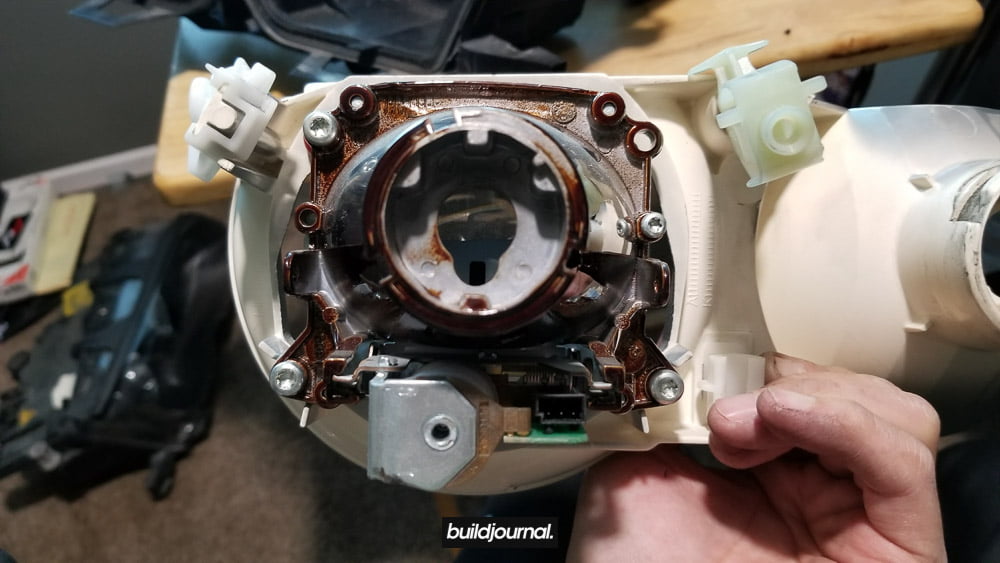
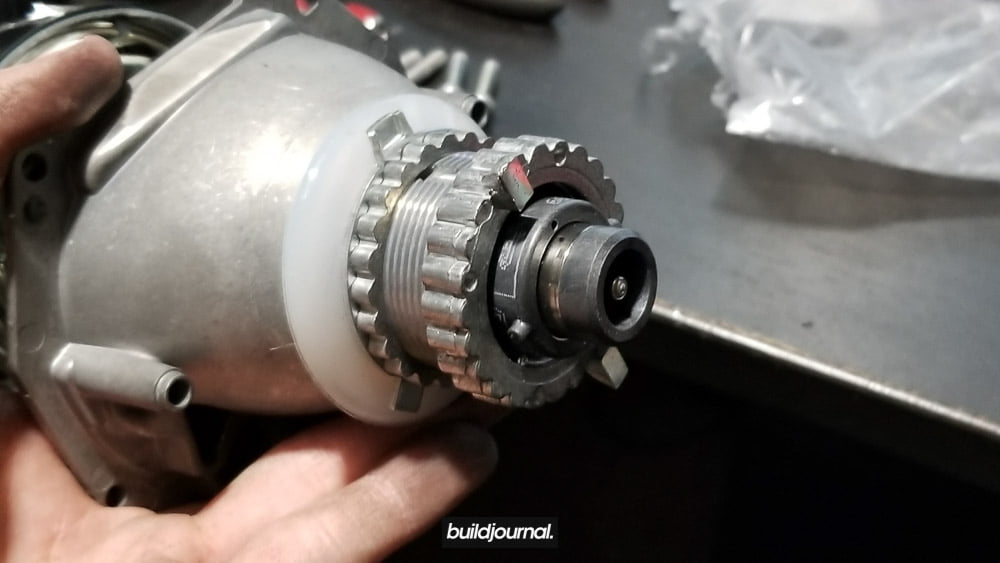
1.4, time to remove the internals. There are 2 dials on the top of the headlight housing used for horizontal and vertical cutoff adjustments. Unscrew both sides evenly until the internal is no longer attached to the adjustment screws. It takes a really long time to do it by hand so I recommend you use a power tool.

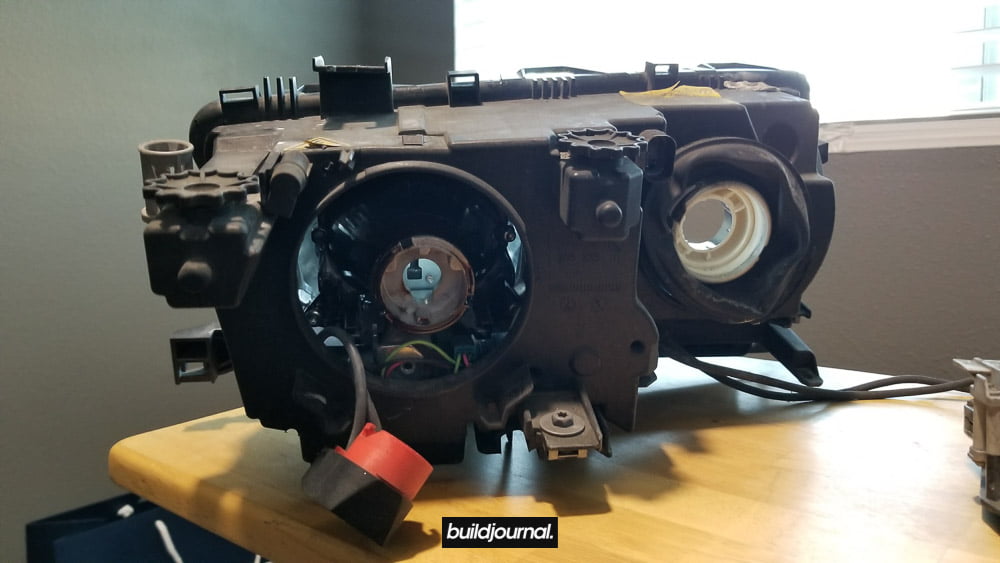
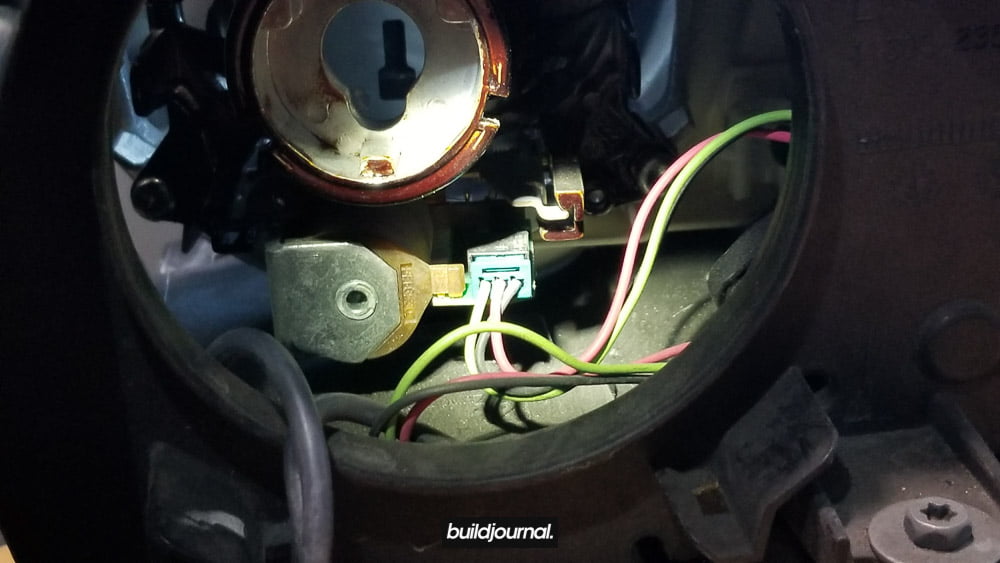
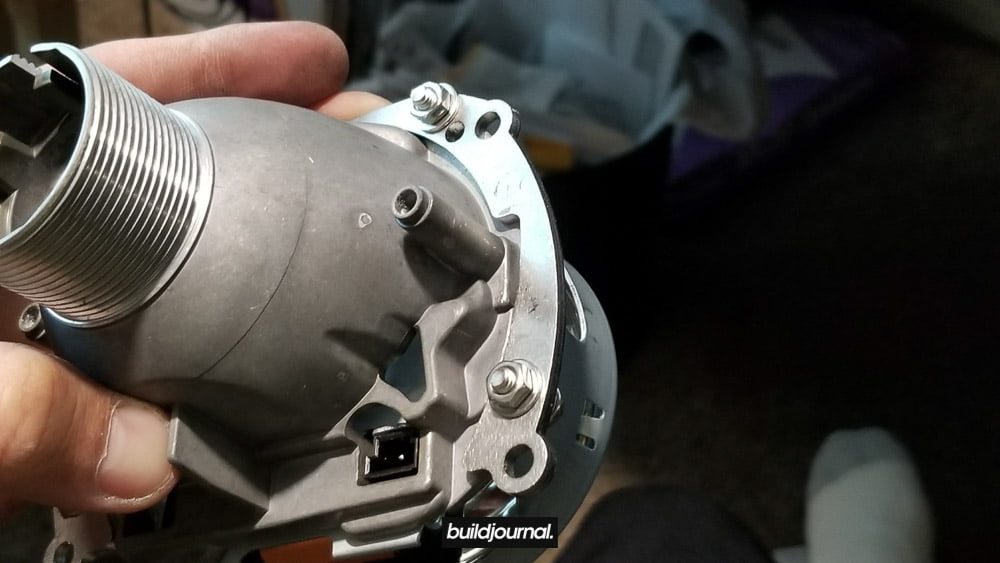
1.5, disconnect the bi-xenon plug if you have it.
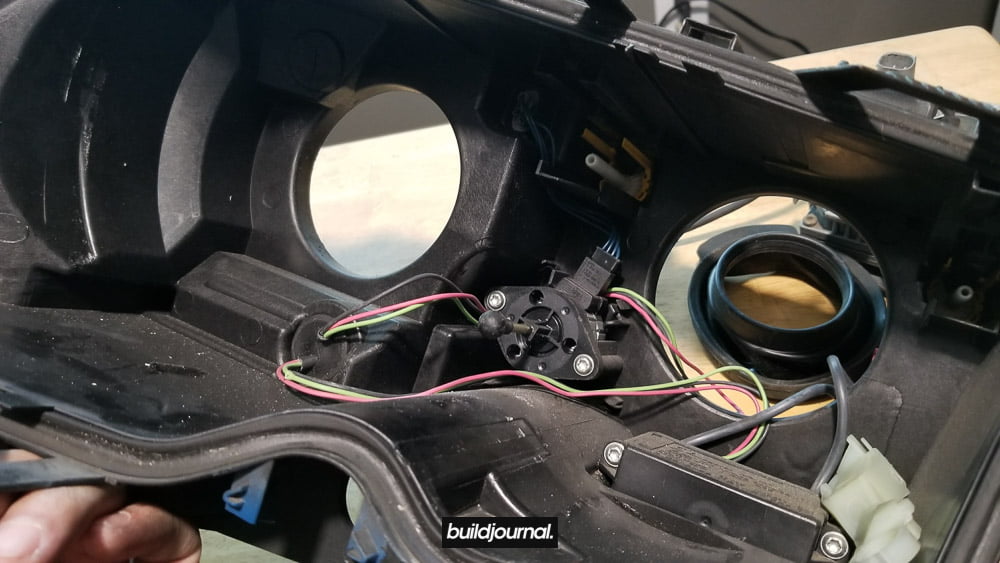
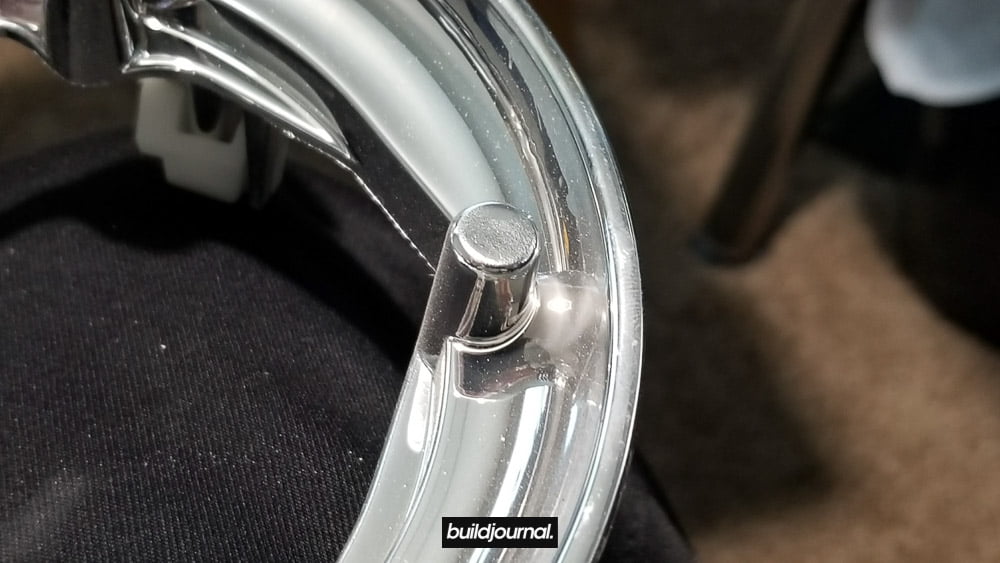
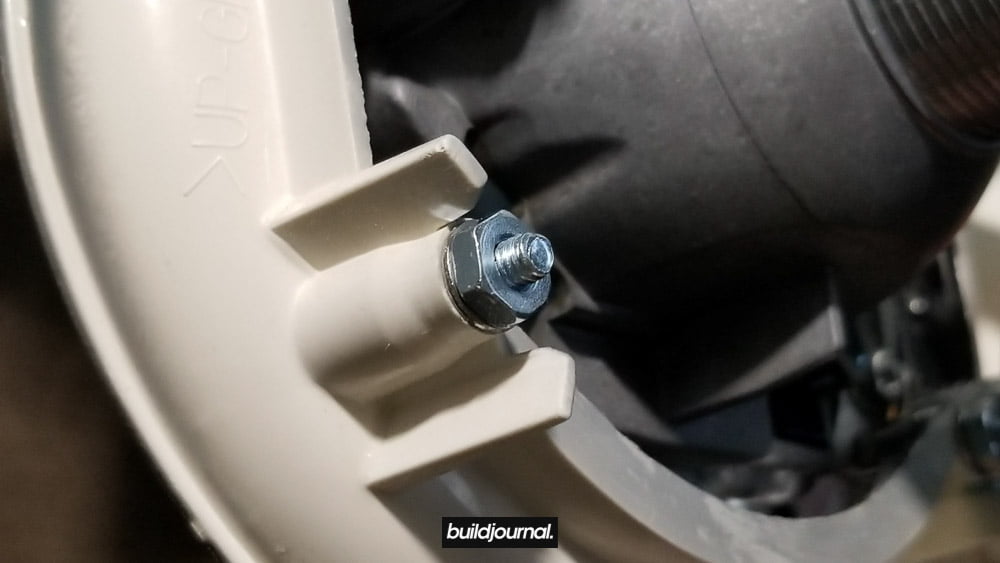
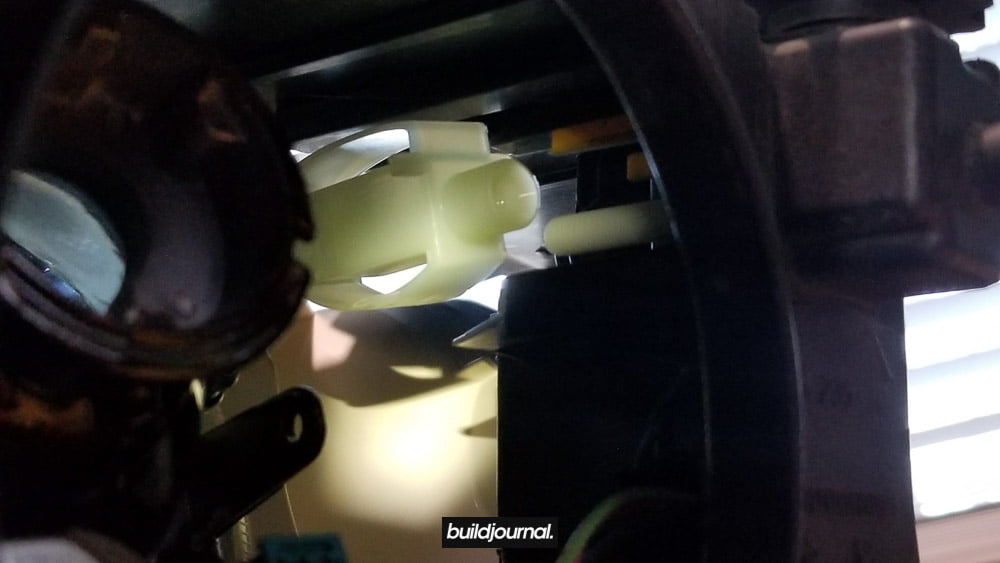
1.6, okay now this is the hardest part. Behind the internal piece, you’ll see a the black ball head leveling motor slotted into the plastic snap tube. In order to remove this, I got the ball head in this position shown below by pulling the top portion of the internal from the other side. Be patient as it will come off, but you’re going to spend a few minutes on this. You can even use a wide flat head to pry apart the plastic snap tube to allow more clearance.
1.7, now the internal piece should come out.
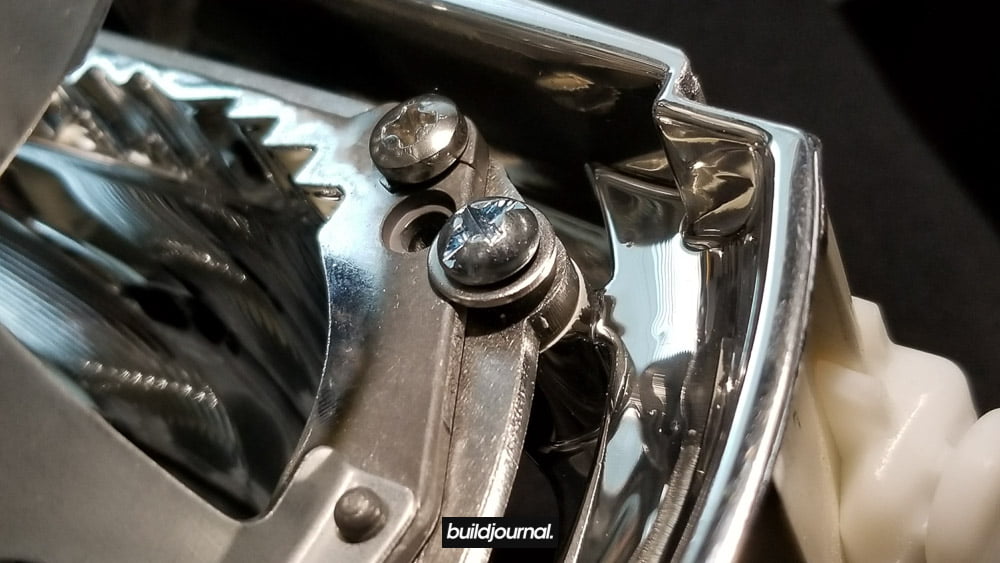
1.8, remove the stock shroud by taking a small flat head and prying the 2 clips on the 3 and 9 o’clock positions accessed from the back of the projector.
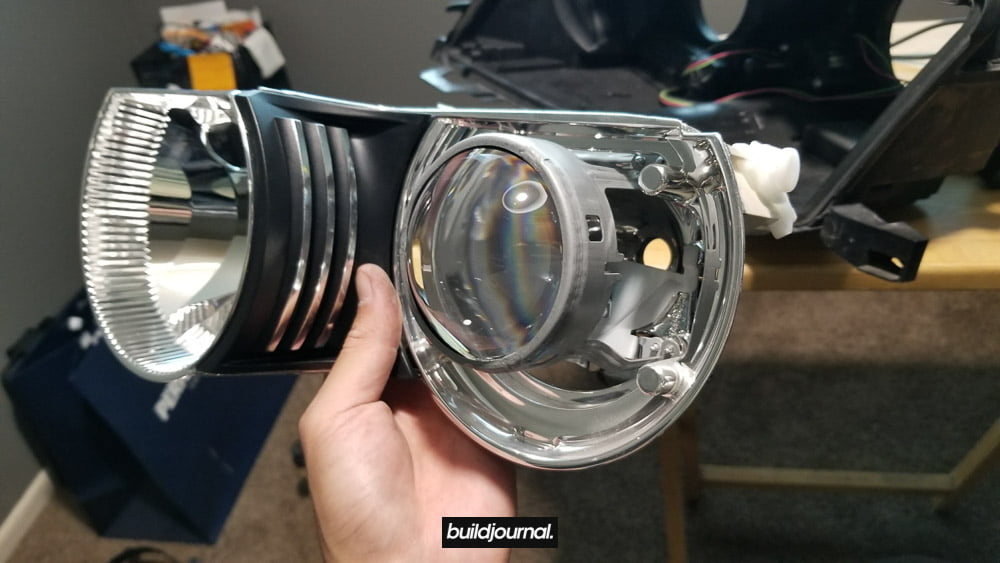
1.9, remove the stock projector from the internal piece by unscrewing the 4 security torx bolts located on the back. There are 2 red plastic inserts that will come loose with the screws.
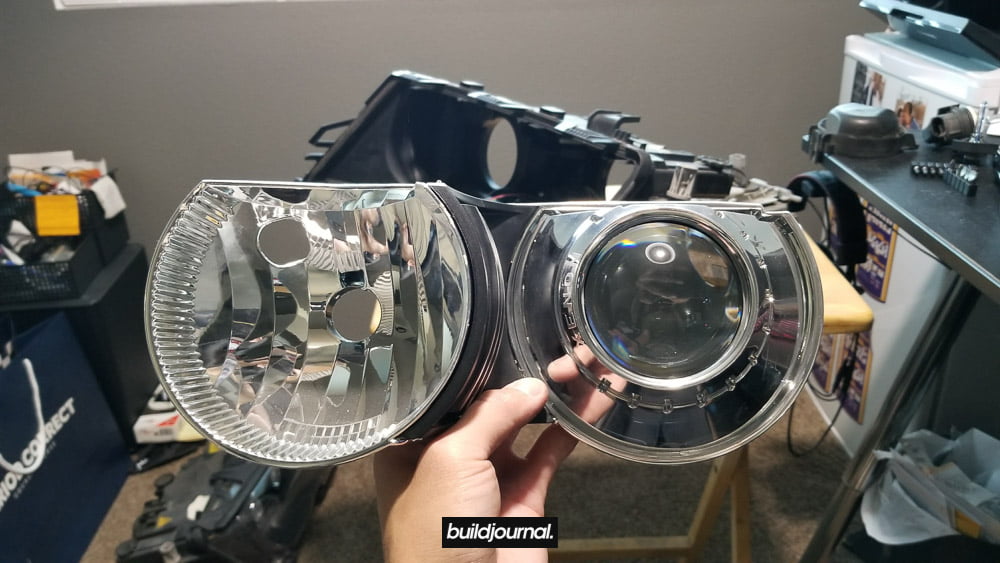
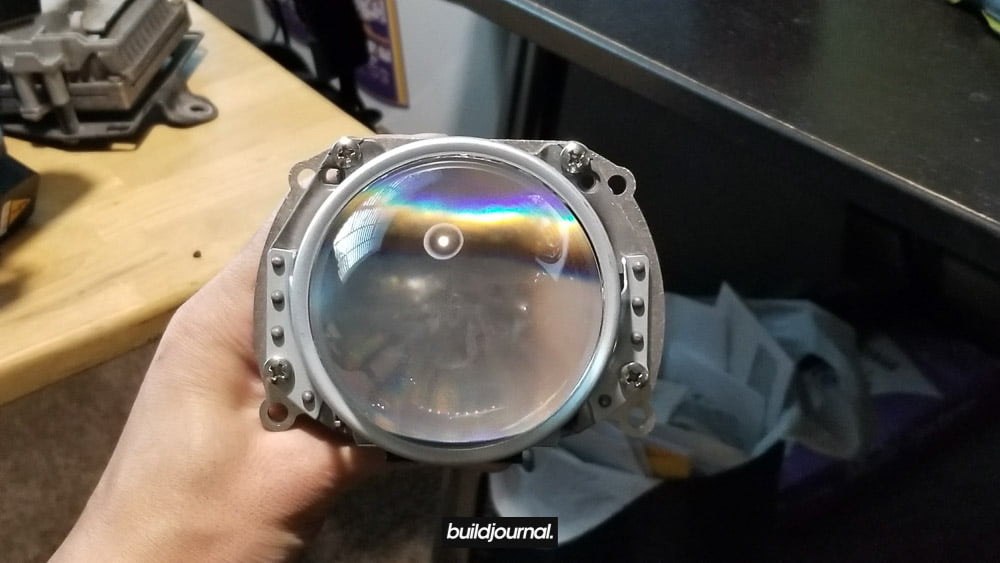
1.10, and now the projector should be out. Here is the side by side comparison with my stock projector with ZKW clear lens. (stock on left)
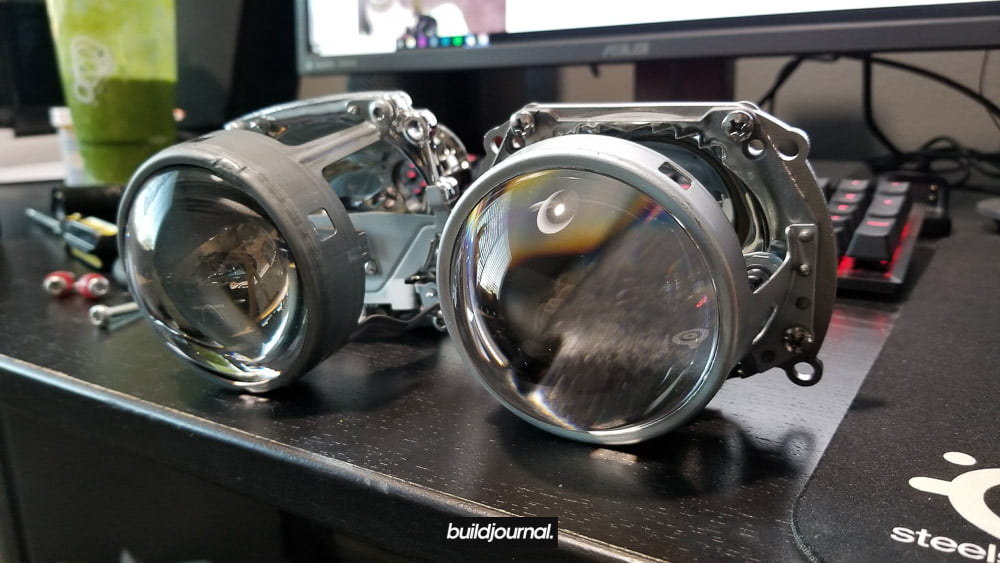
2. Install new G5-R projector
2.1, we’ll need to modify the internal piece to make the new G5-R projector fit and this will require cutting of the 3 tabs on the face of internal piece. Now there is a “cleaner” way to go about cutting and then there is my way, the lazy way. The end result with the “cleaner” method is that the projector/shroud sits a little more flush instead of sticking out a little bit. Lightwerkz calls it the recessed look and I’ve included a video at the bottom. Honestly for me, the subtle difference in gap was not worth the cutting work and risk involved so I just did the easy way.
For my method, I just dremeled the tips just about to the surface of the surround trim piece.
If you want the recessed look, you’ll want to dremel further down than pictured here.
[tg_youtube width=”1920″ height=”1080″ video_id=”jOiENJlHN7A”]
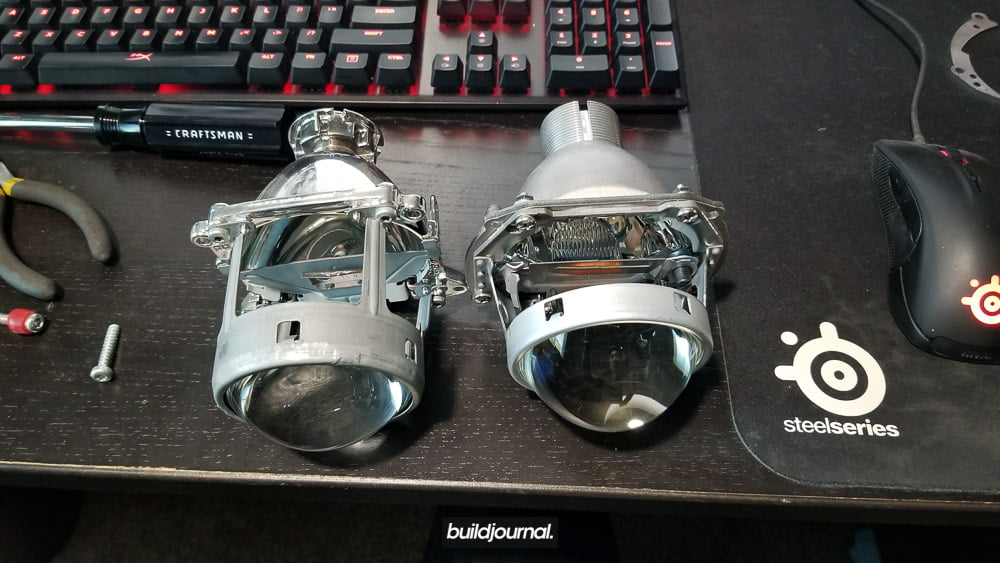
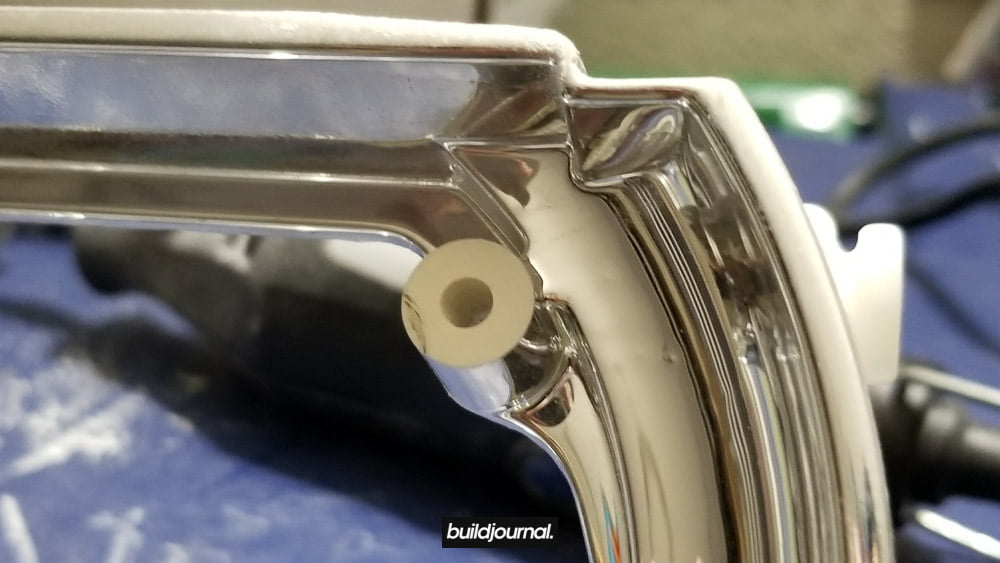
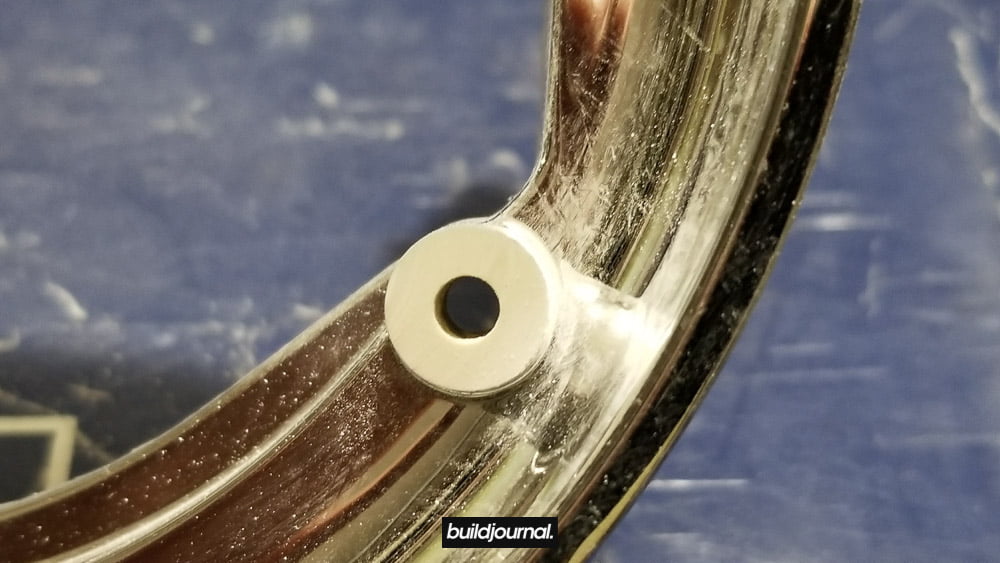
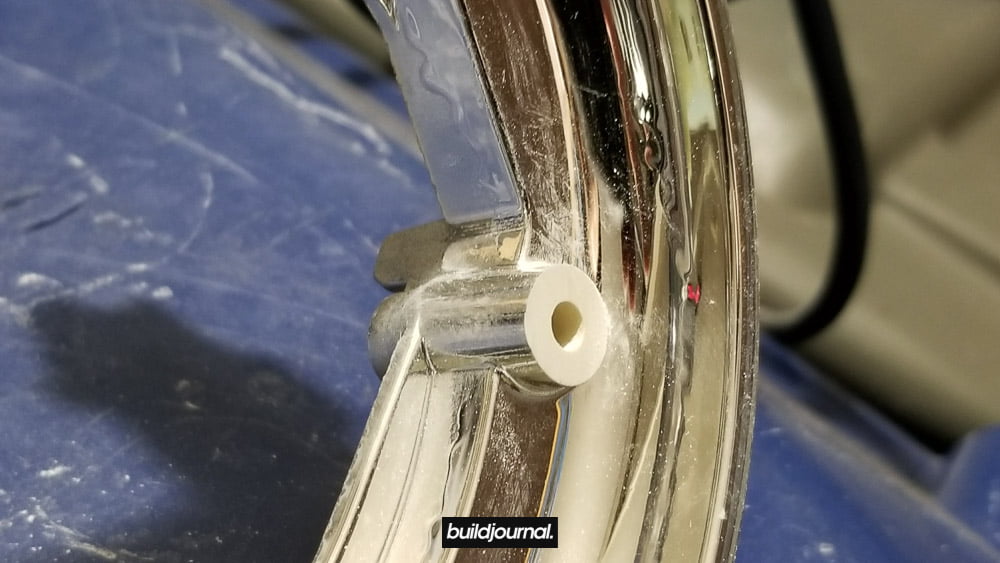
2.2, now it’s time to install the brackets onto the G5-R projector. The Lightwerkz kit doesn’t come with hardware so you’ll have to get your own.
2.3, install the brackets using the smaller M4 screws.
2.4, install project on the internal using the #8 screws and nuts. It is very important that the projector sits nice and straight/level because you can not adjust the horizontal tilt with your adjustment knobs you’ll have a crooked cutoff line if this is not straight. The fit might be tight and you may need to shave/modify the holes to get it to sit level.

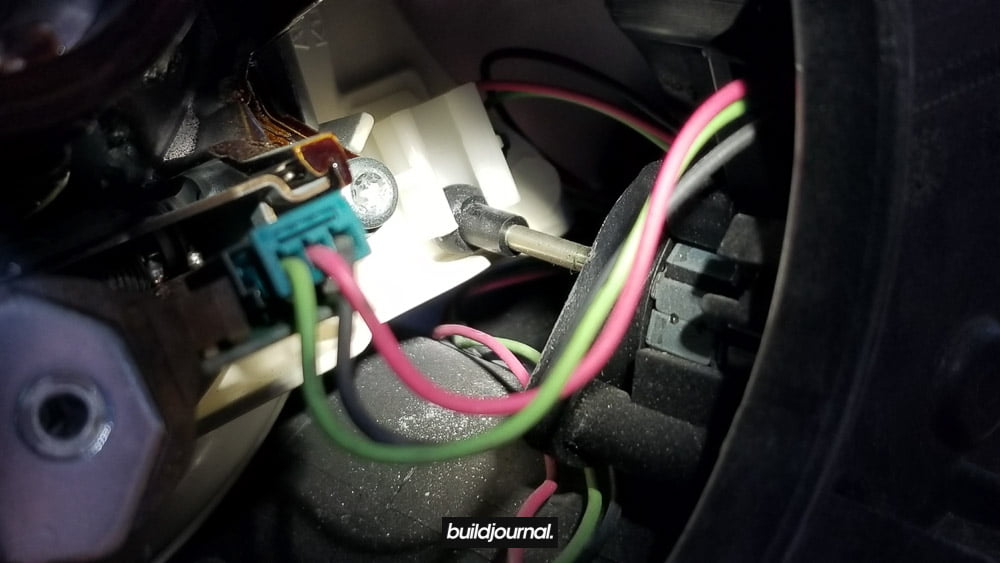
2.5, the G5-R has a 2-prong plug for the bi-xenon, but the OEM plug is a 3-prong. There is a harness supplied and we’ll need to splice the wires together. The directions I got were to splice the OEM green + black then splice it to the new connector. The pink connector splices into the new connector as well. Plug in the bi-xenon plug.

2.6, reverse the steps from uninstalling the internal to get it back in. Make sure the 2 plastic tabs catch in the screw. Important! The plastic tabs, as they go in, have their own slots in the housing. Make sure they go in properly or else your cutoff will be crooked.
2.7, out the shroud back on. For me, I re-used my stock shroud however it’s not going to fit perfectly. Lightwerkz recommends you use JB Weld the shroud onto the projector, but I decided to use 3M double side tape to improvise the mount. I don’t know if this is the most reliable route as the tape may burn, but so far it doesn’t seem to be an issue.
2.8, put bulbs back in. You’ll find some metal pieces for the bulb socket. This is how you assemble it. The spring is not pictured, but it’s between the bulb and end screw.
2.9, put the black housing insert back and the clear lens. Install back on the car!
2.10, now before you completely install the headlights back in, it’s a good idea to test the lamps to make sure they’re working and there aren’t any weird issues.
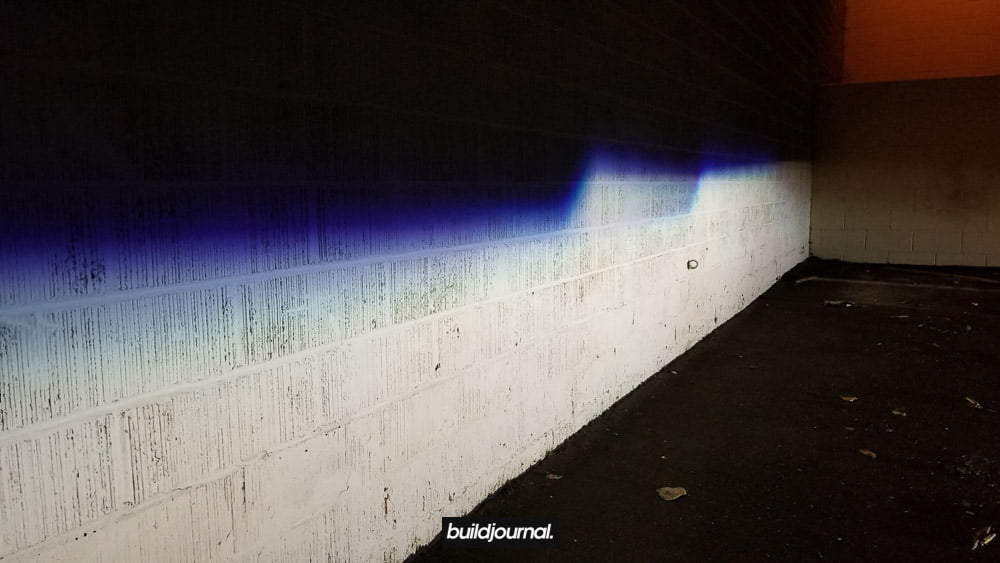
3. Align your cutoff
It’s very important you align your cutoff to DOT standard so you don’t blind oncoming traffic potentially putting you in danger. You can find an article how to to align headlights here.
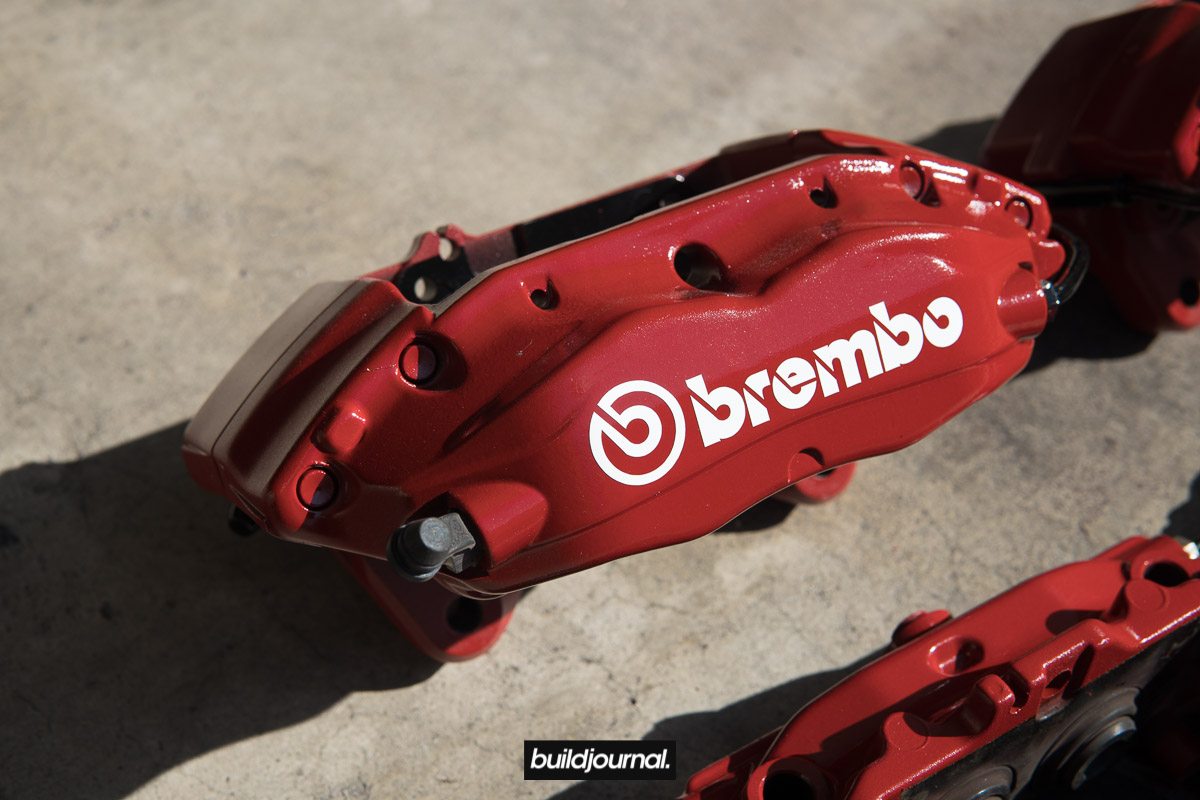
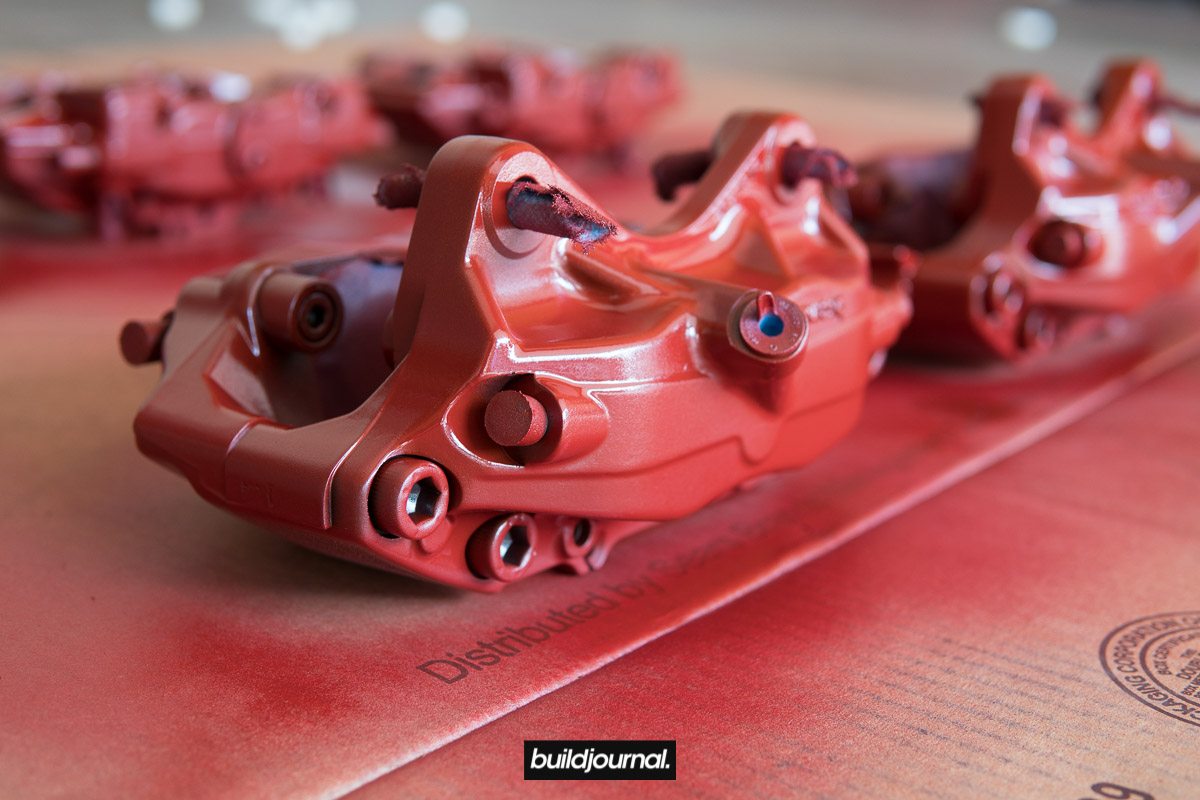
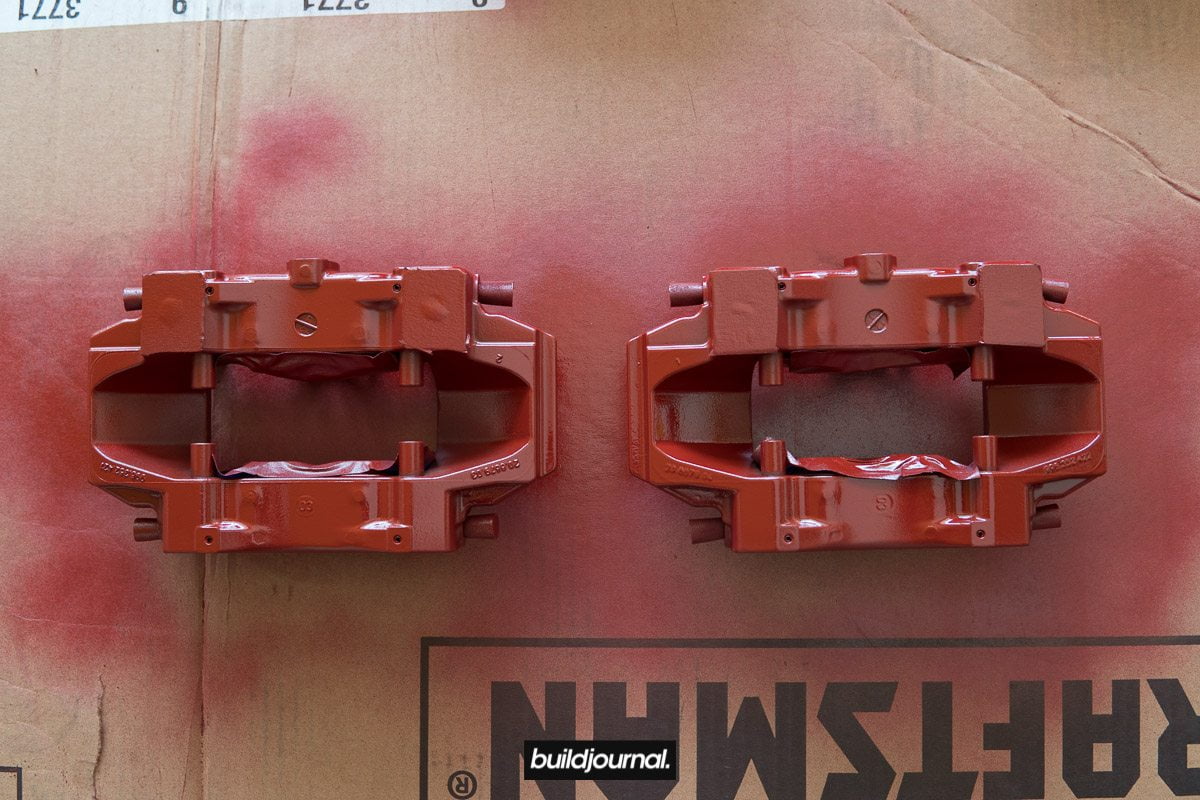
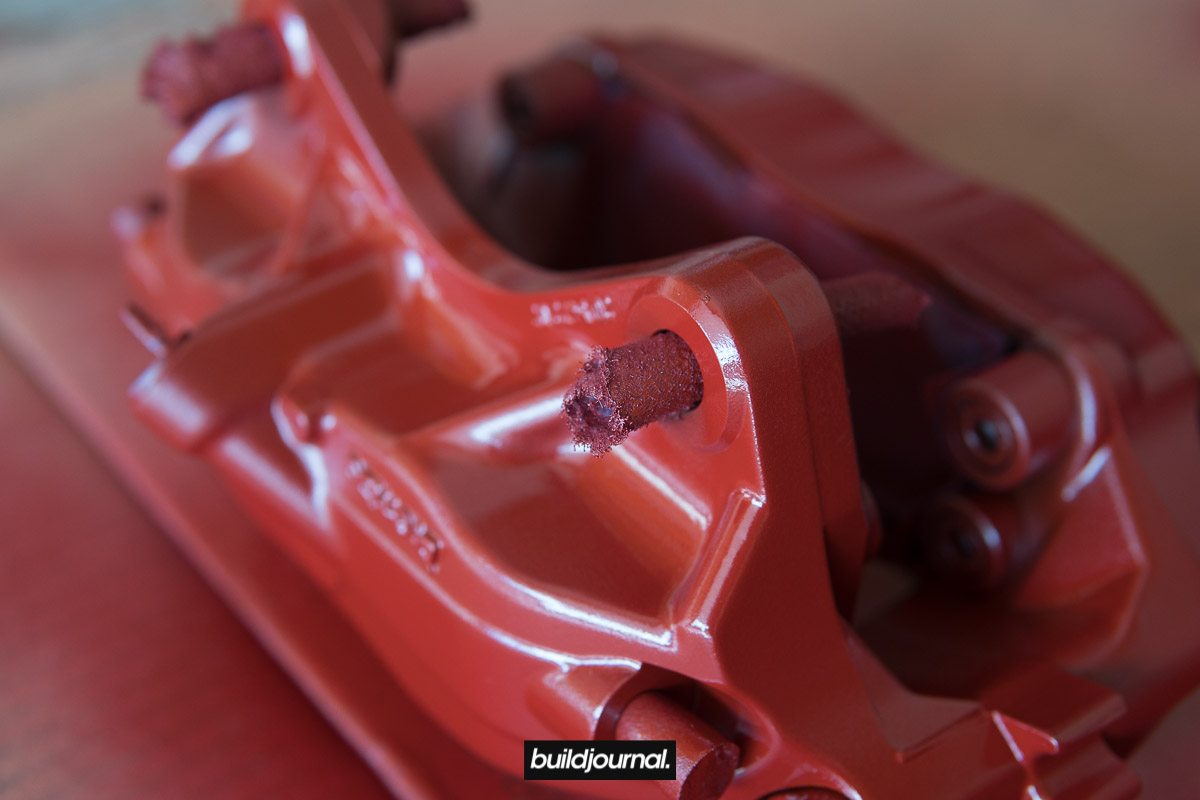
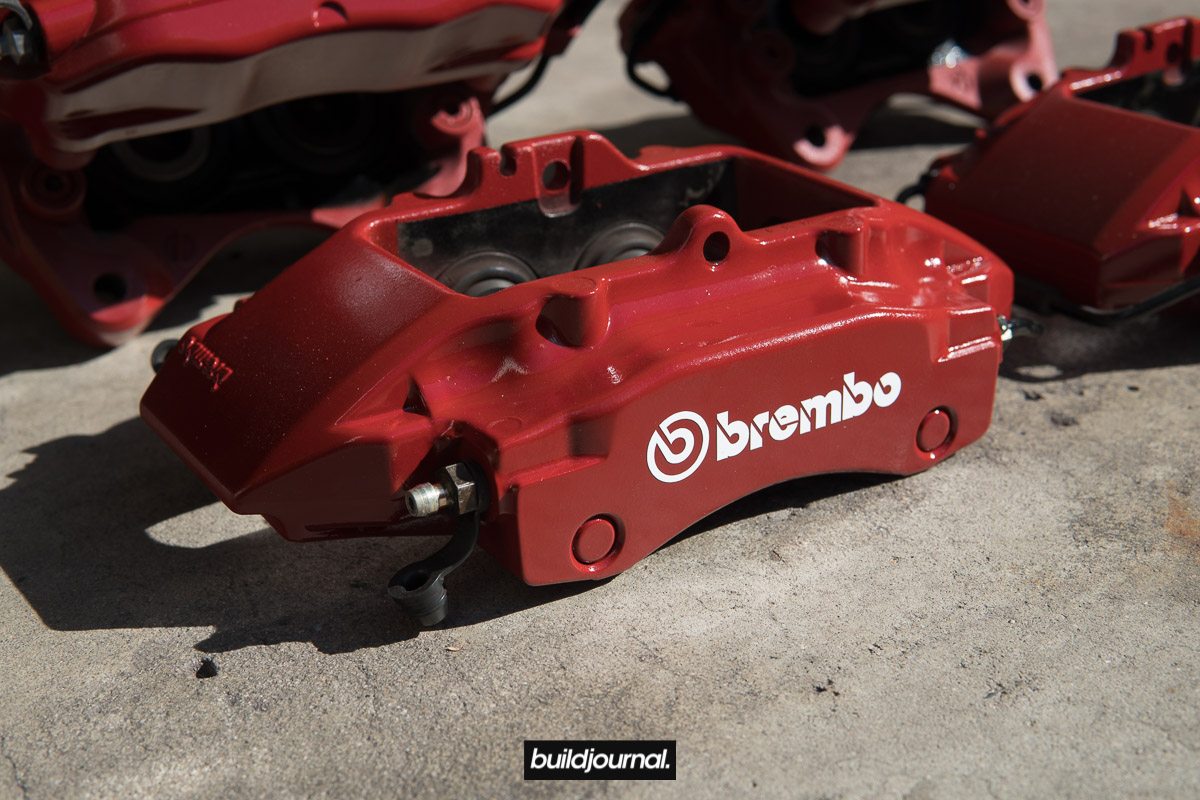
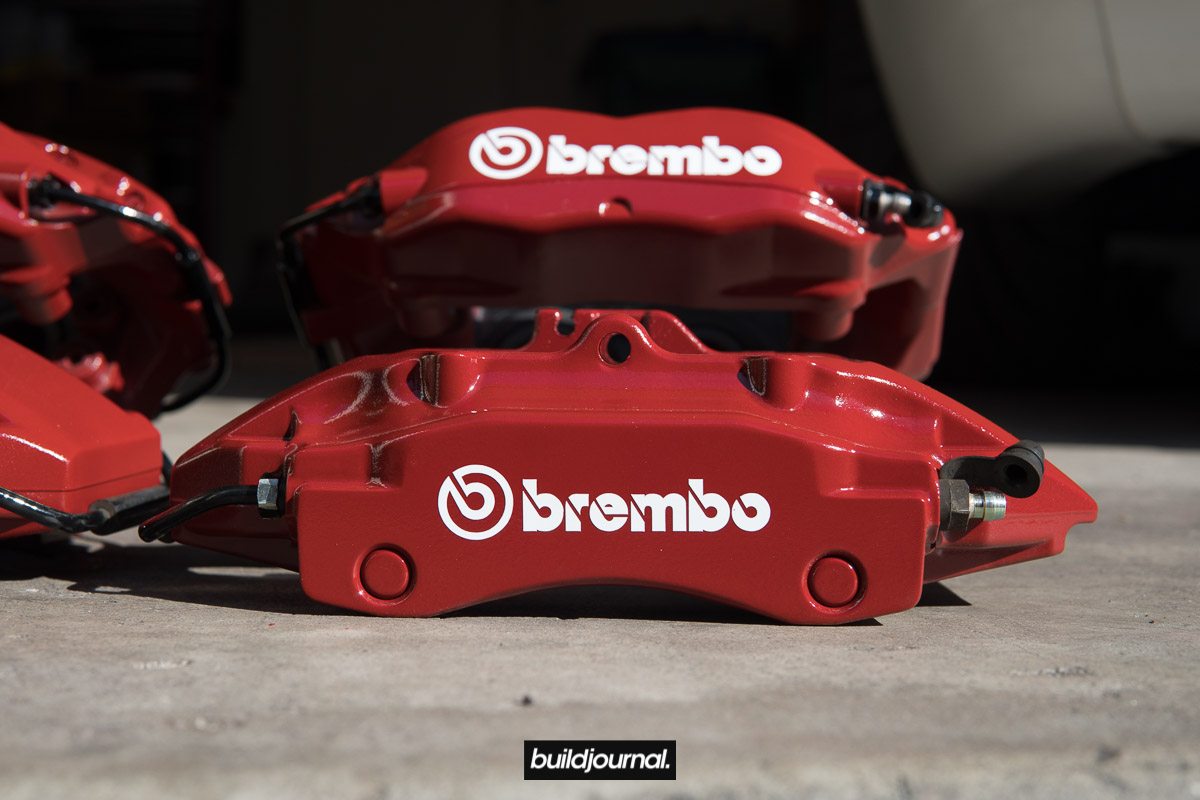
DIY: How to Paint Brake Calipers Brembo Red
I recently did a brake upgrade article on the E31 and 996 calipers for the E46 M3 and I thought I'd do a DIY on how to paint brake calipers. As brake calipers age, the paint also ages and the surface will clearly show fading of the clear coat. Some of you may even have damaged base coat that deserves a much needed respray. Powdercoating is also a popular option, but for those that don't want to deal with taking apart the caliper and seals, spray painting the brake calipers is the way to go. As long as you put in the proper prep work and take your time with coats, the results can be really good.
Things you need
Paint prep your brake calipers
1.1, disassemble E31/996 calipers including brake lines, bleeder valves, hard line (optional)
1.2, plug brake fluid and bleeder valves so paint doesn't get in there
*Pro tip: earplugs are cheap and they work great for plugging
1.3, sand surface of caliper with 400 grit sandpaper if your calipers are already painted. If your calipers are raw, a simple wire brush to remove dirt and grime will do.

1.4, clean calipers with brake cleaner and soap water getting as much dirt off as you can
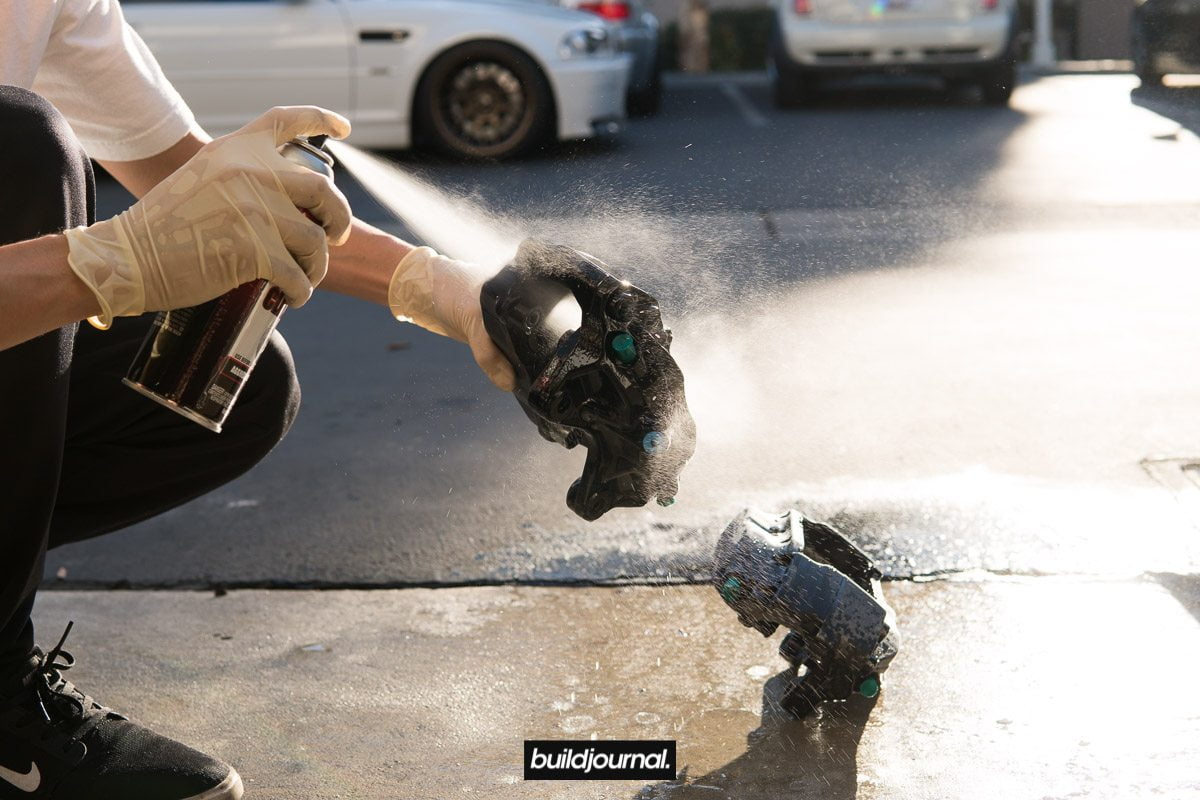
Paint your brake calipers
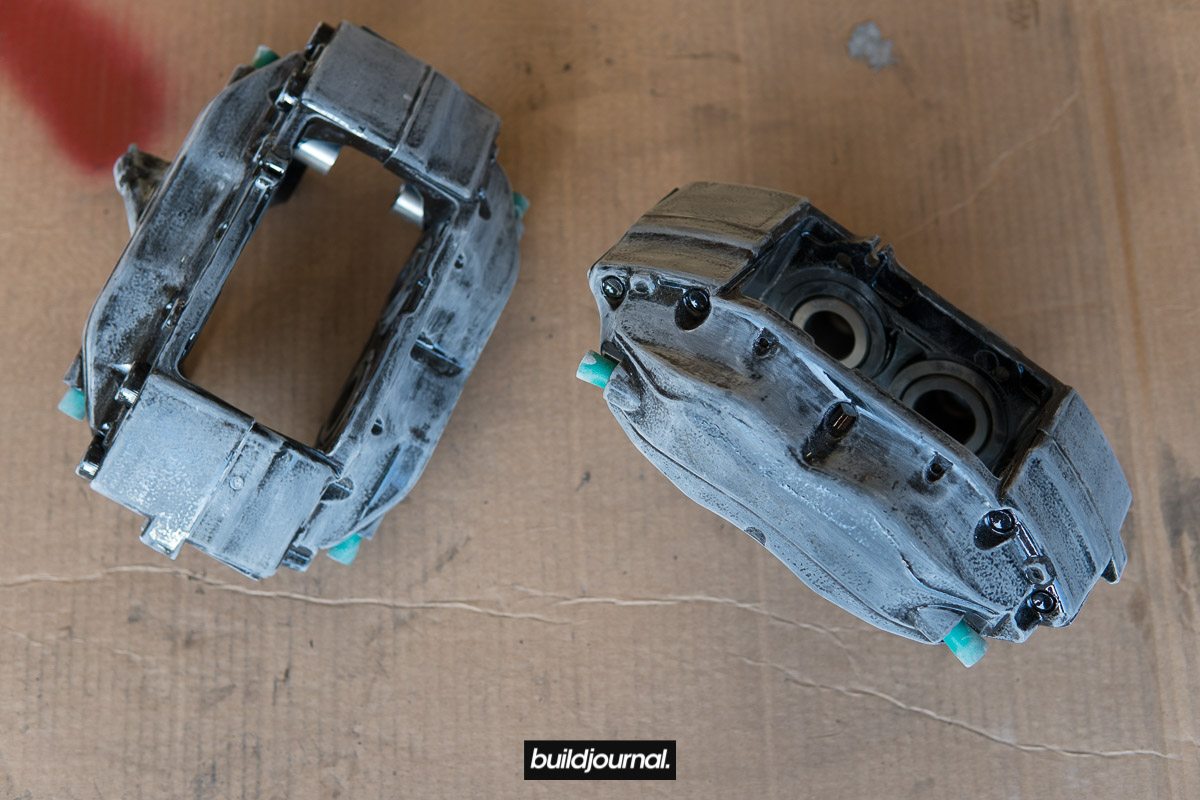
2.1, once fully dry mask off caliper pistons, carrier bolt holes and the mounting surface on your calipers
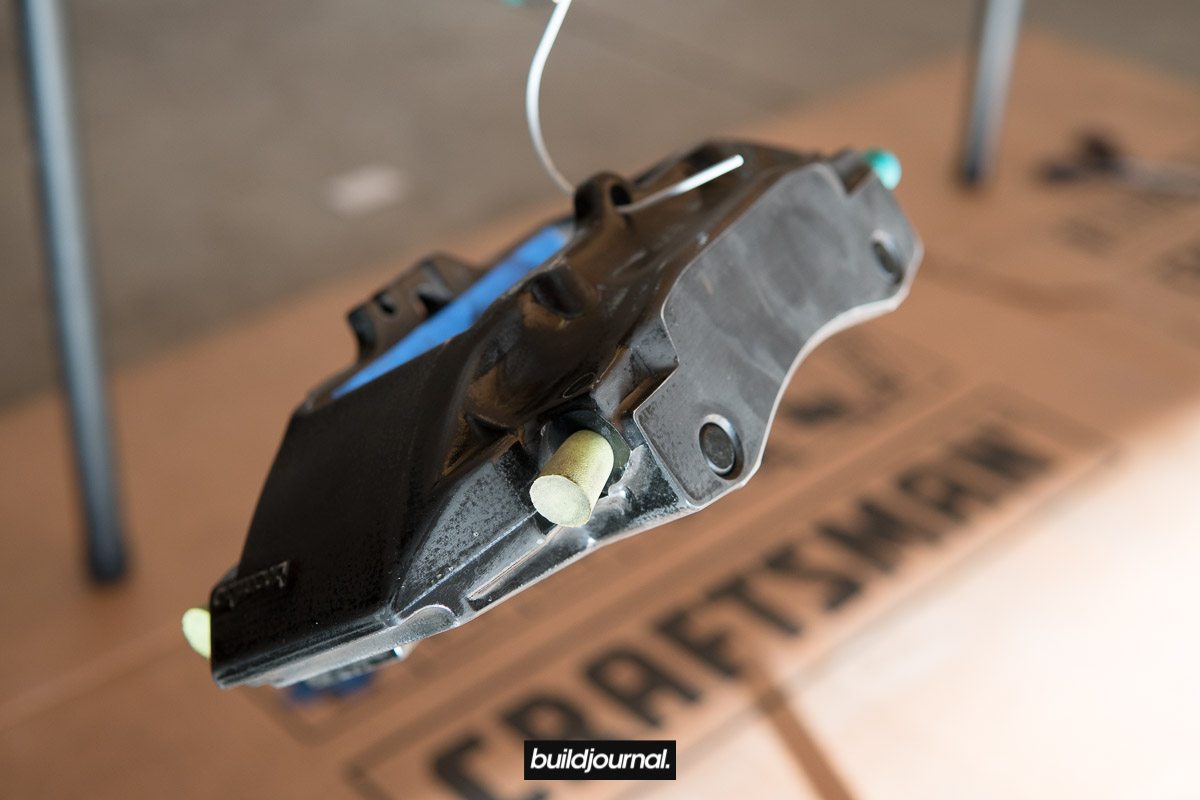
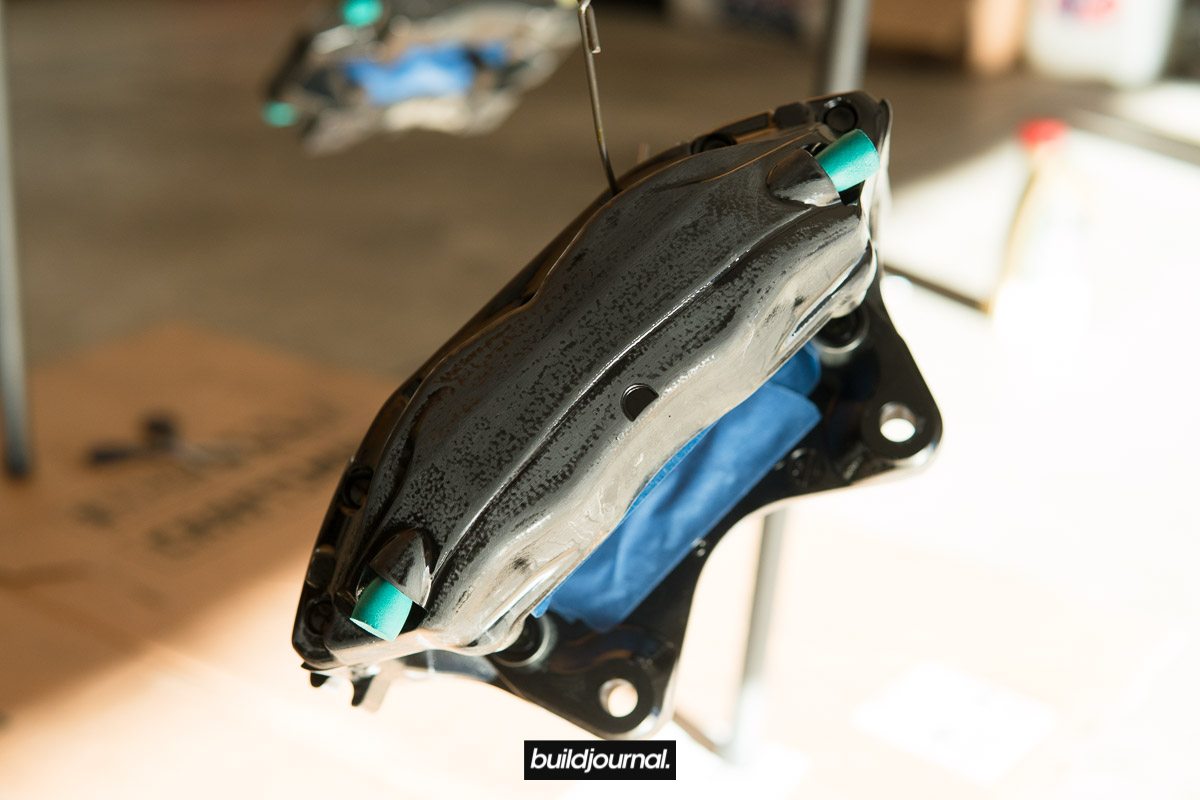
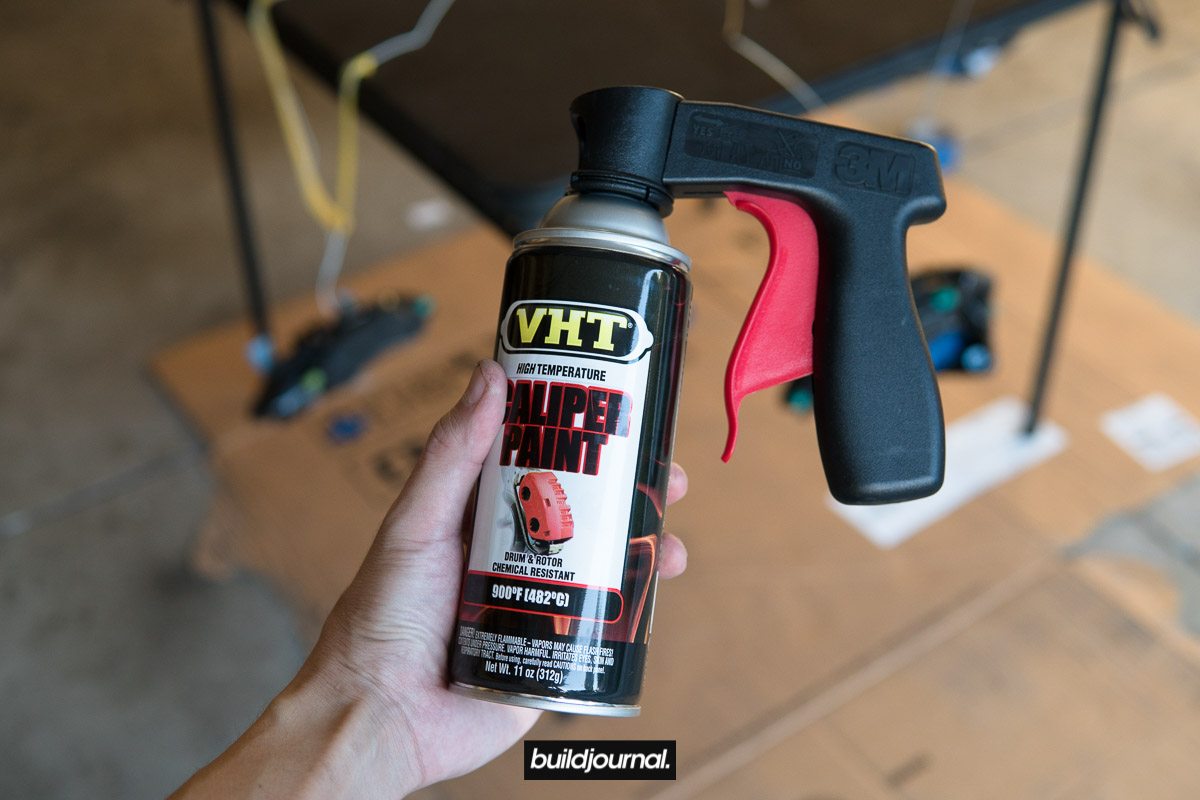
2.2, you can now start spraying light layers of paint; I did 5 layers of VHT red with 10 minutes of dry time between each coat (notice all the areas I masked off)
2.3, after the base paint has dried, put Brembo decal on and spray 2 light coats of clear
2.4, once fully dry (refer to instructions on paint can) reinstall bleeder valves and remove masking
2.5, you have the option to bake them to properly cure the paint (VHT bake at 200°F for 1 hour)
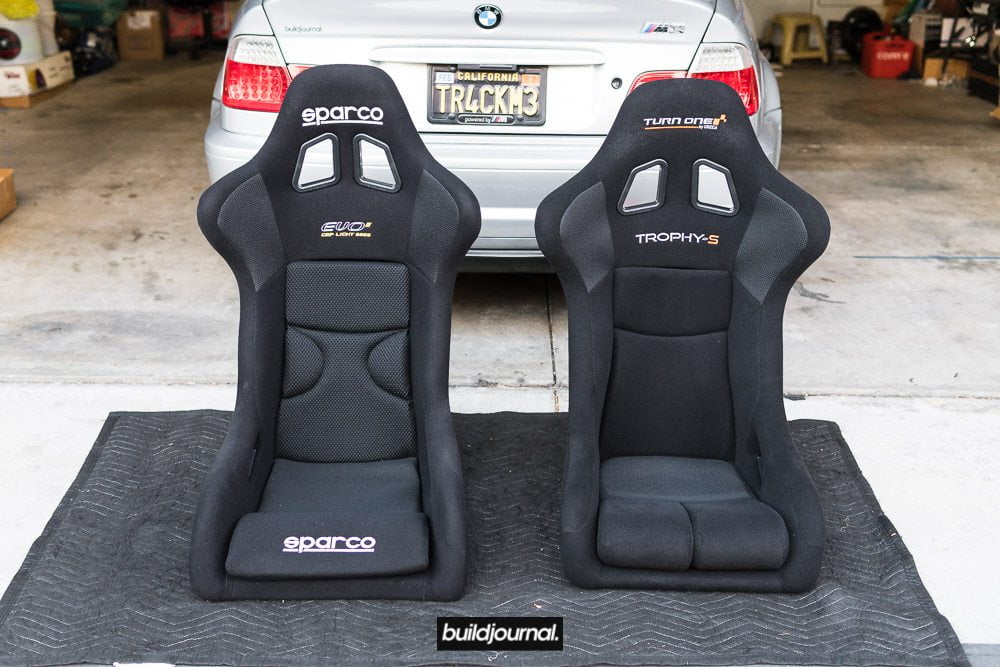
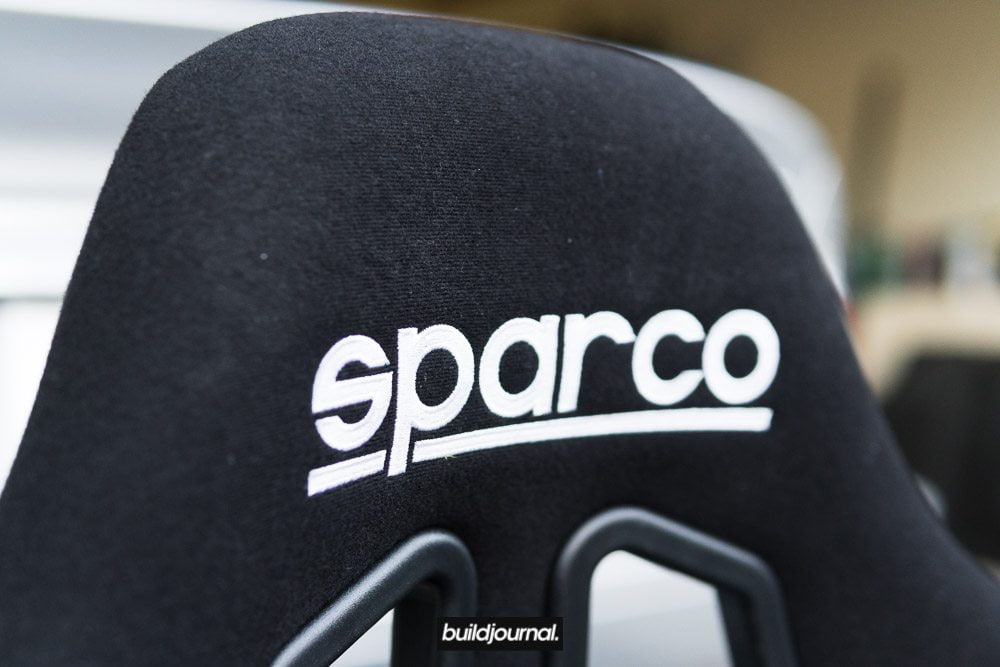
Sparco EVO Bucket Seat for $570 Brand New
If you're looking for bucket seats and want to save a few hundred dollars on a set of Sparco EVO's, this read is for you. Everyone wants Recaro seats. Pole Position, Profi SPG, or maybe the Sportsters, but you're gonna have to shell out some cash money to get those. While shopping for seats, we came across an interesting find as an alternative. They're basically Sparco EVO (FIA approved) seats for $450 brand new.
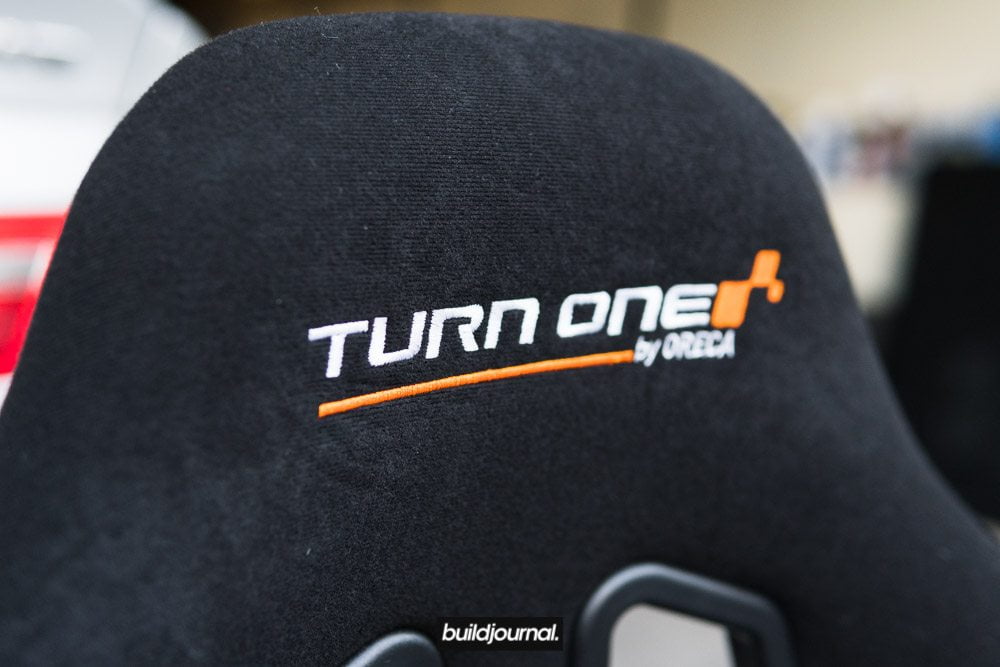
What is Turn One by Oreca?
Now, they're not exactly branded Sparco, but it's made by Turn One by Oreca. Yes, the Oreca you probably heard of if you're into racing. If you don't know them, look them up. Turn One makes all sorts of racing gear including helmets, racing suit, steering wheels, seat belts, etc. and they're pretty big in Europe. That's why we know little about these here in the states.
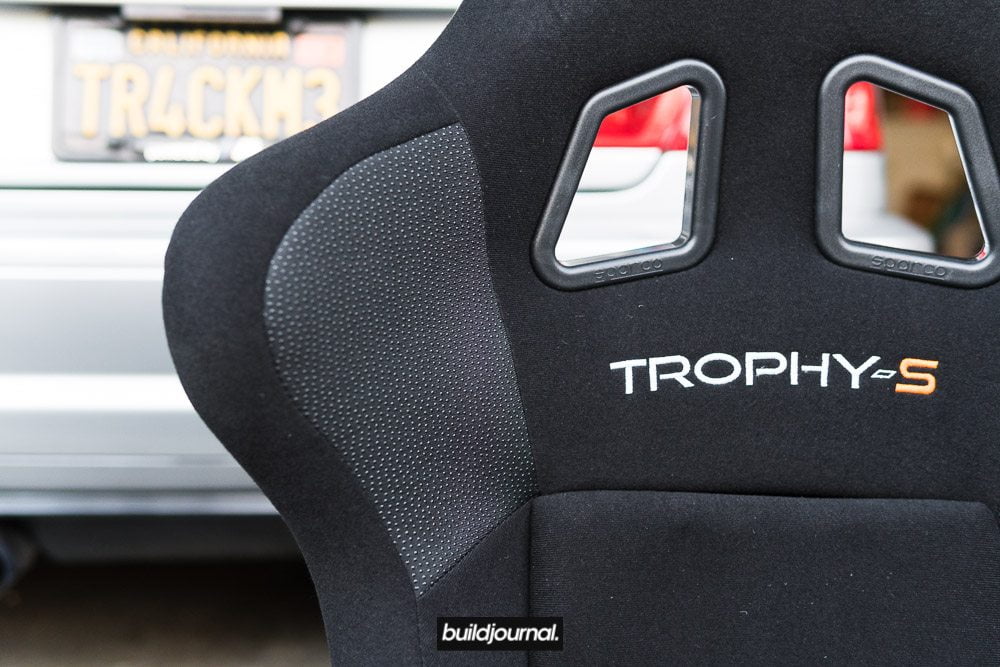
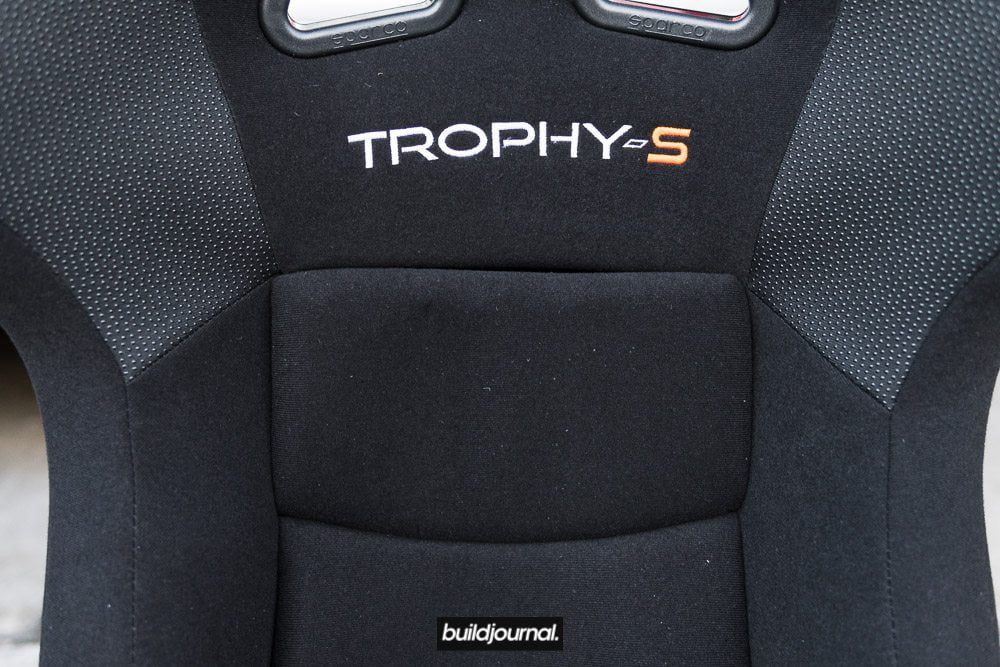
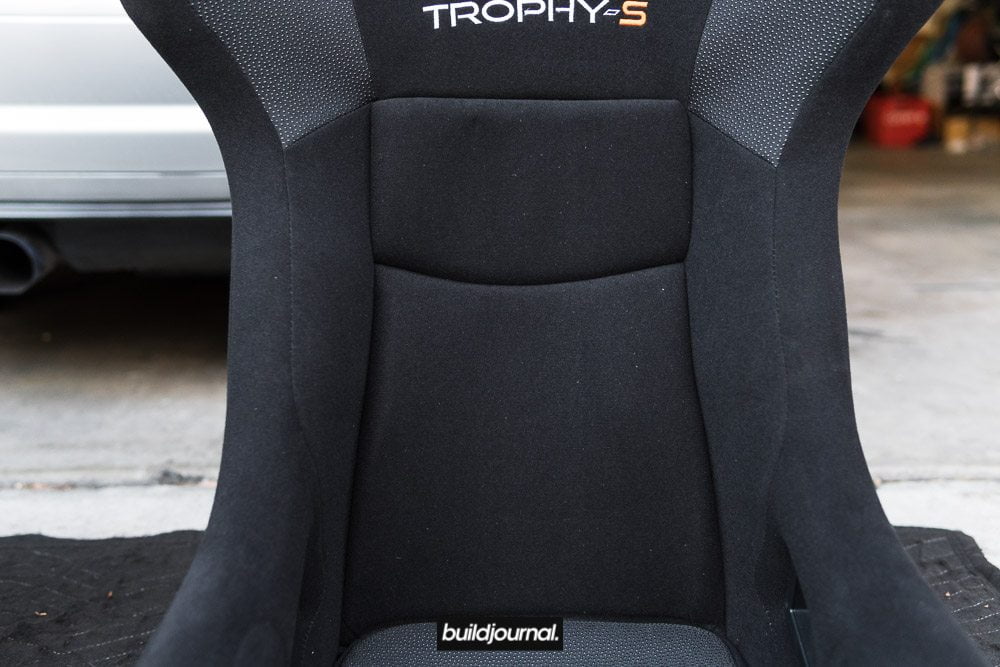
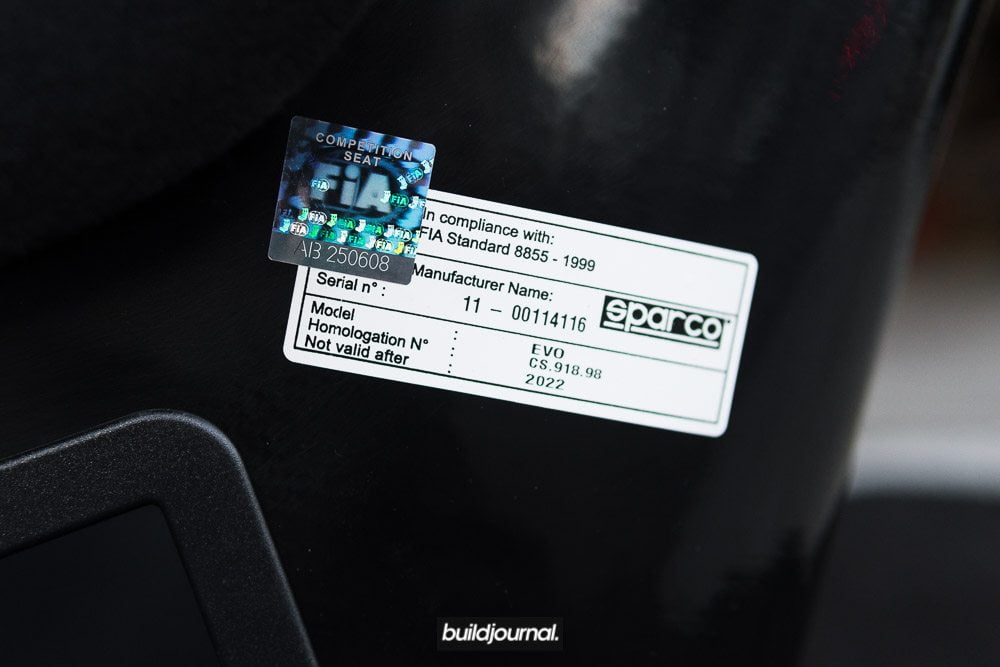
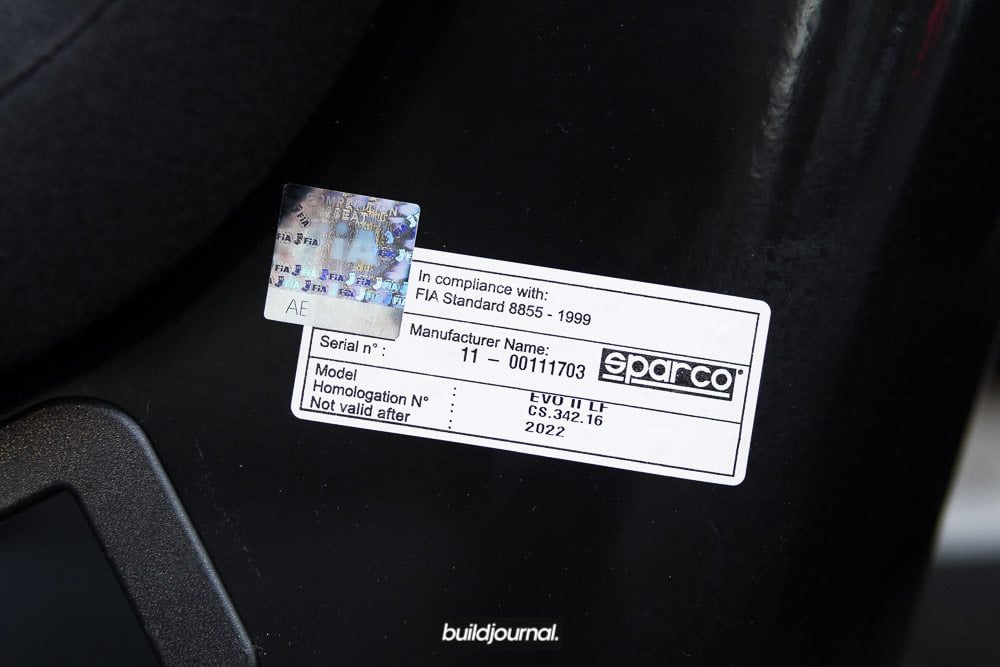
The seats we eyeballed are called Turn One Trophy-S (FIA 8855-1999 Approved). After researching a bit more, it turns out they're rebranded Sparco EVOs. Like straight from Sparco's factory. It even has all the Sparco stickers on the seat. We're not sure why it's so cheap, but the price was pretty attractive so Oscar bought a set for his car. The only thing about obtaining these seats is that they're shipped from Europe so shipping does get a little expensive. See below for cost breakdown.
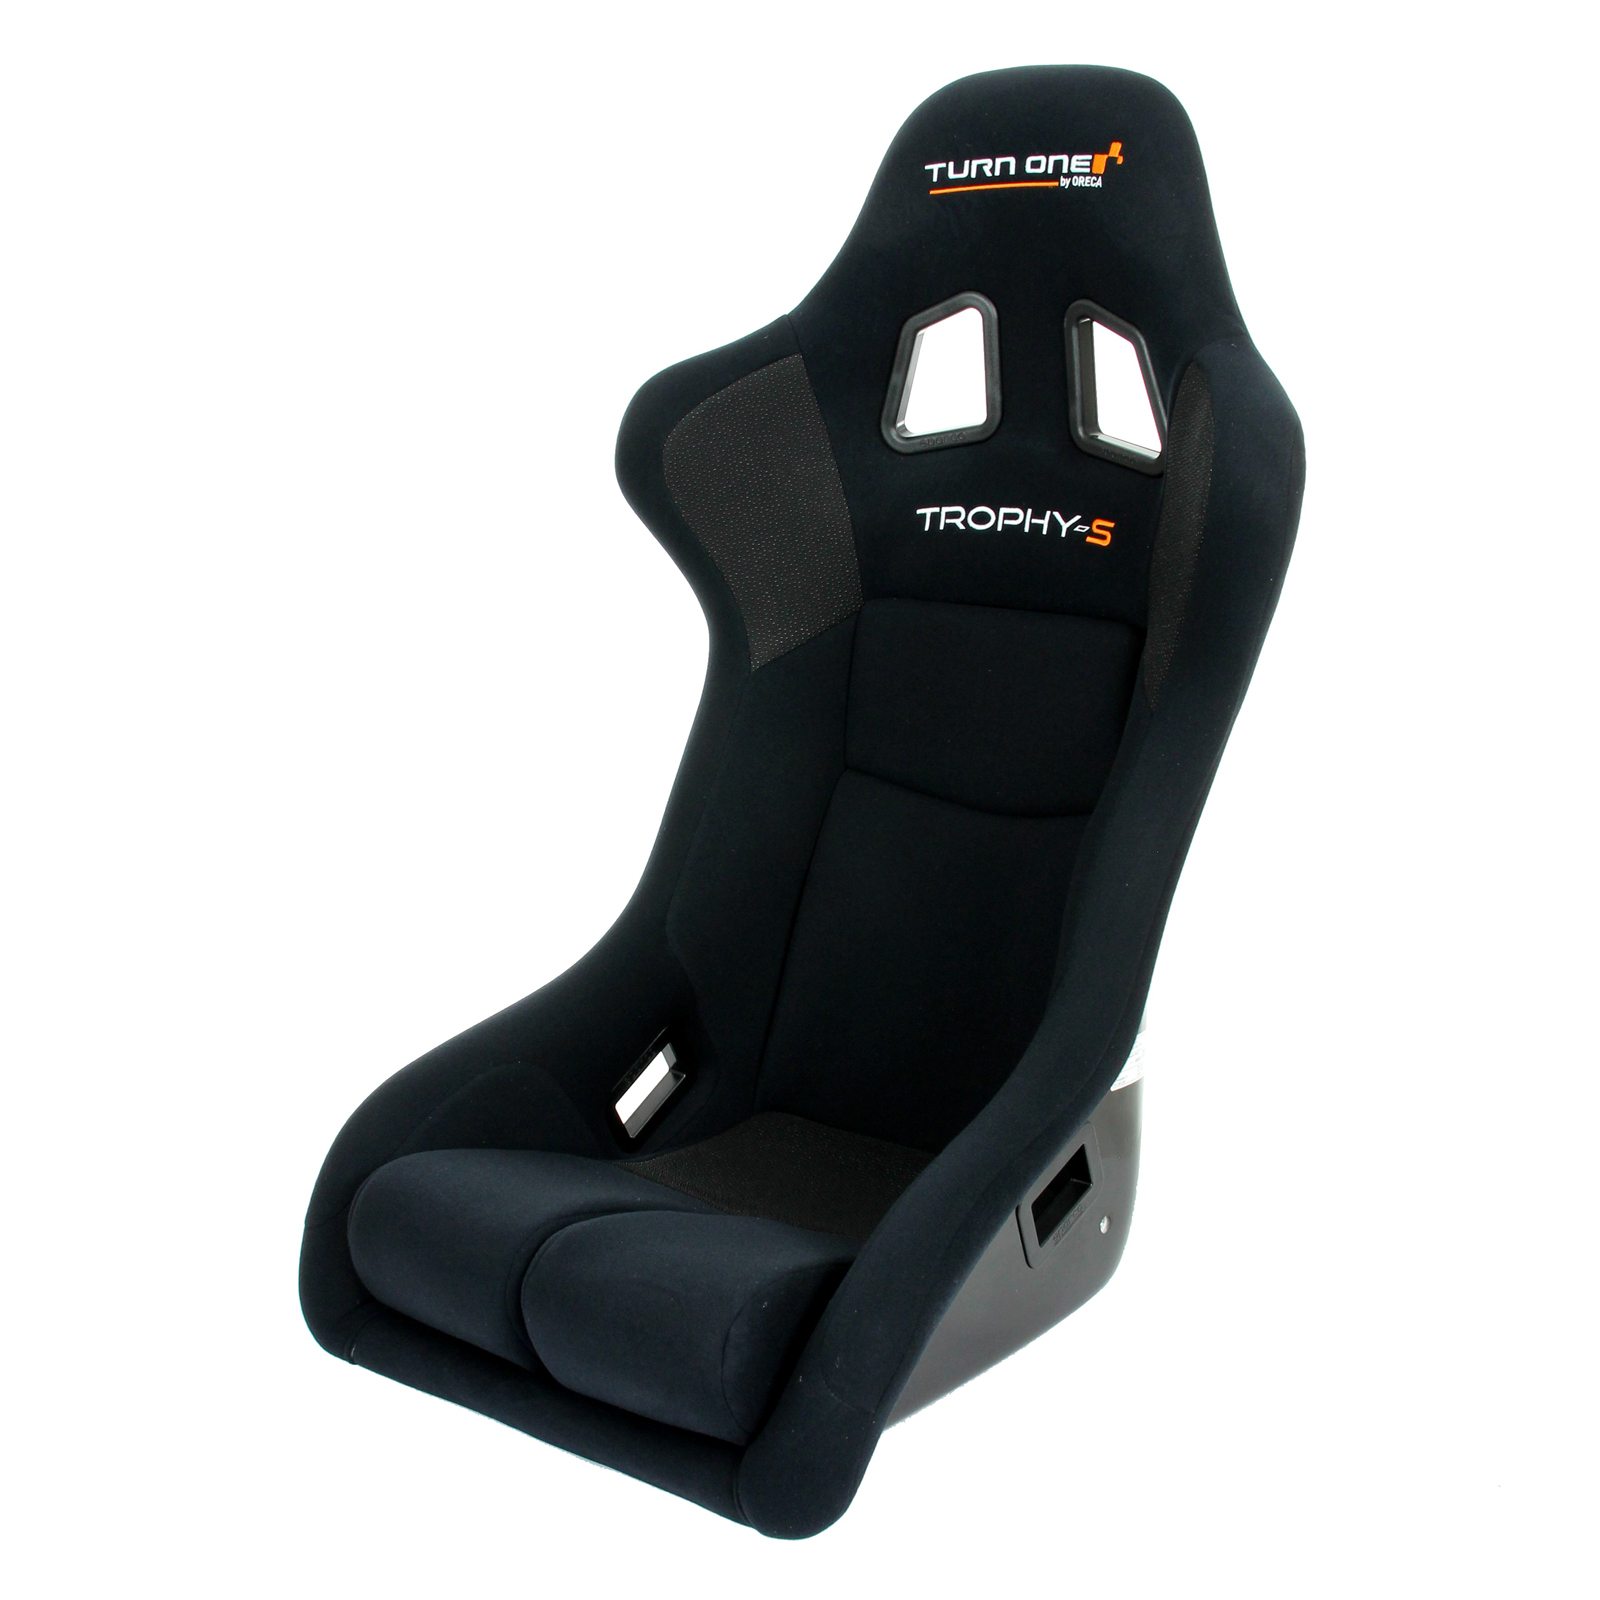
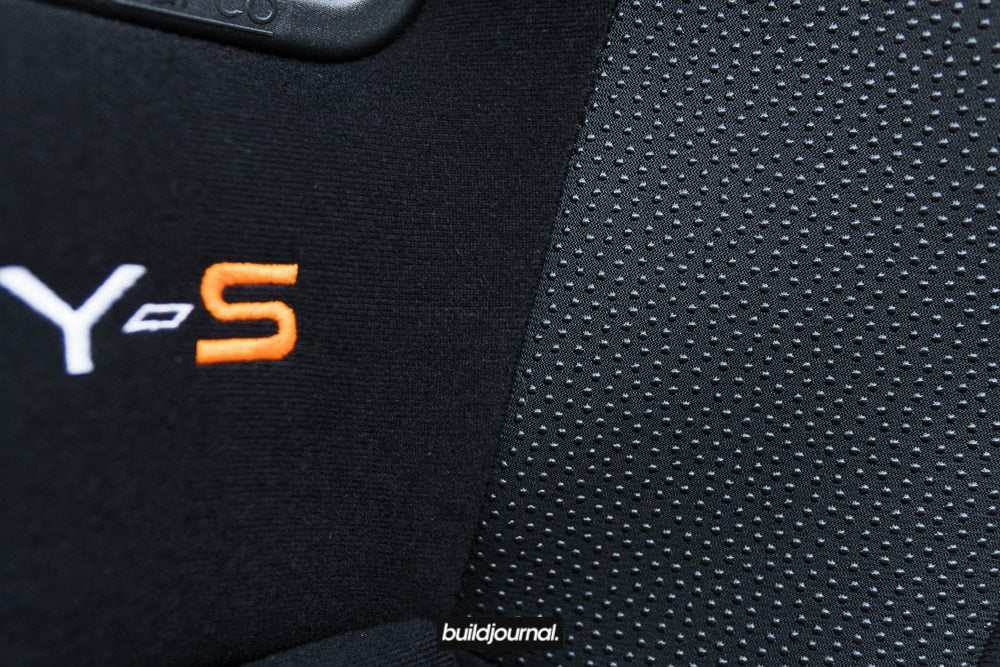
Turn One Trophy-S
- Part Number: 8OR00807FTN
- Seat Shell Size: Standard
- Construction: Fibreglass
- Seat Design: Non Head Protection
- Mountings: Side Mounts
- Homologation: FIA 8855-1999 Approved
Let's see the comparison
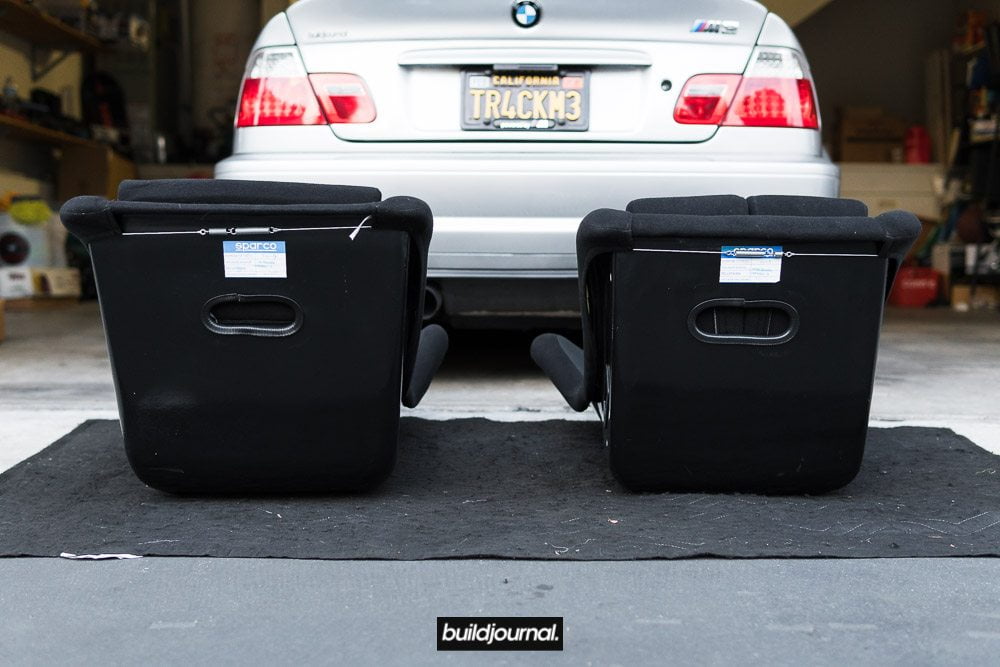
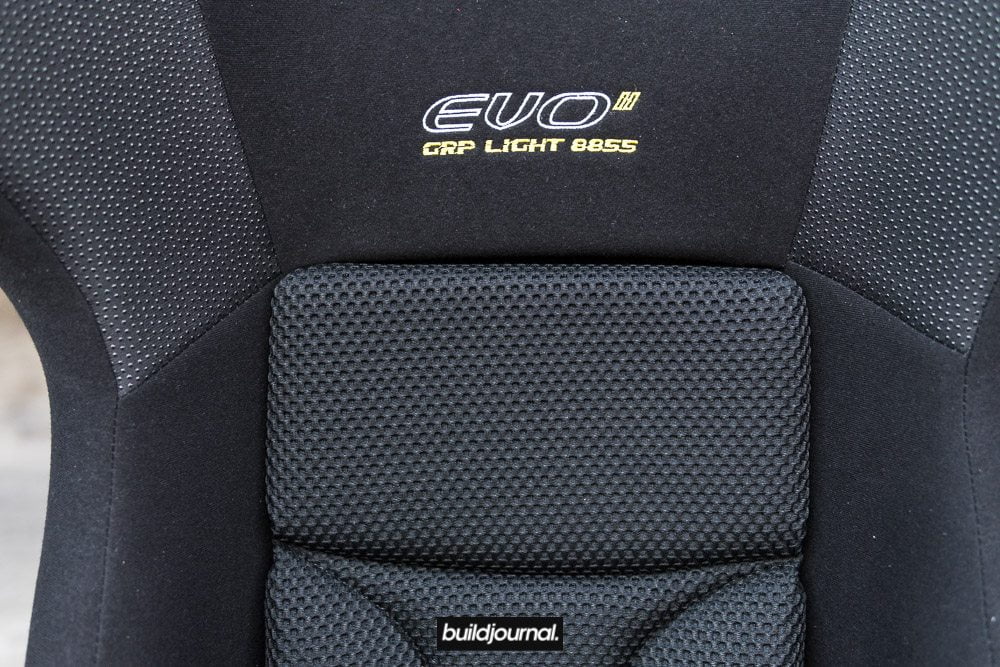
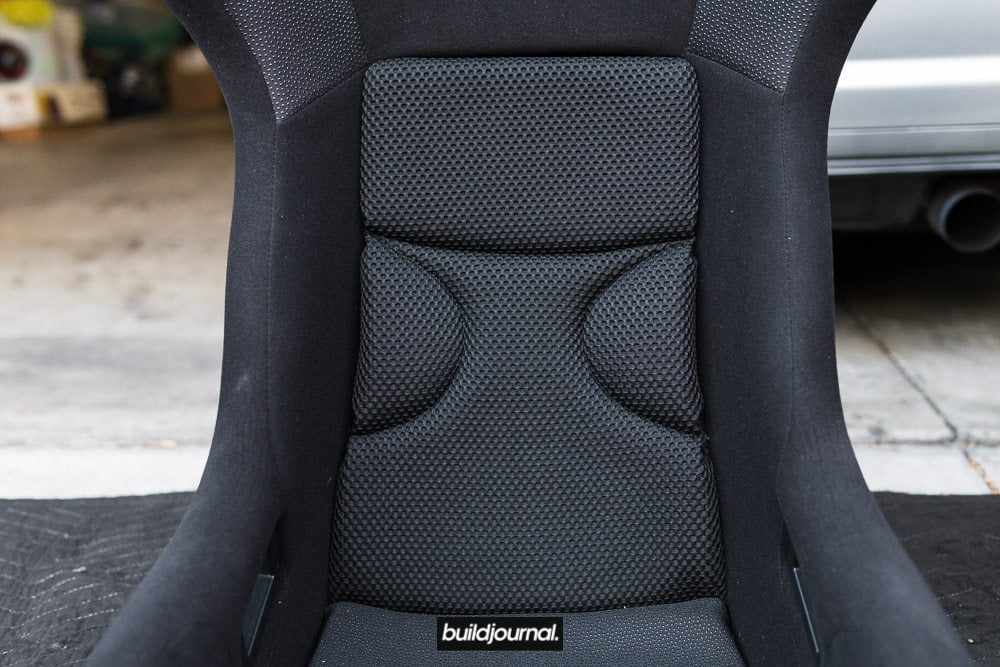
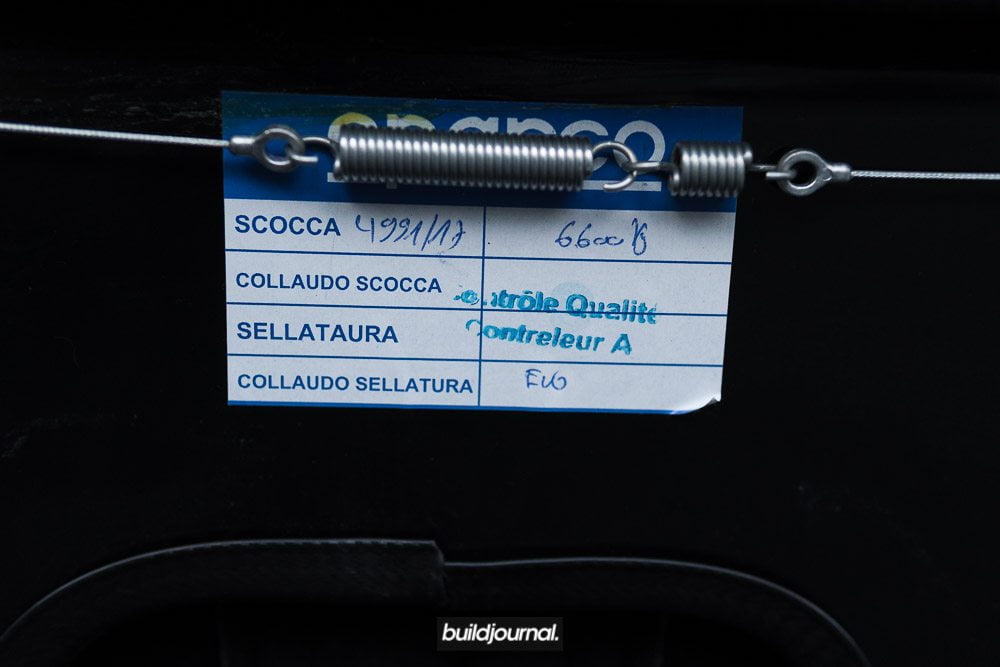
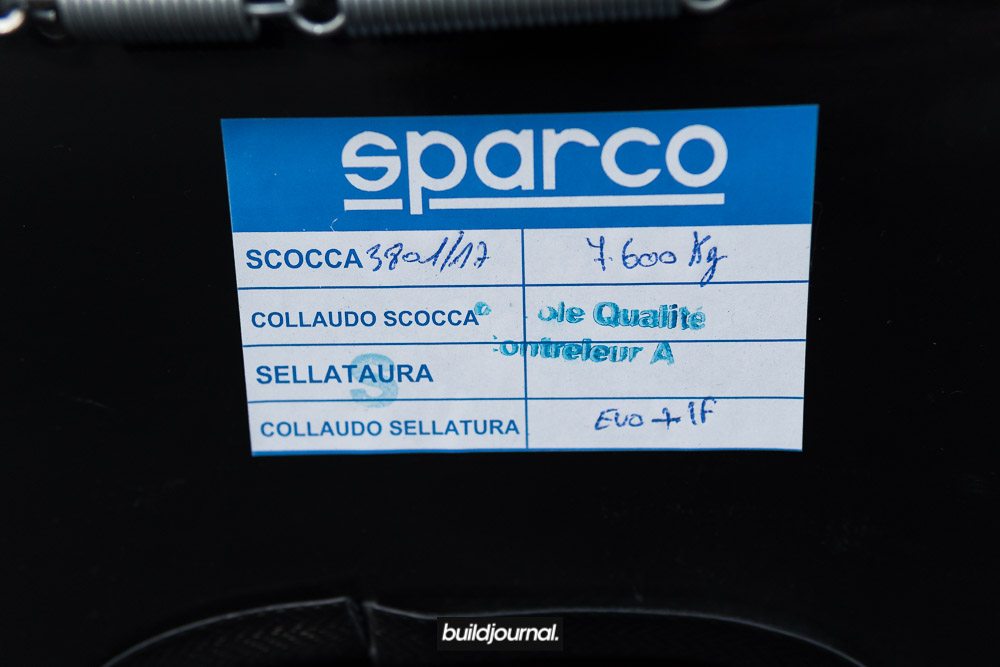
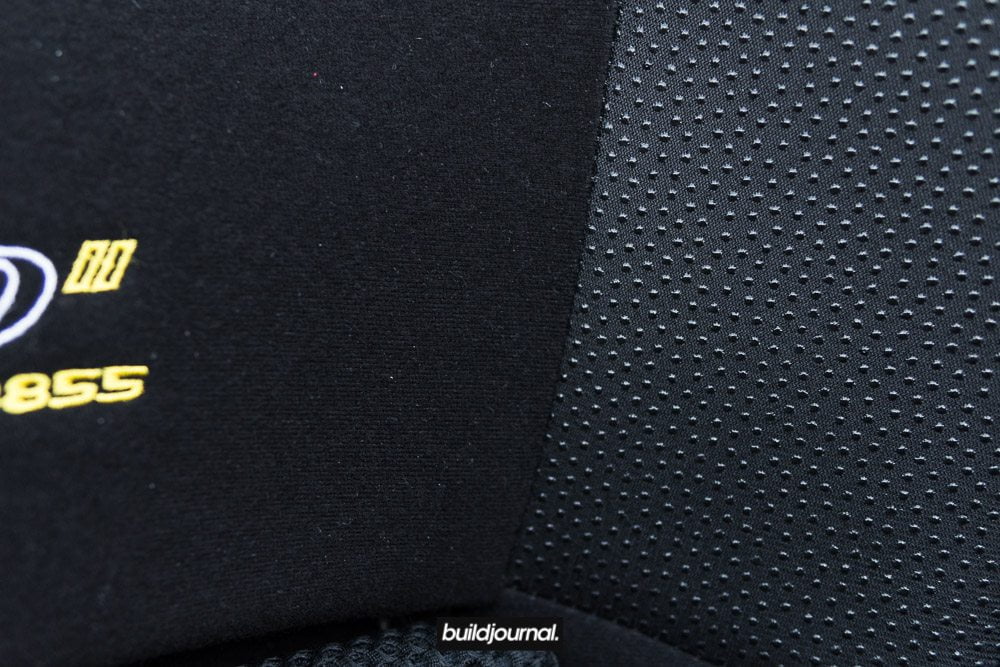
It was fortunate timing to have a set of actual Sparco EVO II seats that I was going to put in my car, so I wanted to do a side-by-side pictorial to show the similarities of these seats. Now, the Sparco EVO II is a bit different than the regular EVO so there are minor differences, but you'll see below that they're very similar.

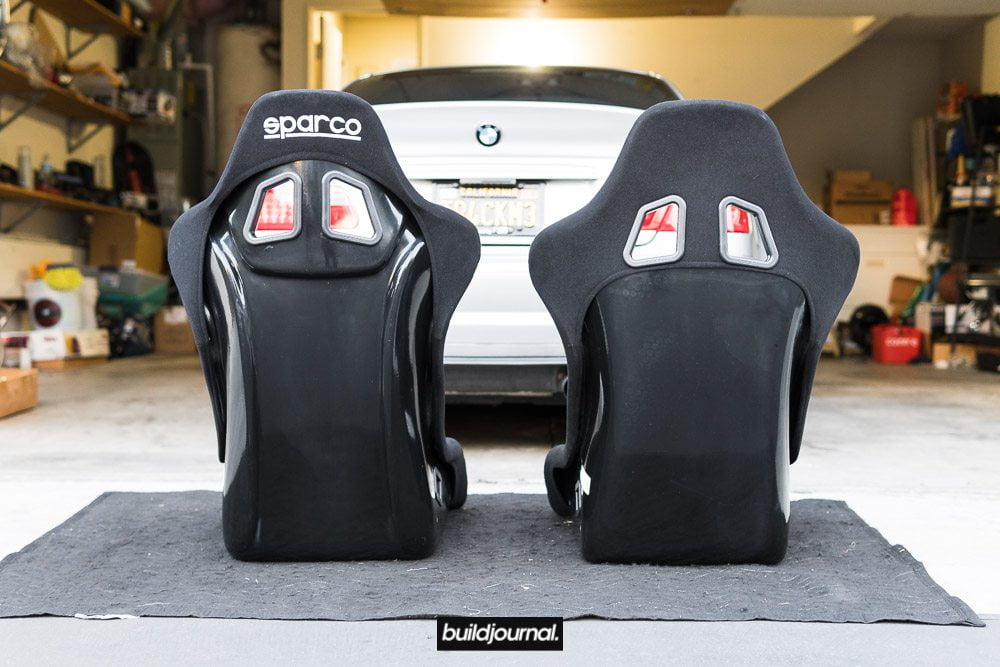


Okay, so how much does it cost?
On RallyNuts Motorsport's website the price is £339.00 (no 20% VAT for US). This translates to $453.39 USD per seat + $232 USD for shipping. Although the price per seat is cheap, the shipping really adds a lot so we think it's only worth it if you buy 2 seats. For 2 seats the total comes out to $1,139.64 total, which is $569.82 per seat with international shipping included. Still not bad for some Sparco EVO's right? Let us know what you think in the comments below.
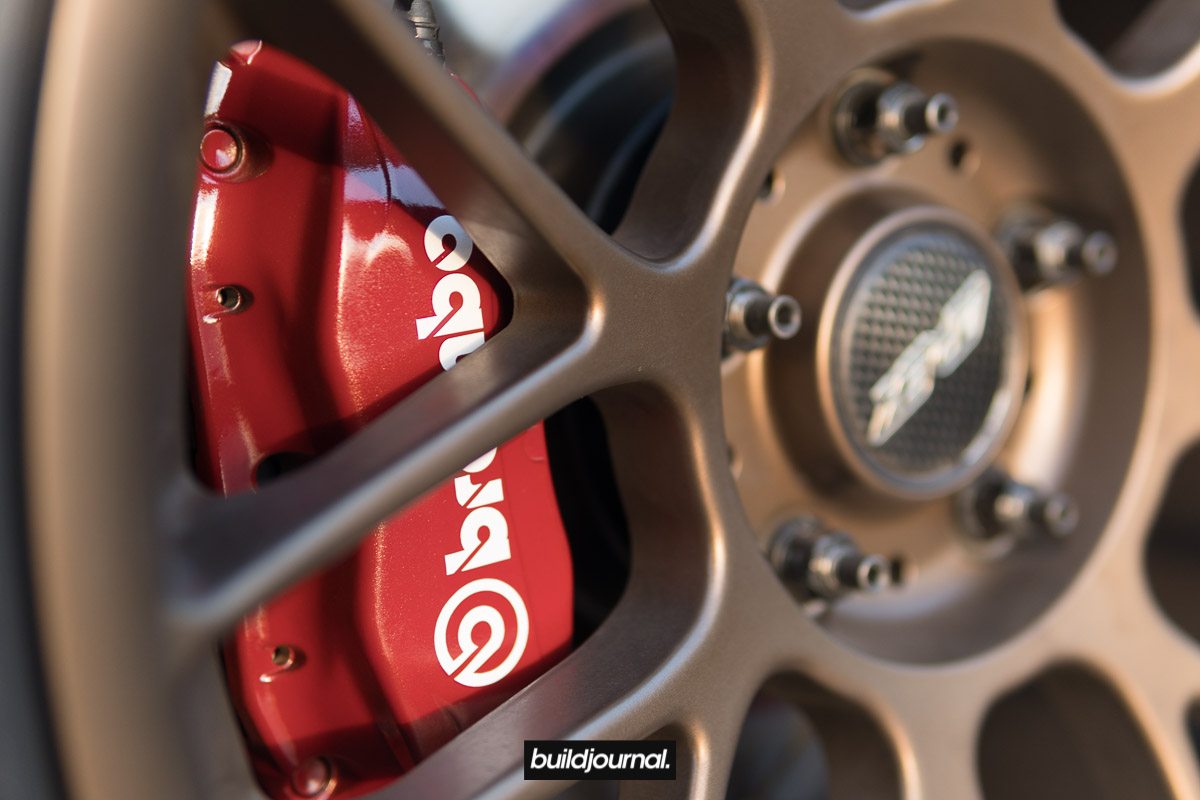
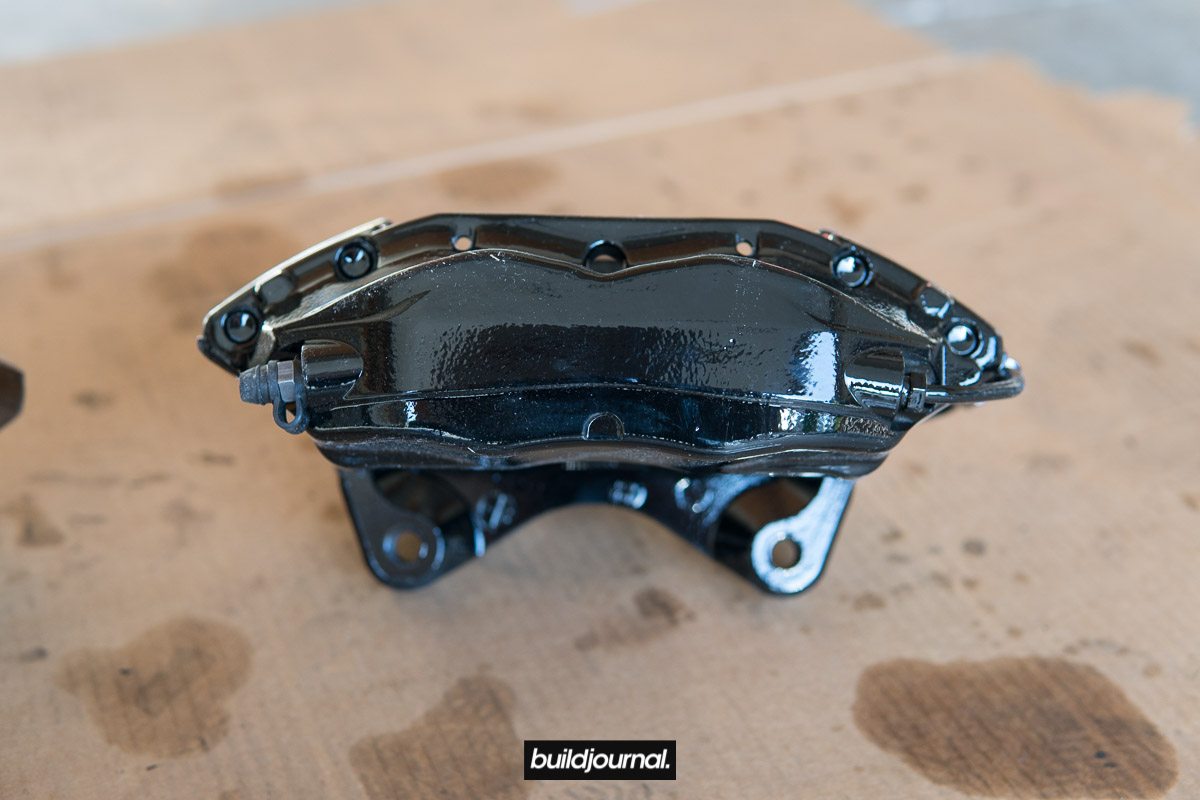
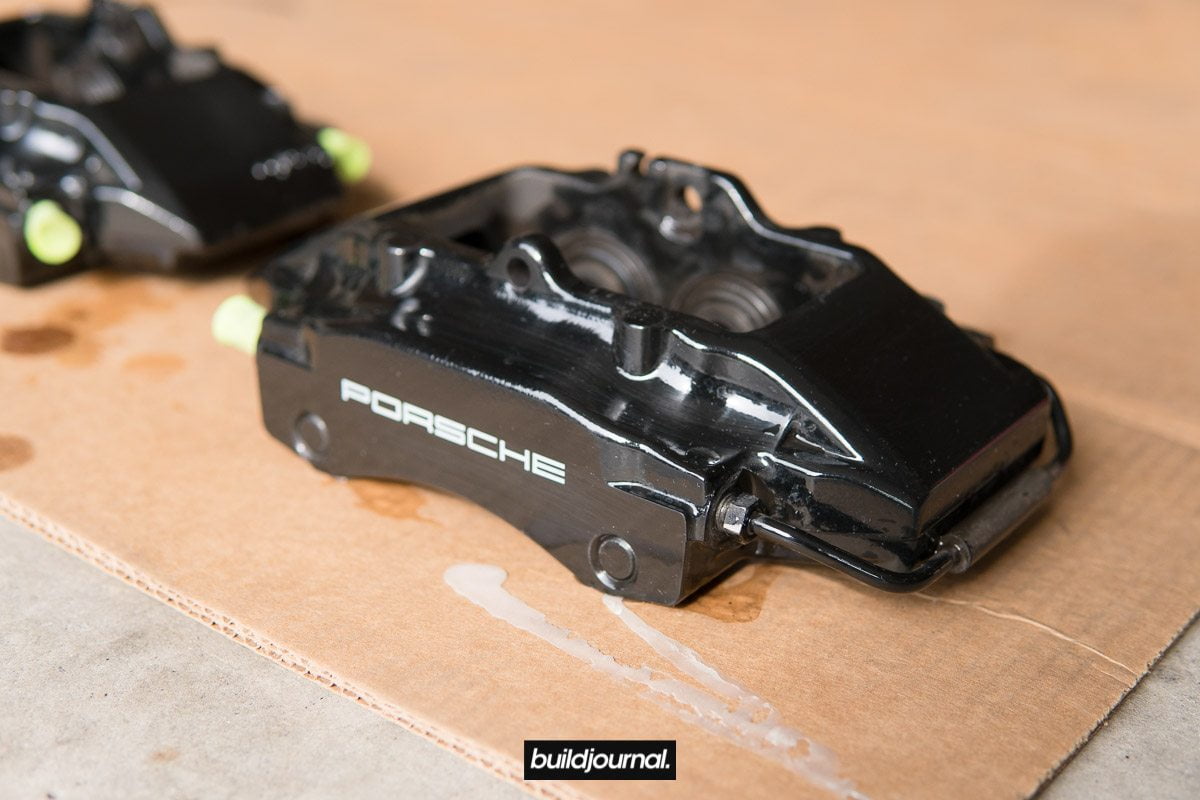
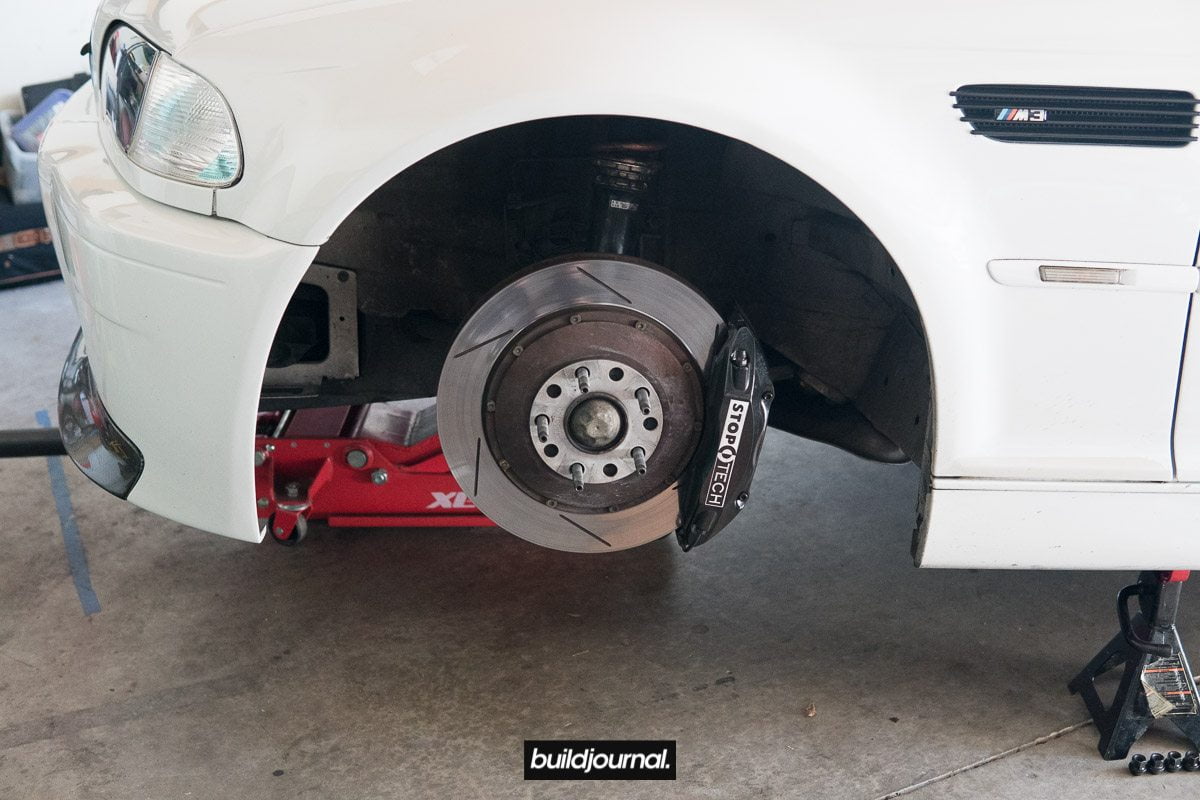
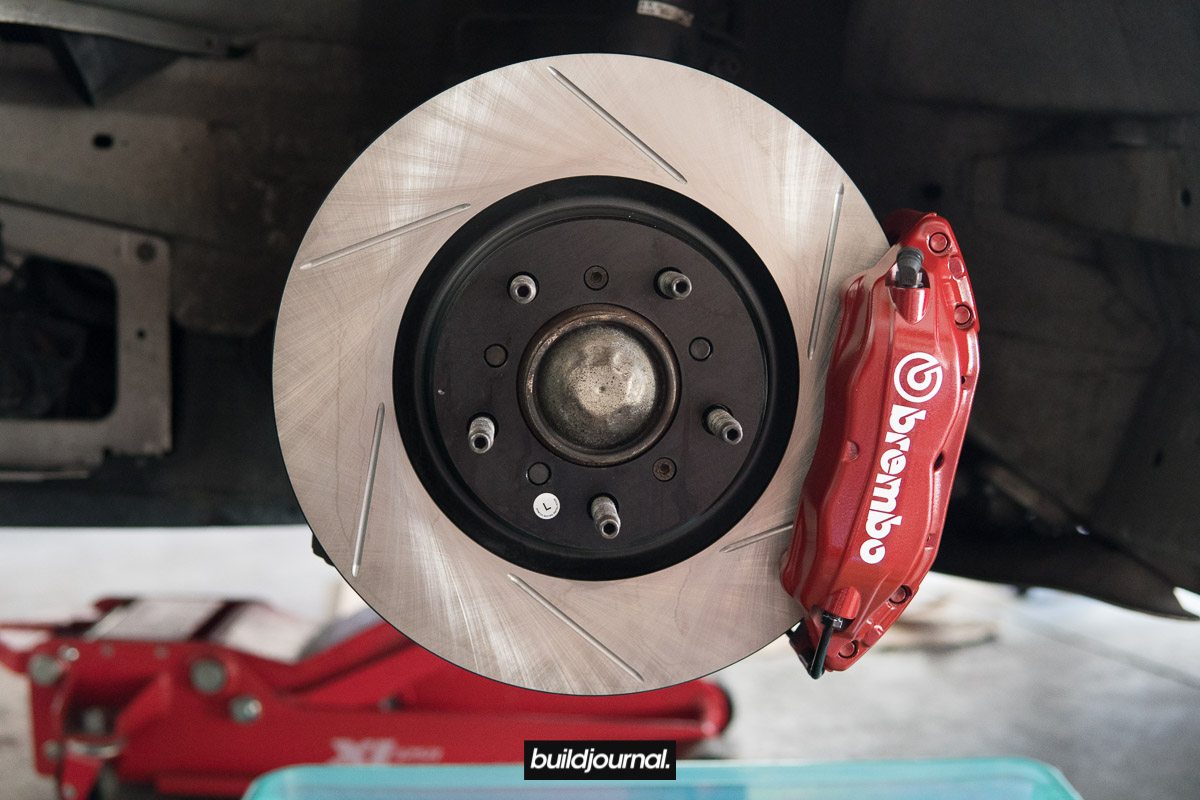
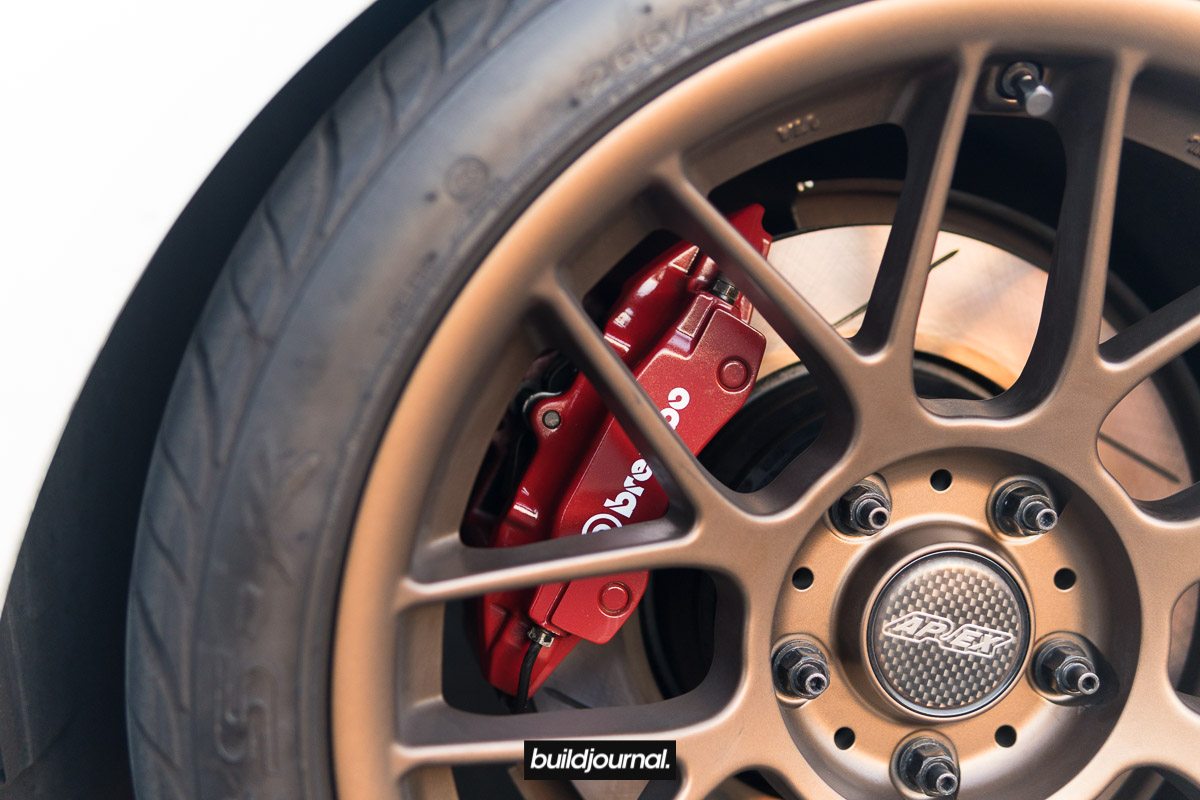
E46 M3 Brembo E31 996 Big Brake Kit Retrofit DIY & Guide
Buildjournal E46 M3 Brembo BBK Retrofit
The "Buildjournal" E46 M3 Brembo E31 996 big brake kit retrofit improves braking performance over the stock (including ZCP) brake system with a larger 4-pot Brembo front calipers from a BMW E31 840Ci and a 4-pot Brembo rear calipers from a Porsche 996. Yes, an E31 840ci front calipers.
Why E31/996 calipers?
A lot of E46 M3 owners do the "996" retrofit using the Porsche front calipers as well, but there's one big flaw with that...the brake bias!
The front/rear 996 system was designed for a rear-engine setup thus the brake bias gets thrown off when it's installed on the E46 M3. The setup may actually decrease braking performance compared to stock. Check out our E46 M3 Brake Bias Chart article for more details.
- Pre-09/2002 owners with the DSC3-based master cylinder have 1.27:1 stock brake bias (56.0%F 44.0%R)
- 996 front/rear setup changes to 1.15:1 (53.5%F 46.5%R)
- E31/996 retains 1.27:1 brake bias (56.0%F 44.0%R)
- Post-09-2002 owners with the MK3-based master cylinder have 1:54.1 stock brake bias (60.6%F 39.4%R)
- 996 front/rear setup changes to 1.39:1 (58.1%F 41.9%R)
- E31/996 retains 1.54:1 brake bias (60.6%F 39.4%R)
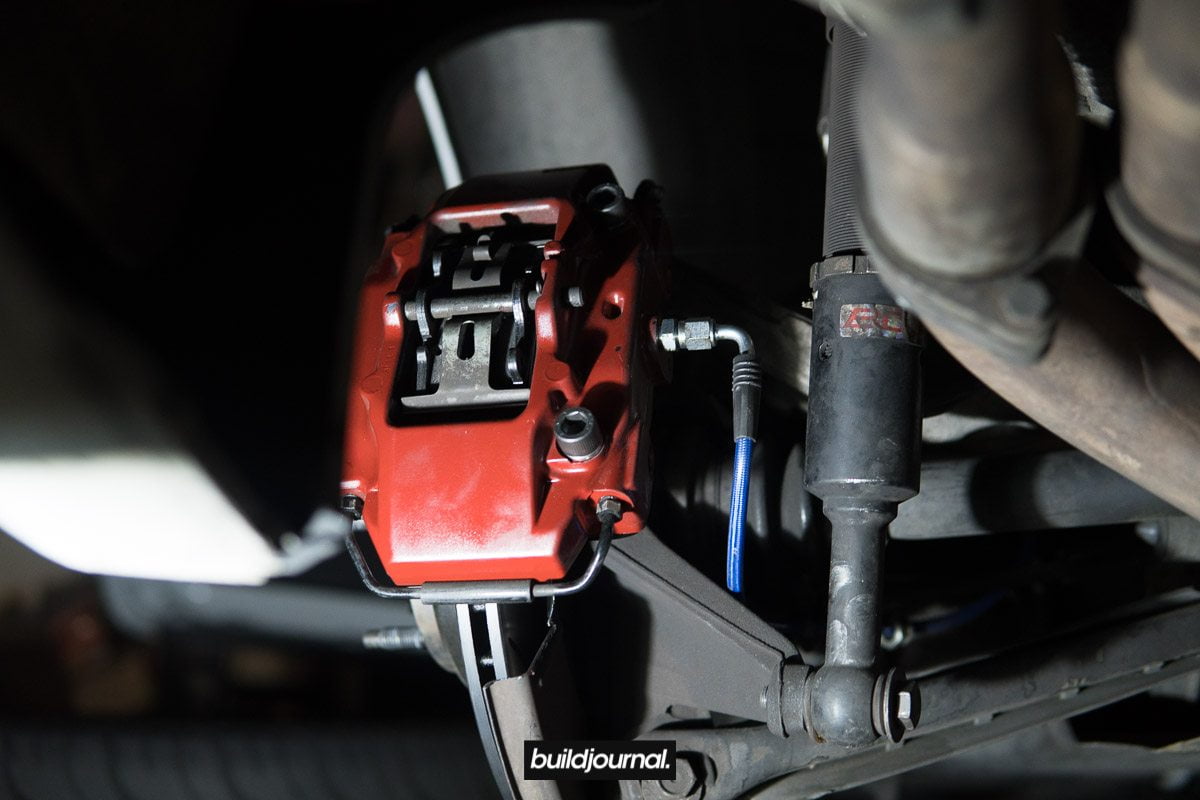
Now, here comes the E31 caliper. Using this caliper you're able to retain stock brake bias when paired with the 996 rear calipers. A match made in heaven. A few years back, there was a thread on M3Forums talking about the E31 caliper retrofit and Oscar was the first one try the setup. Now that he'as ran it for a while, I decided to do the retrofit myself and take off my Stoptech ST-40 calipers. There's no argument here that the Stoptech's are better than the E31 calipers, but the reason why I decided to do this E46 M3 Brembo retrofit was for reasons other than pure performance.
Great thing about the E31 caliper is that it's 100% bolt on to the stock E46 M3 (non ZCP) retaining the 325x28mm rotor size. There are lots of advantages about this setup including ease of install and friendly on wallet, however there are some cons about this setup. We'll talk about that later in the article.
How much is the E46 M3 Brembo retrofit?
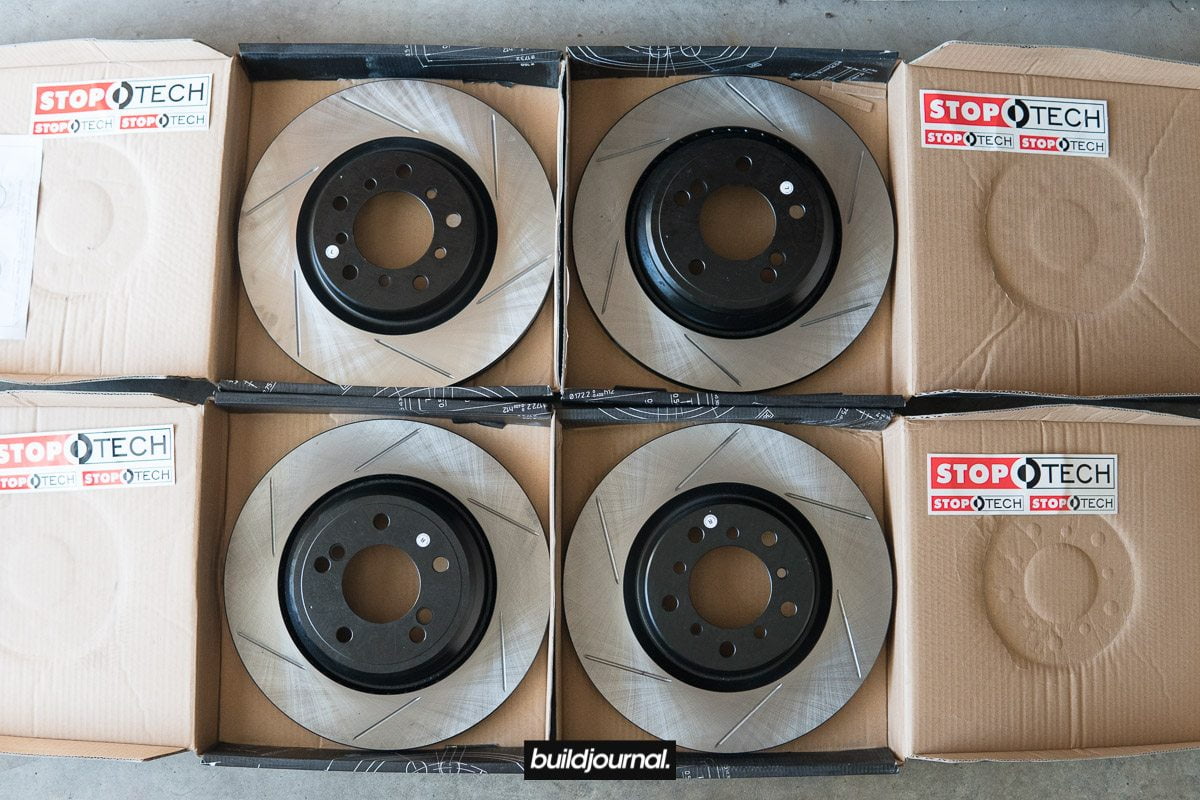
It cost me around $2,100 for a 4 corner E46 M3 Brembo BBK setup and that includes calipers, rotors, brake pads, brake lines and brake fluid. You can probably save more money by sourcing your own vendors. In addition, since this setup utilizes the stock E46 M3 rotor sizes you can save a little more money when time comes to replace rotors. My Stoptech AeroRotors are $280 each corner!
E31/996 retrofit parts list
| Part | Quantity | Part # | Price | Link |
|---|---|---|---|---|
| BMW 840Ci caliper (left) | 1 | 34111161177 | $524.31 | https://goo.gl/dhdCkn |
| BMW 840Ci caliper (right) | 1 | 34111161178 | $524.31 | https://goo.gl/eU7i5h |
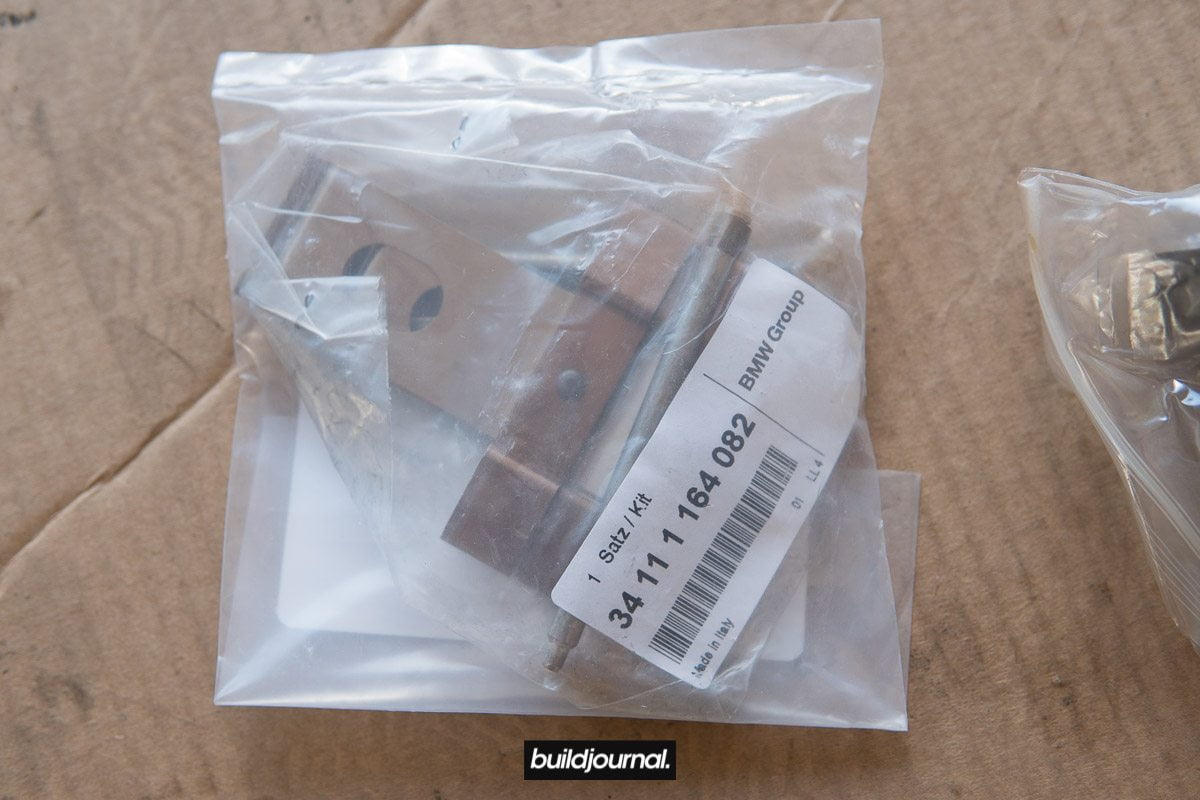
| 840Ci pad hardware | 1 | 34111164082 | $58.59 | https://goo.gl/ntqbaF |
| Rear Porsche 996 Caliper Adapter | 1 | $194.95 | https://goo.gl/JfrnT5 | |
| Rear brake lines | 1 | $64.95 | https://goo.gl/3Bkfrp | |
| Stoptech rotor slotted front right | 1 | 12634059SR | $82.00 | http://amzn.to/2kFz9ti |
| Stoptech rotor slotted front left | 1 | 12634058SL | $82.00 | http://amzn.to/2B7bsVZ |
| Stoptech rotor slotted rear right | 1 | 12634054SR | $82.00 | http://amzn.to/2B6z2lL |
| Stoptech rotor slotted rear left | 1 | 12634054SL | $82.00 | http://amzn.to/2kbzULm |
| Porsche 996 rear caliper (left) | 1 | 996352421 | $120.00 | |
| Porsche 996 rear caliper (right) | 1 | 996352422 | $120.00 | |
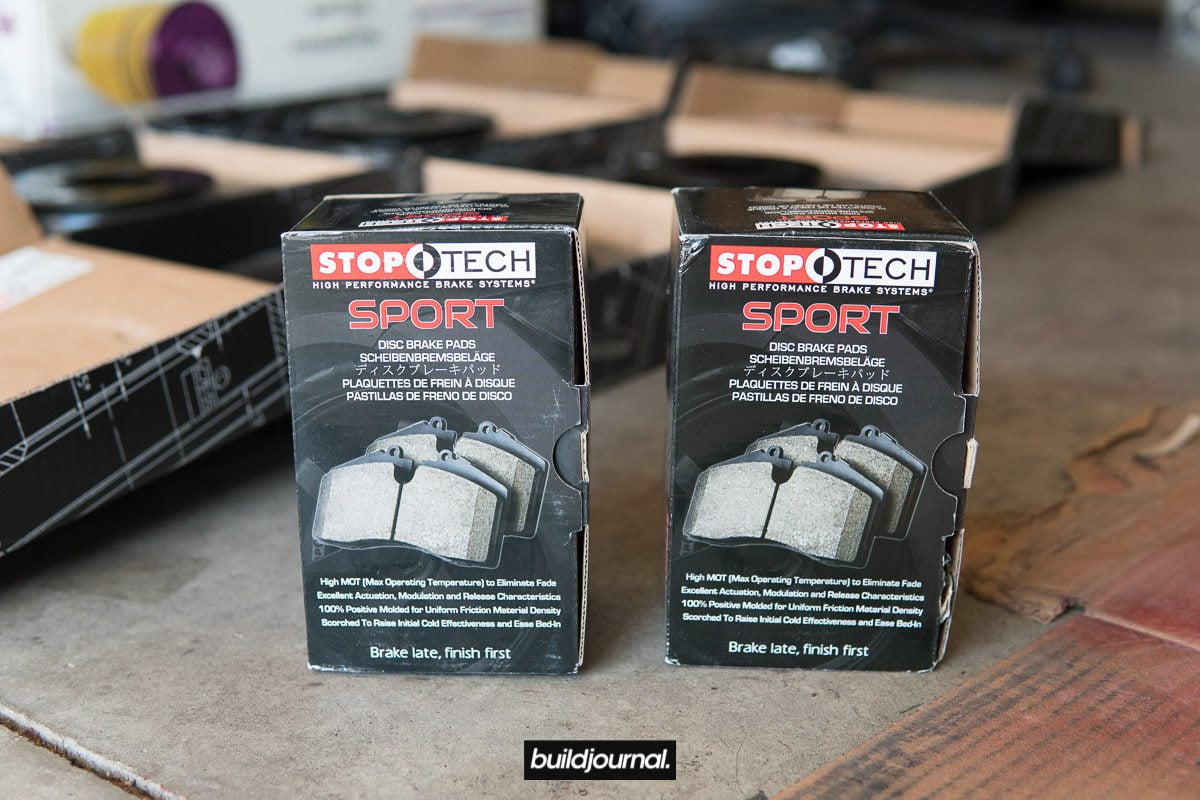
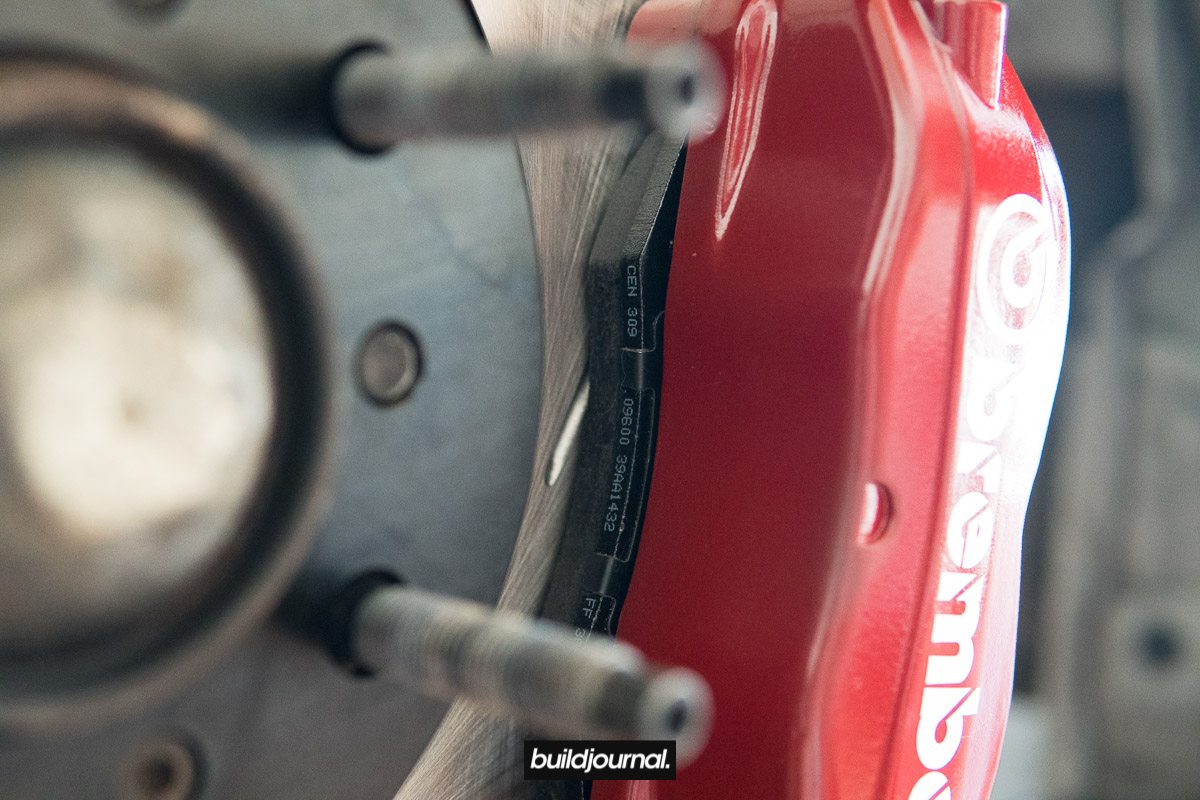
| Front brake pads (840ci) FMSI D960 | 1 | 309-09600 | $74.05 | https://goo.gl/o274o7 |
| Rear brake pads (Boxster front) FMSI D737 | 1 | 309-07370 | $92.97 | https://goo.gl/ALirZx |
| Brake fluid (Castrol SRF) | 1 | $61.96 | http://amzn.to/2kEGjOA | |
| Total | $2,164.09 |
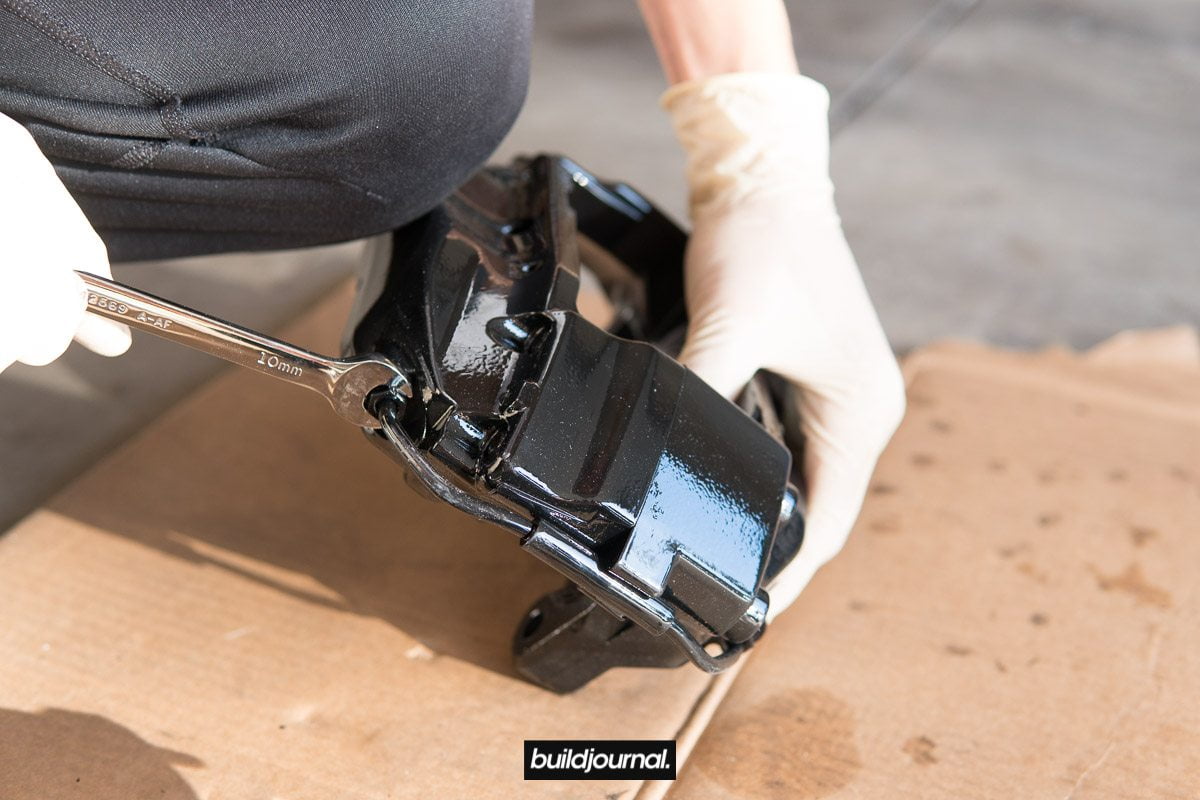
Instructions on E46 M3 Brembo install
This DIY will cover the installation of the new calipers, rotors, pads and brake lines, however your experience may differ from mine. Please use this as a guide and not an exact step-by-step instruction.
Disclaimer: This DIY does require you to lift your car so please use proper tools and follow all safety procedures if you choose to attempt. This guide is for your reference only. We are not liable for any damages or injuries that result from this guide.
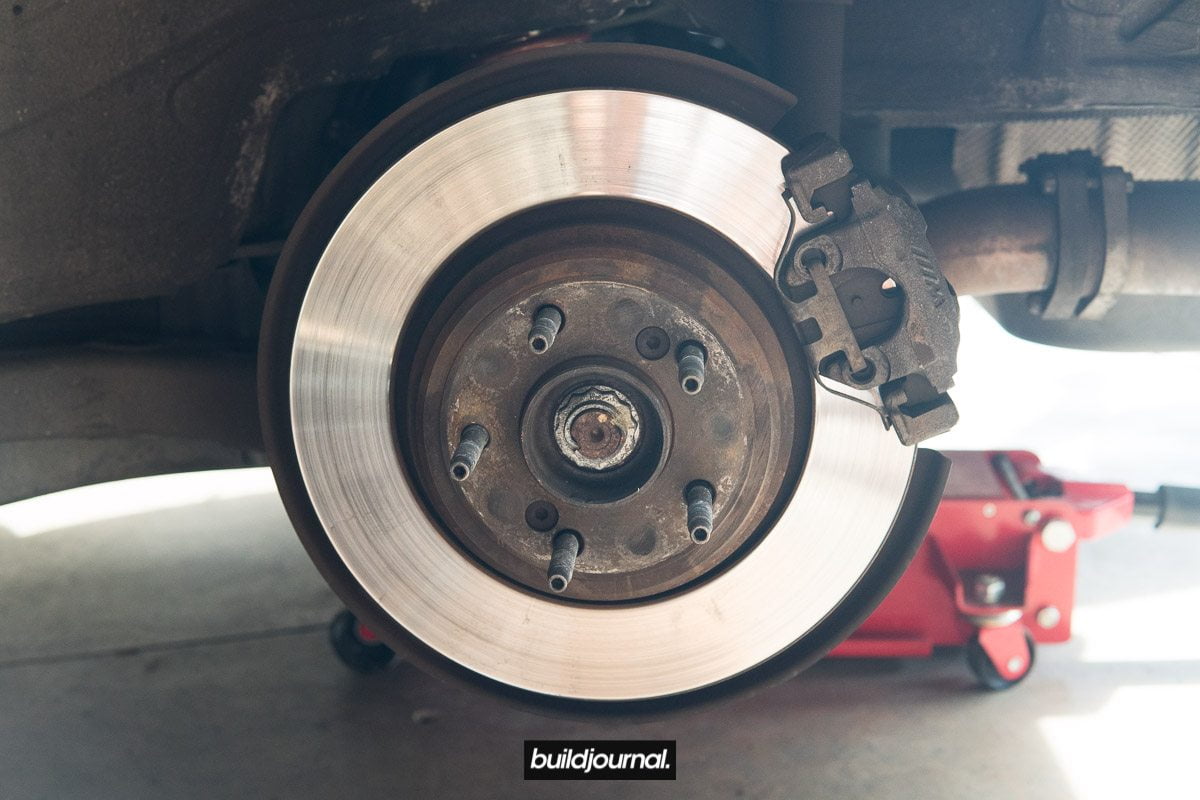
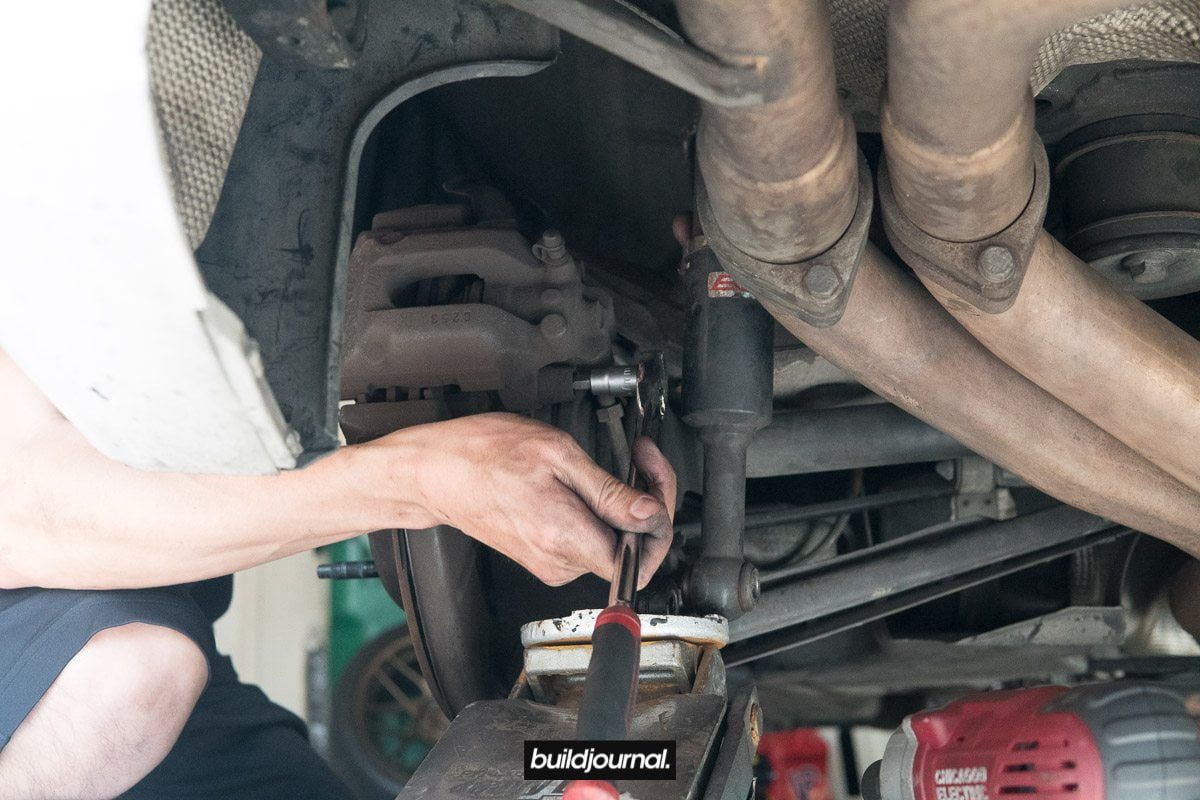
1. Install E31 front caliper
1.1, starting on the front driver side, get car up on jacks and remove wheel to access brakes
1.2, free up all the brake and wear sensor lines from the grommets/brackets
1.3, remove brake line from caliper and make sure to clamp the brake line so fluid doesn't leak too much (don't want to dry up master cylinder)
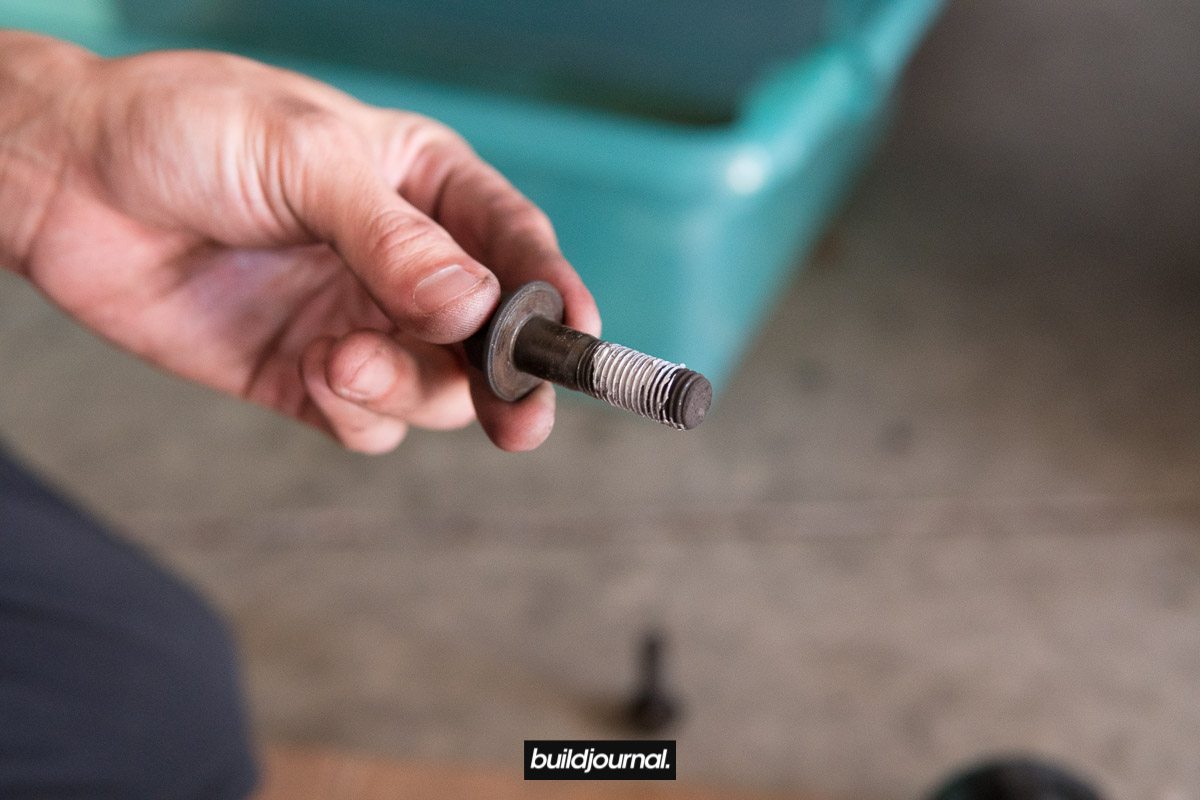
1.4, remove 2 bolts on the backside of the rotor holding the caliper bracket to spindle and slide out the caliper; you may need to remove pads and compress pistons to release caliper. If so, I recommend you open your brake fluid reservoir and make sure it doesn't overflow.
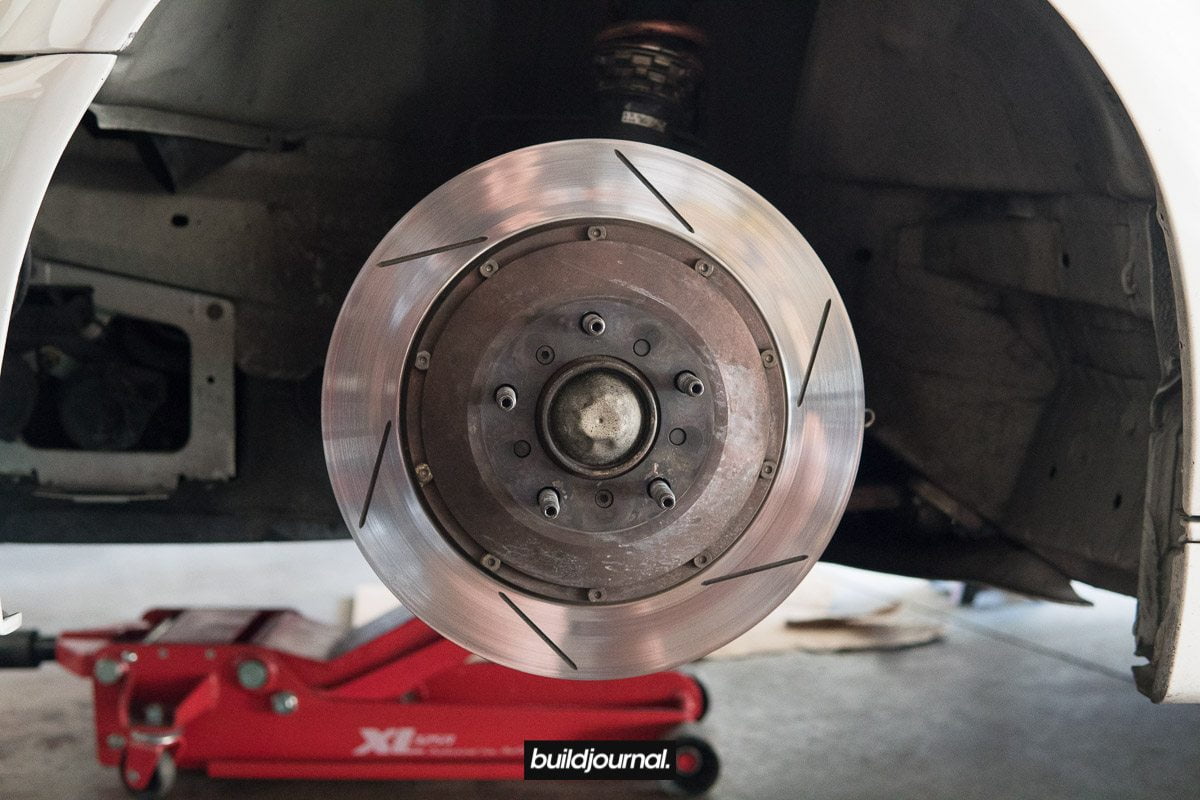
1.5, remove the 2 hex bolts on the rotor and remove the rotor
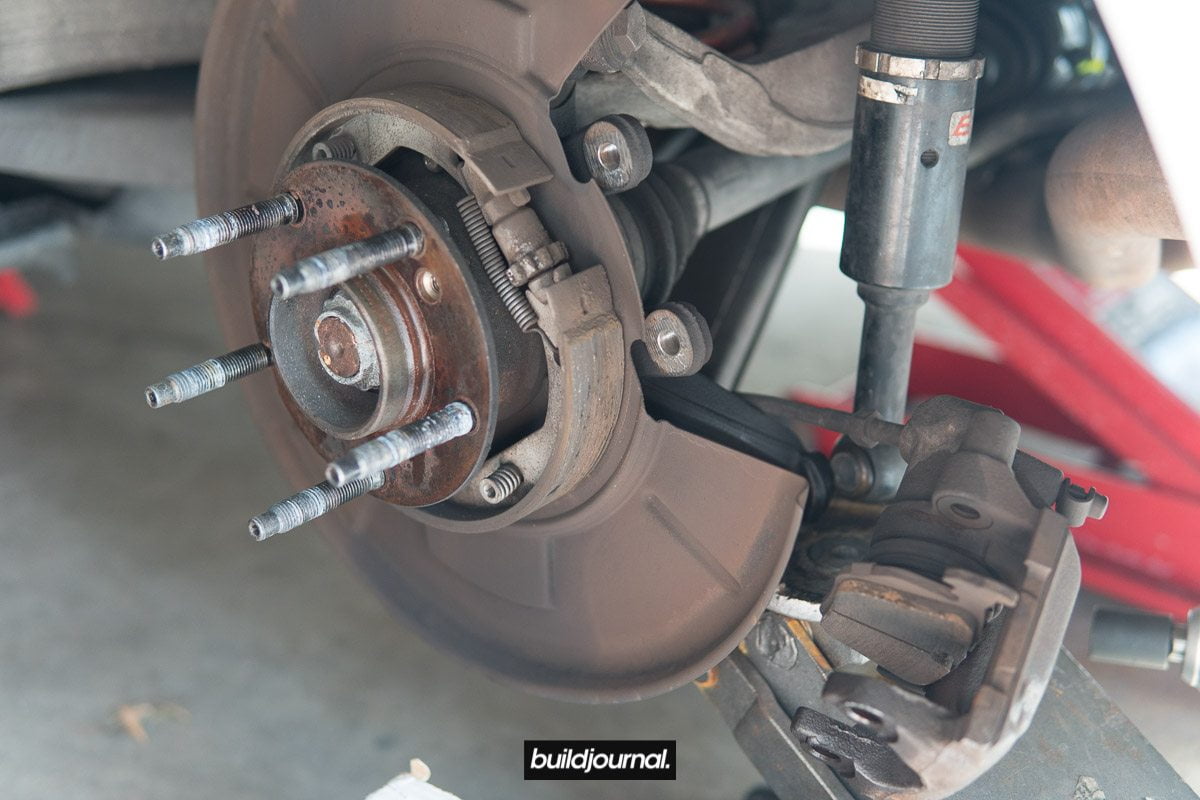
1.6, install new rotor including the 2 torx bolts to secure rotor (be aware of rotational direction)
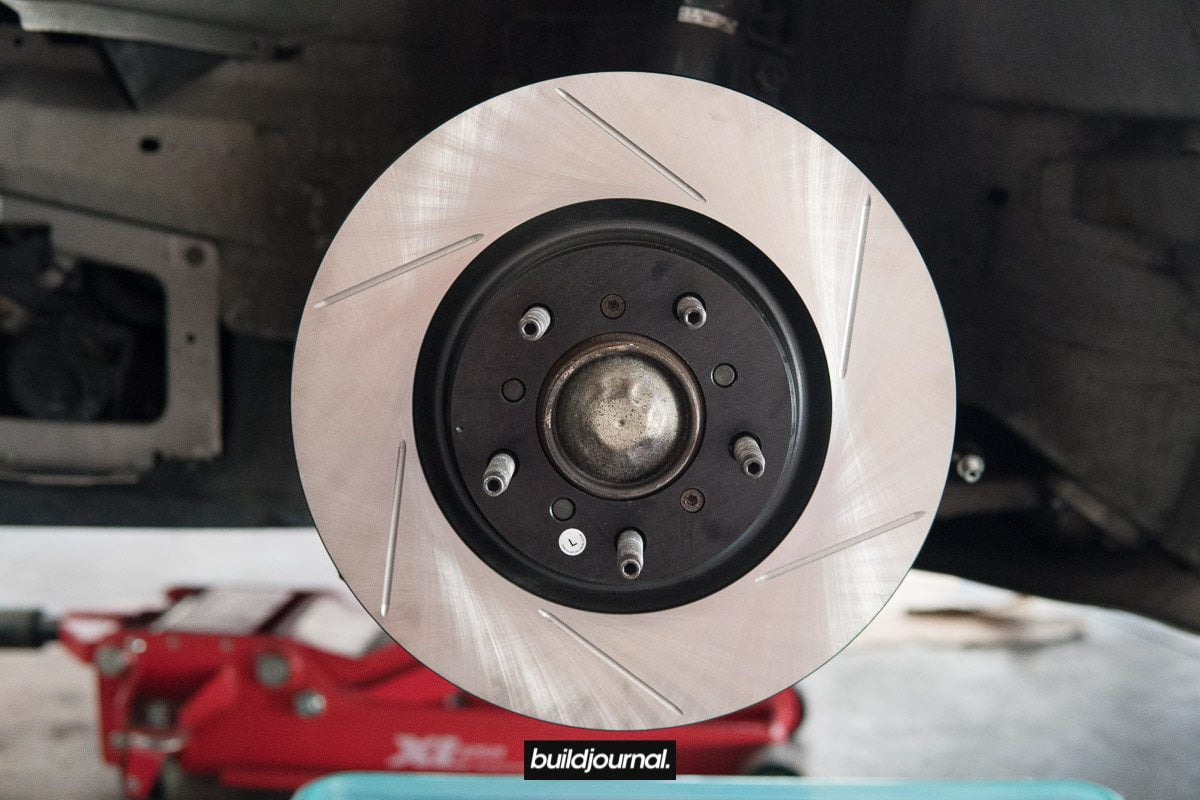
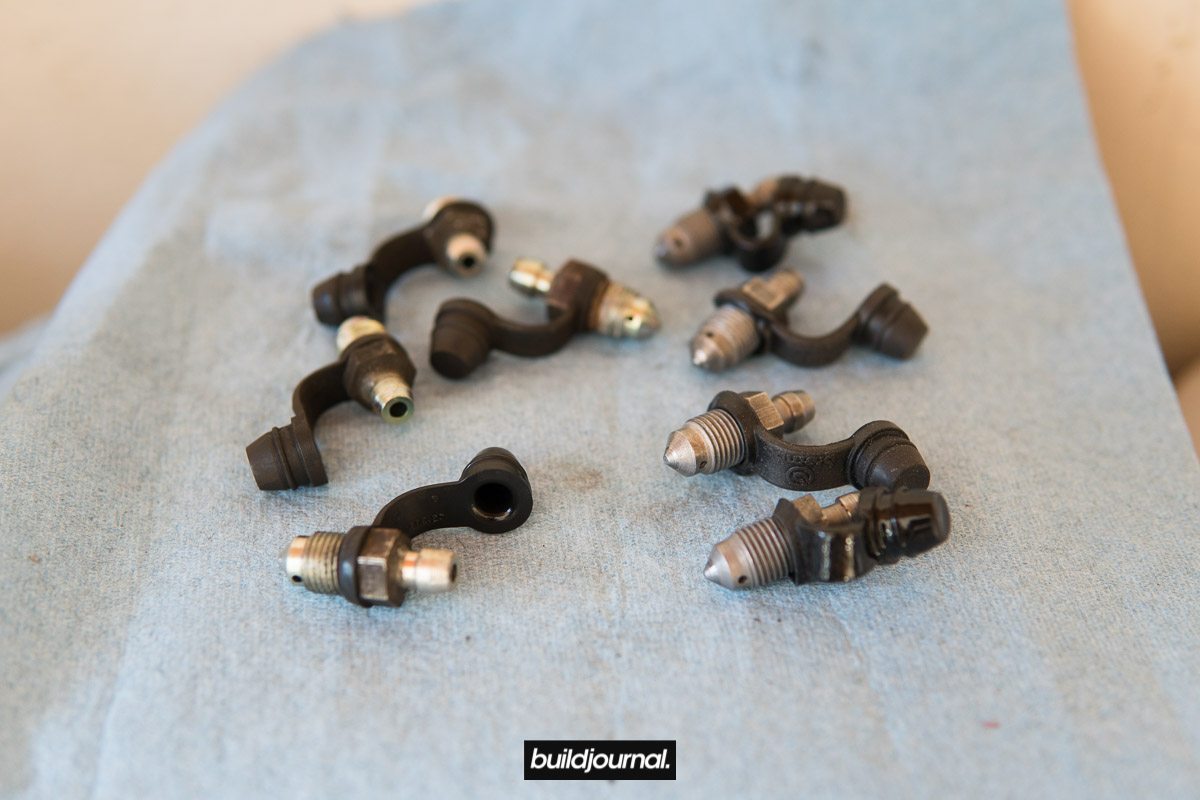
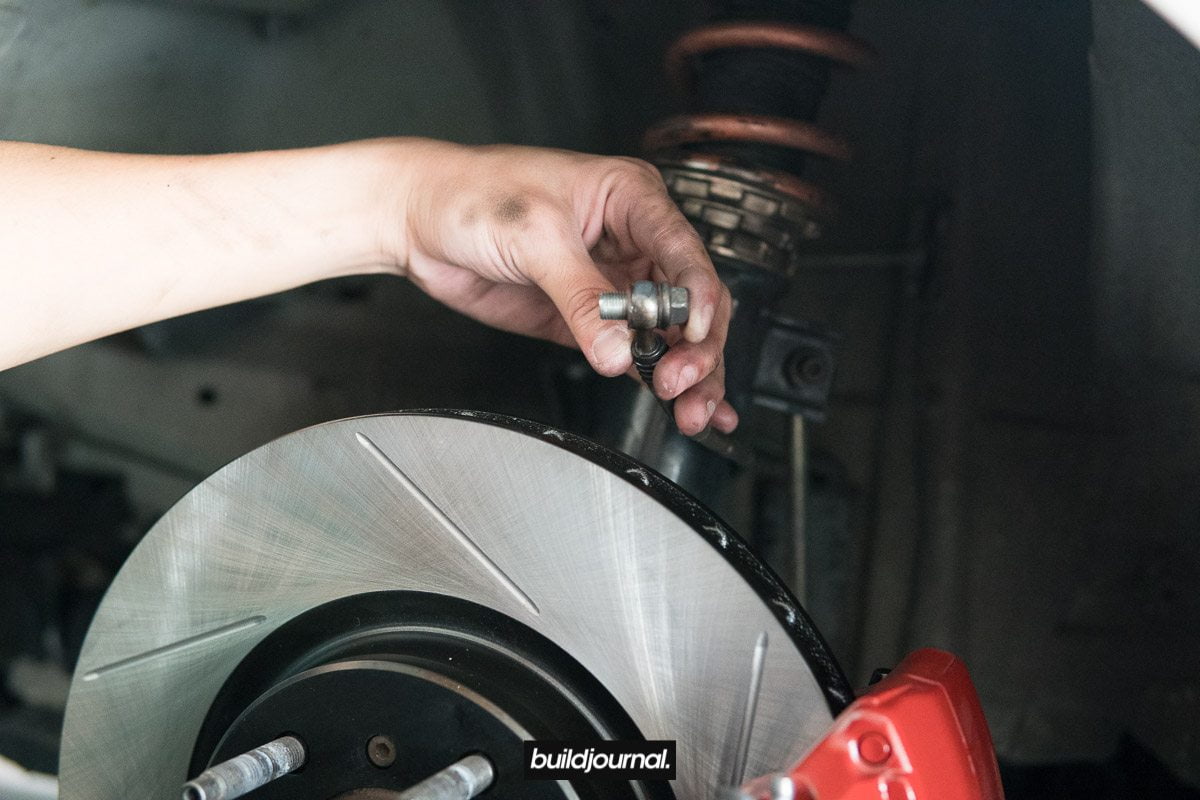
1.7, reinstall brake line on E31 caliper. The left caliper goes on the right side and vice versa. Make sure the bleeder valve is facing up. 11mm bleeder torque to 9-12 ft-lb.
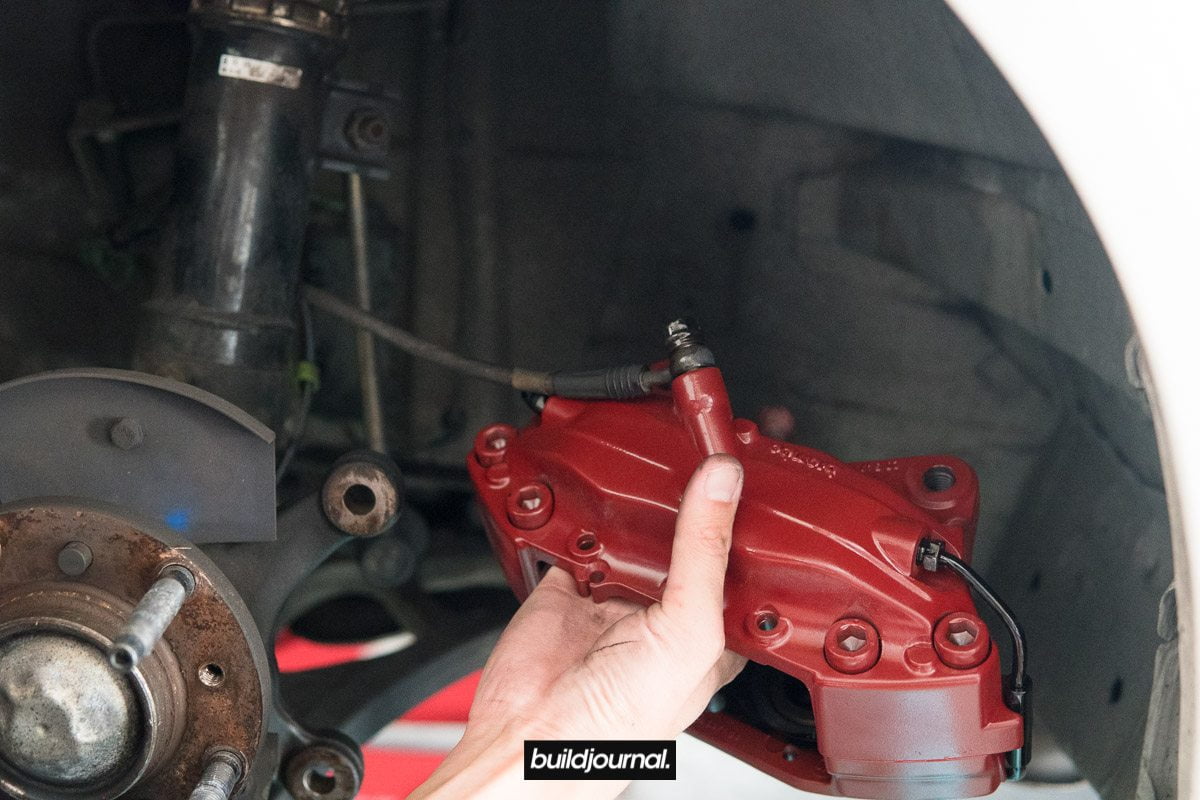
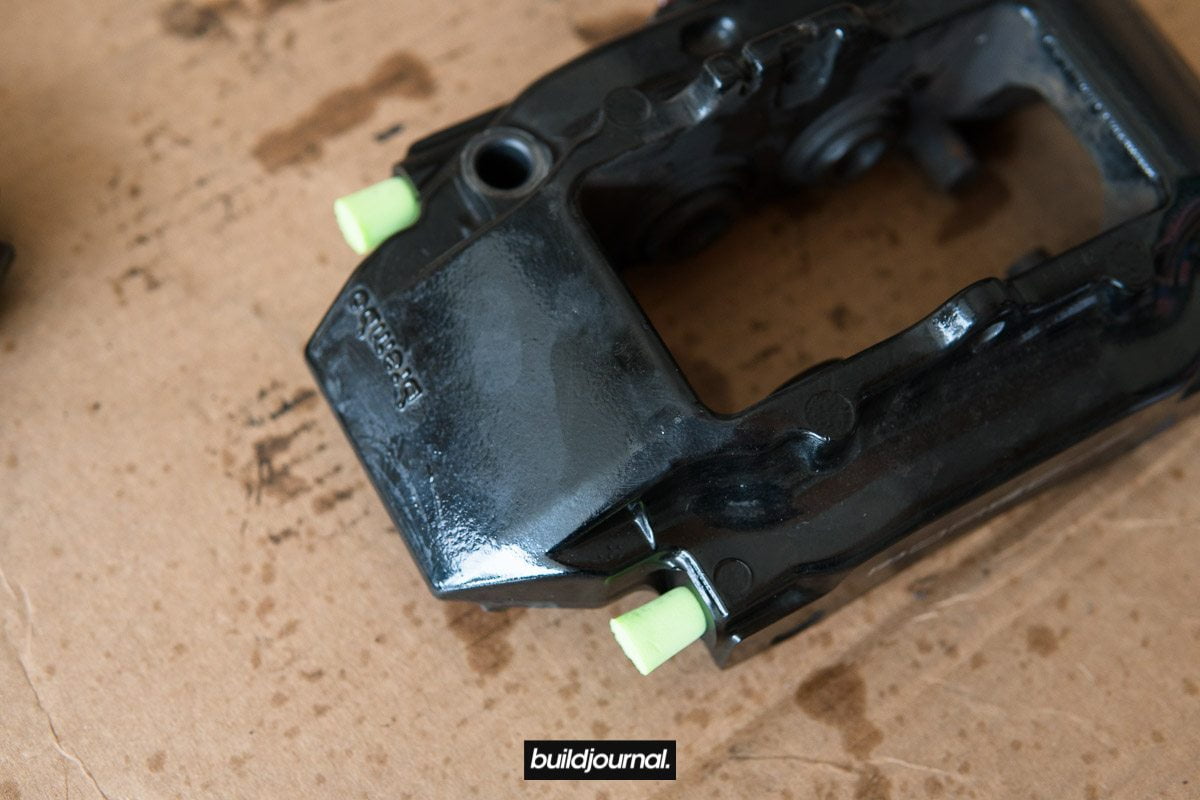
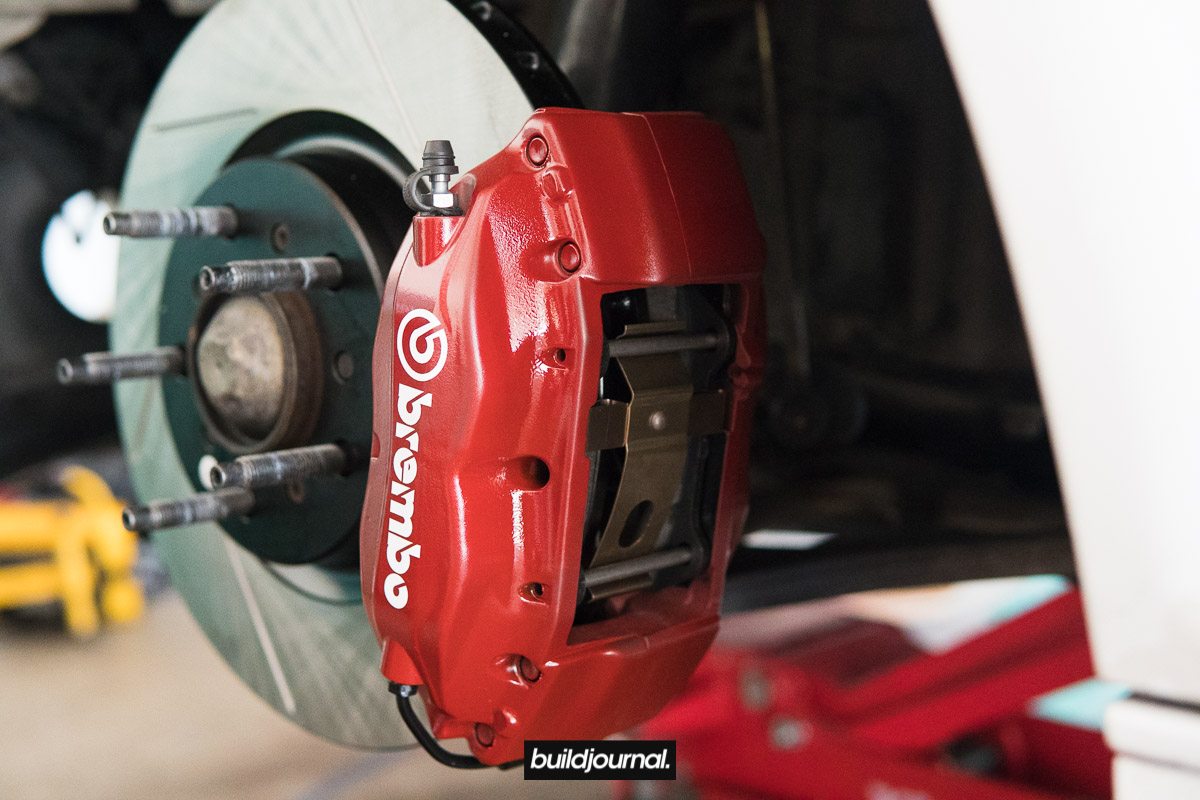
1.8, install new front E31 Brembo caliper. I like to use anti-seize so the caliper bolts don't freeze up inside. Torque to 81 ft-lbs.
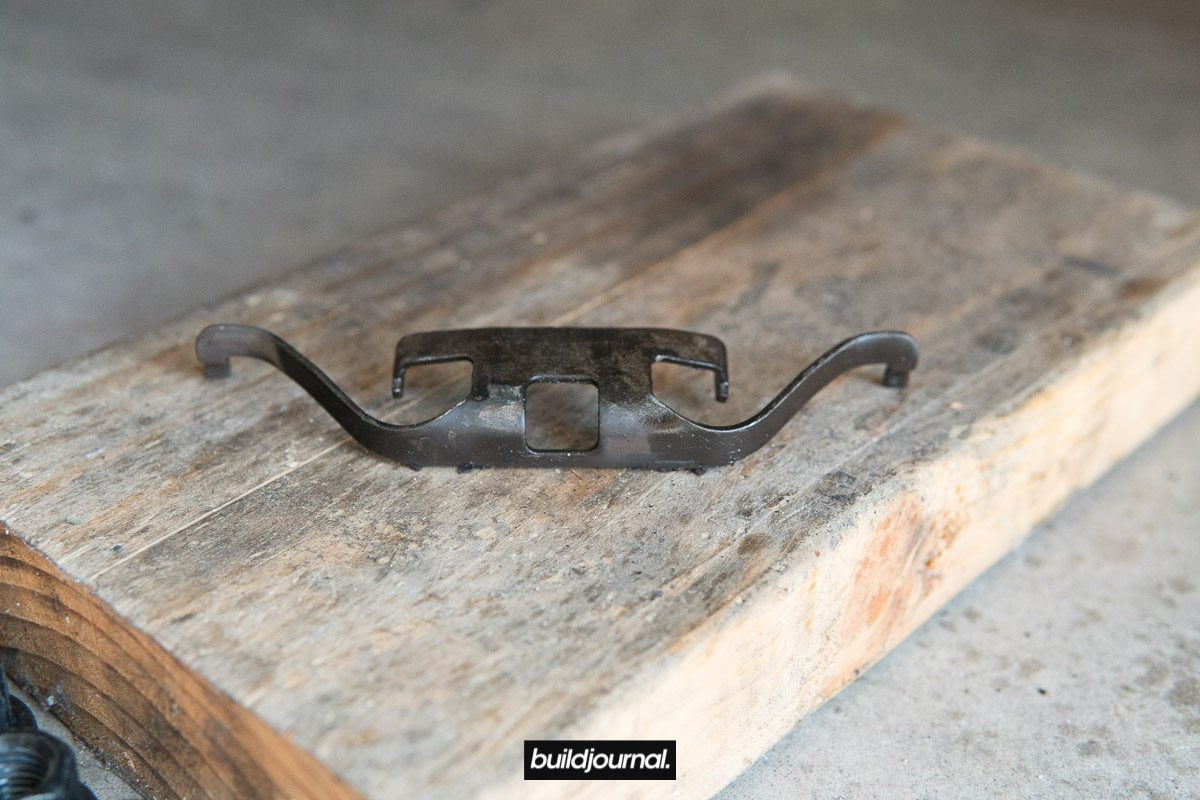
1.9, install new pads (FMSI D960) with the new hardware kit
1.10, tuck away the brake line and pad sensor so it's not in the way of anything
1.11, repeat for passenger side front
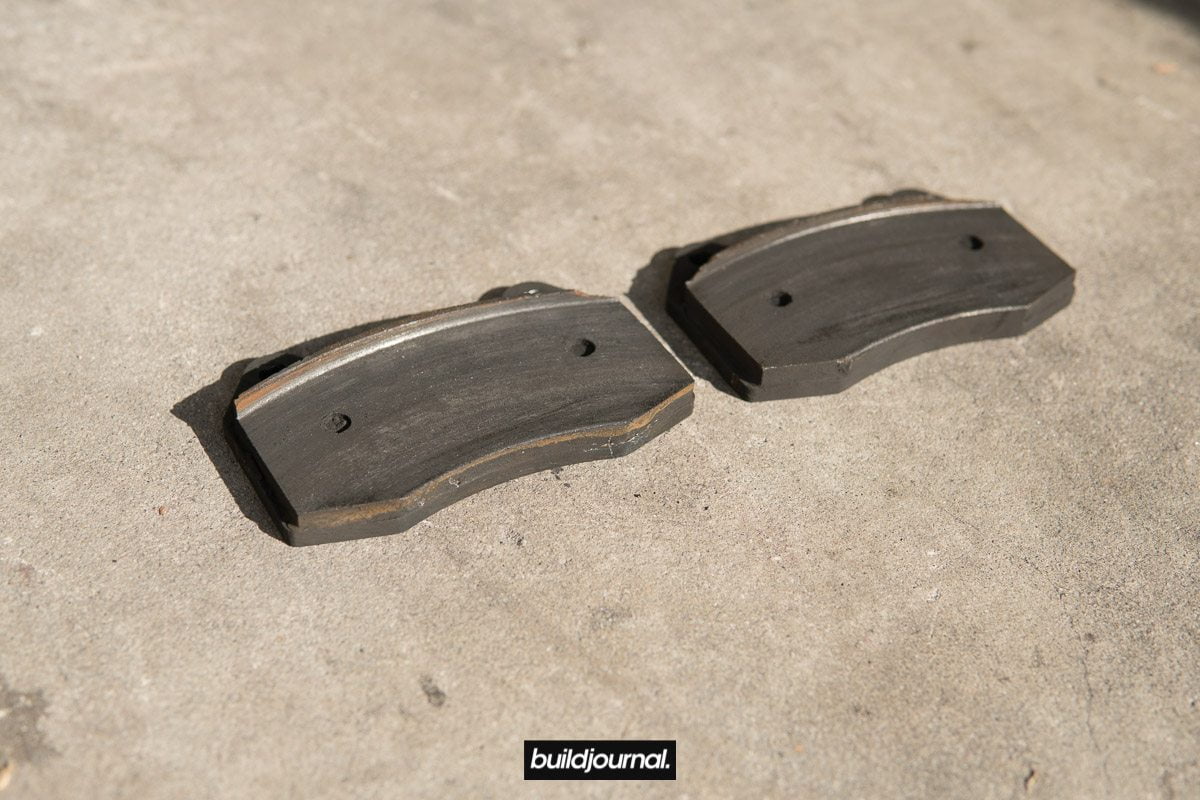
Note: The front E31 pads are offset on the rotor and has about a 5mm rust ring on the inner side and the outer part of the pads will have uneven wear. Despite not having a full contact patch, the pistons are directly over the rotor and utilizes 95% of the pad. Below you can see a set of used E31 pads taken from Oscar's car.
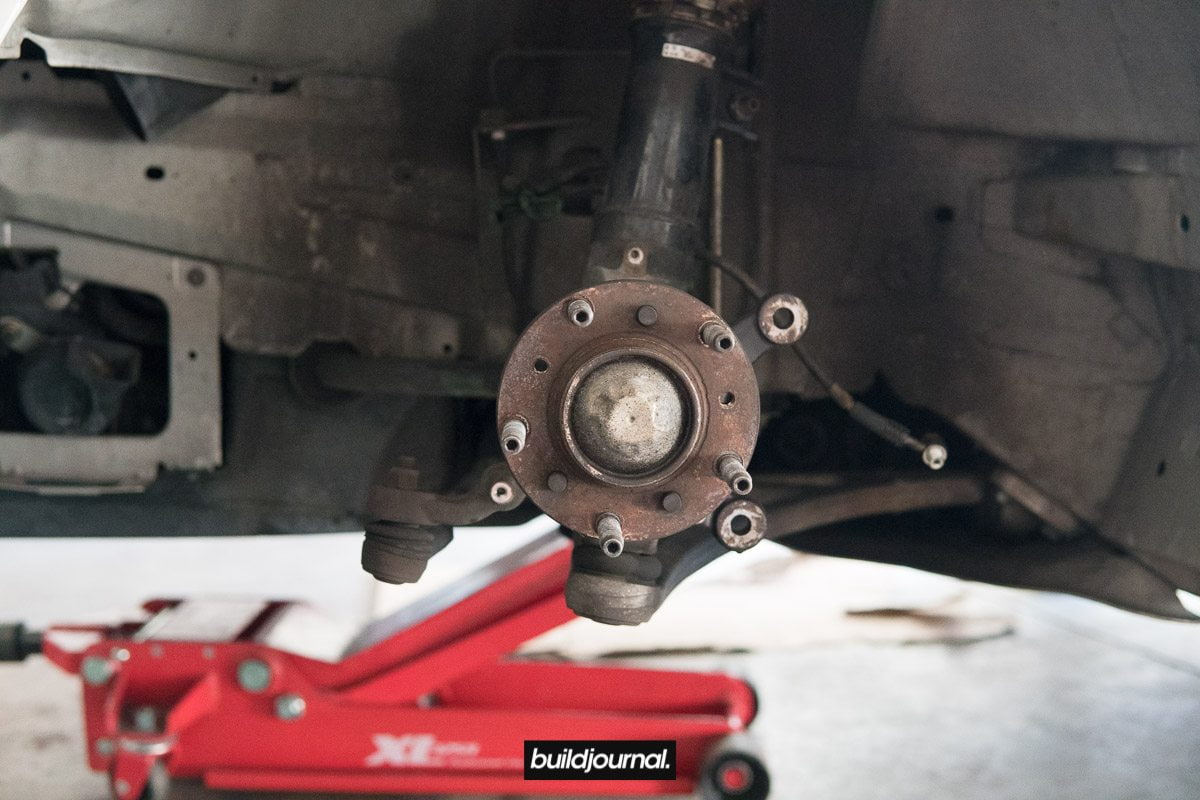
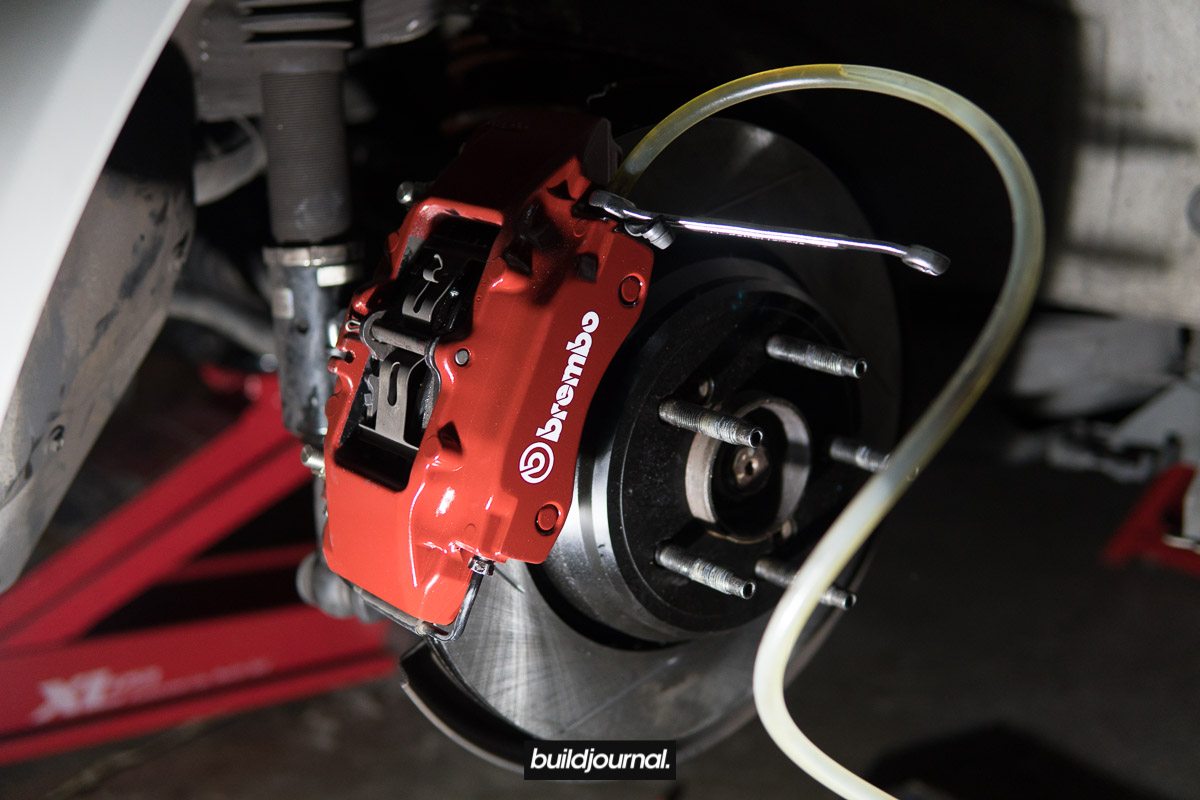
2. Install 996 rear caliper
2.1, now go to the rear and remove the wheel to access the rear calipers
2.2, use a pry bar to release the retaining clip (be careful because this thing will shoot out in any direction)

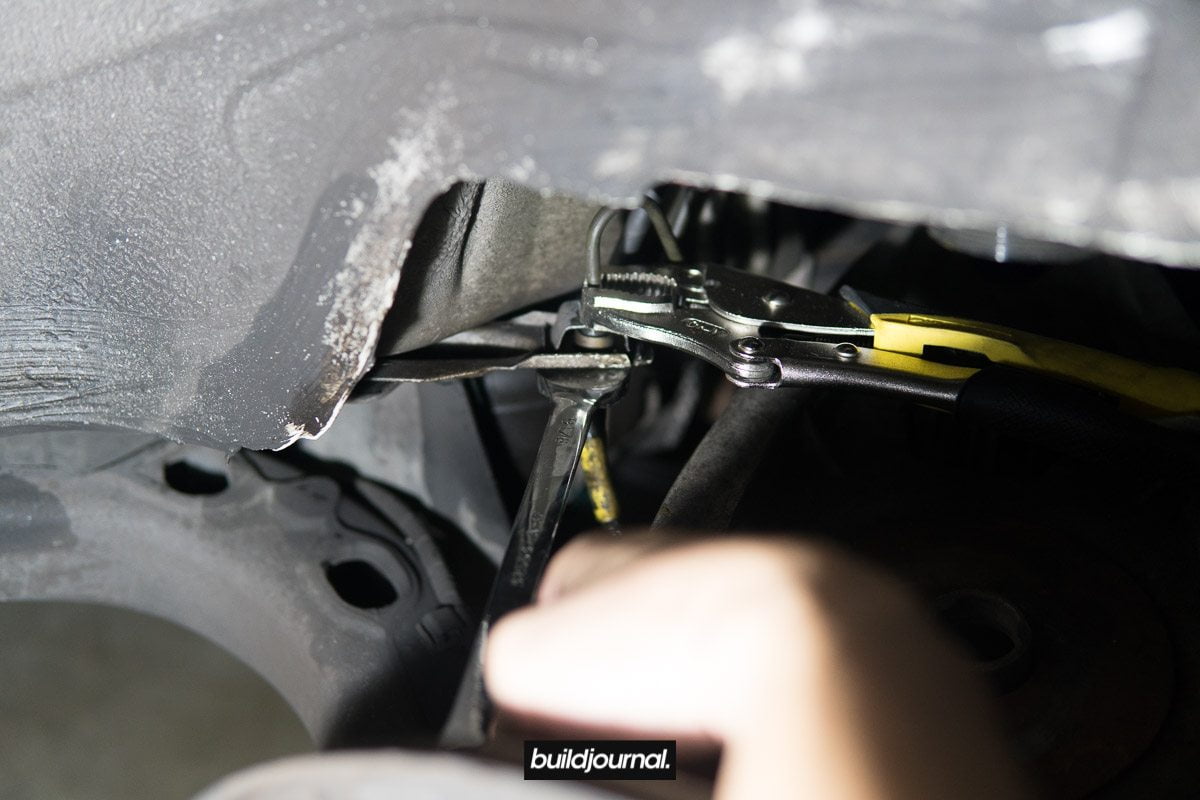
2.3, remove 2 black caps and remove the 2 caliper retaining bolts. I had to release the lower shock bolt to access my tool in there. Support lower shock with a jack to release tension if you are going to remove the lower shock bolt.
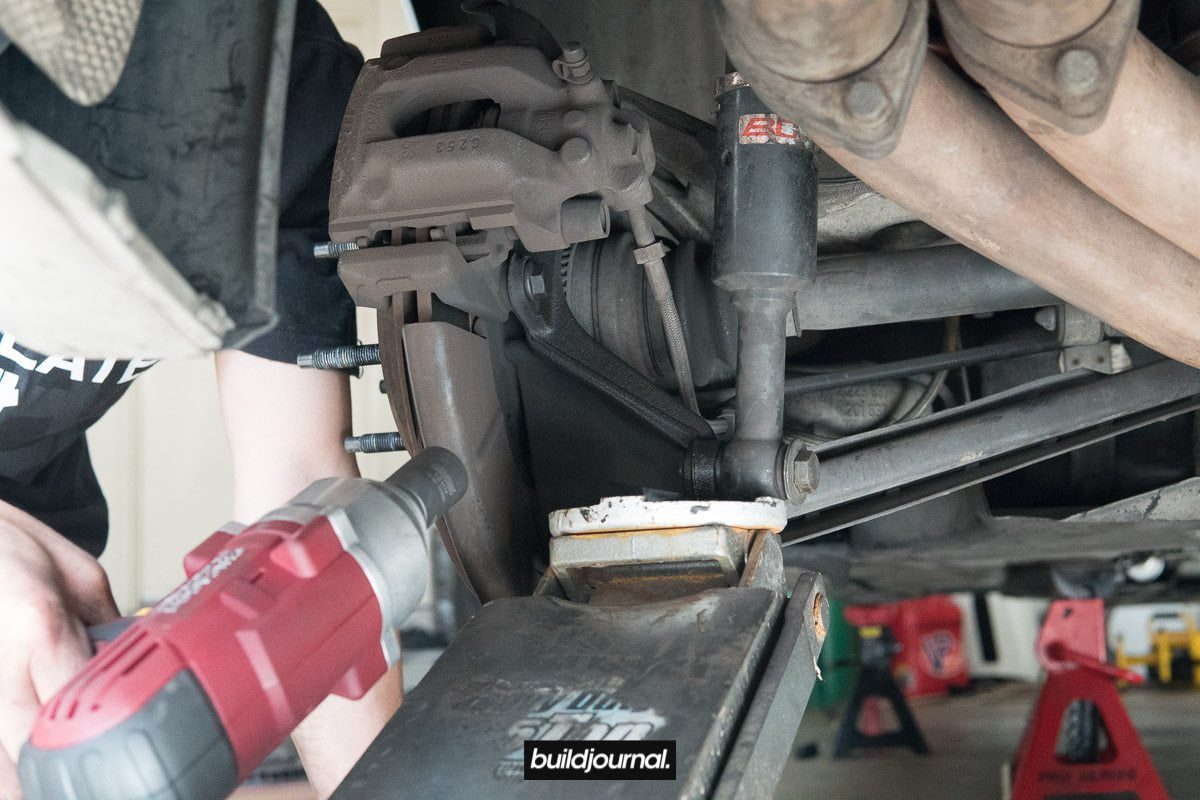
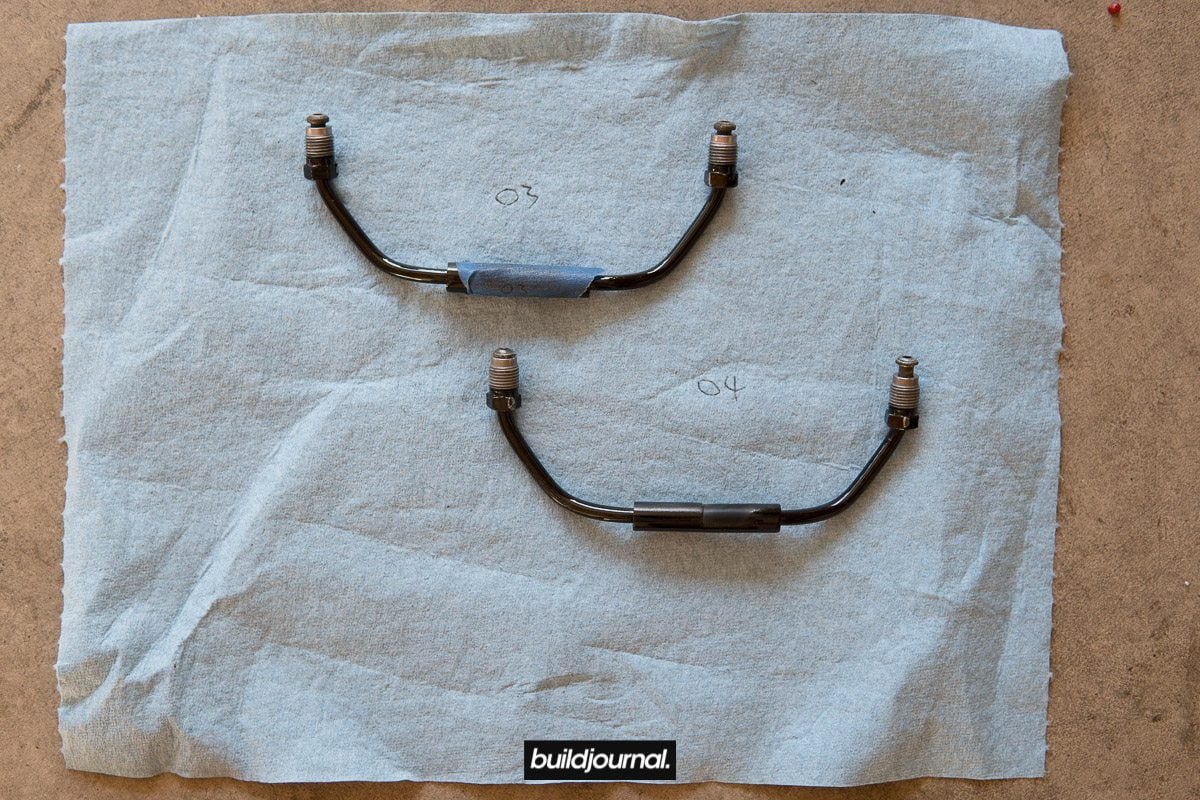
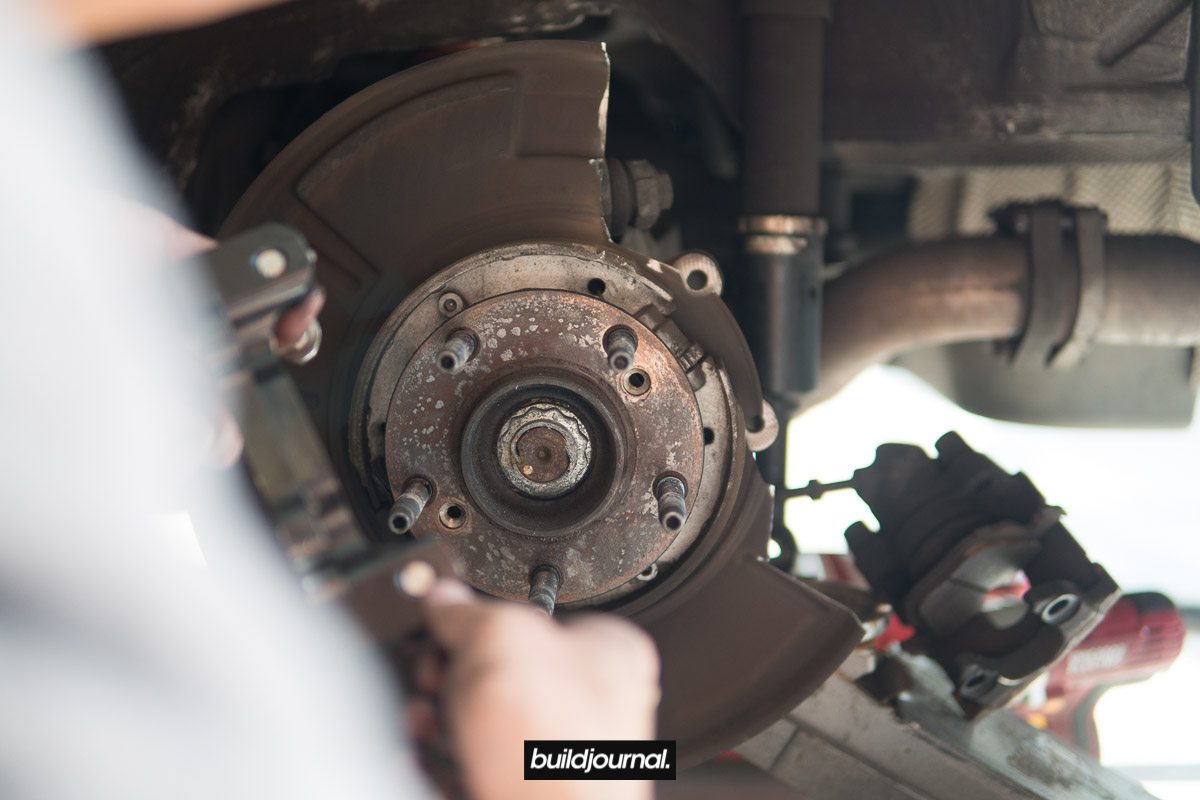
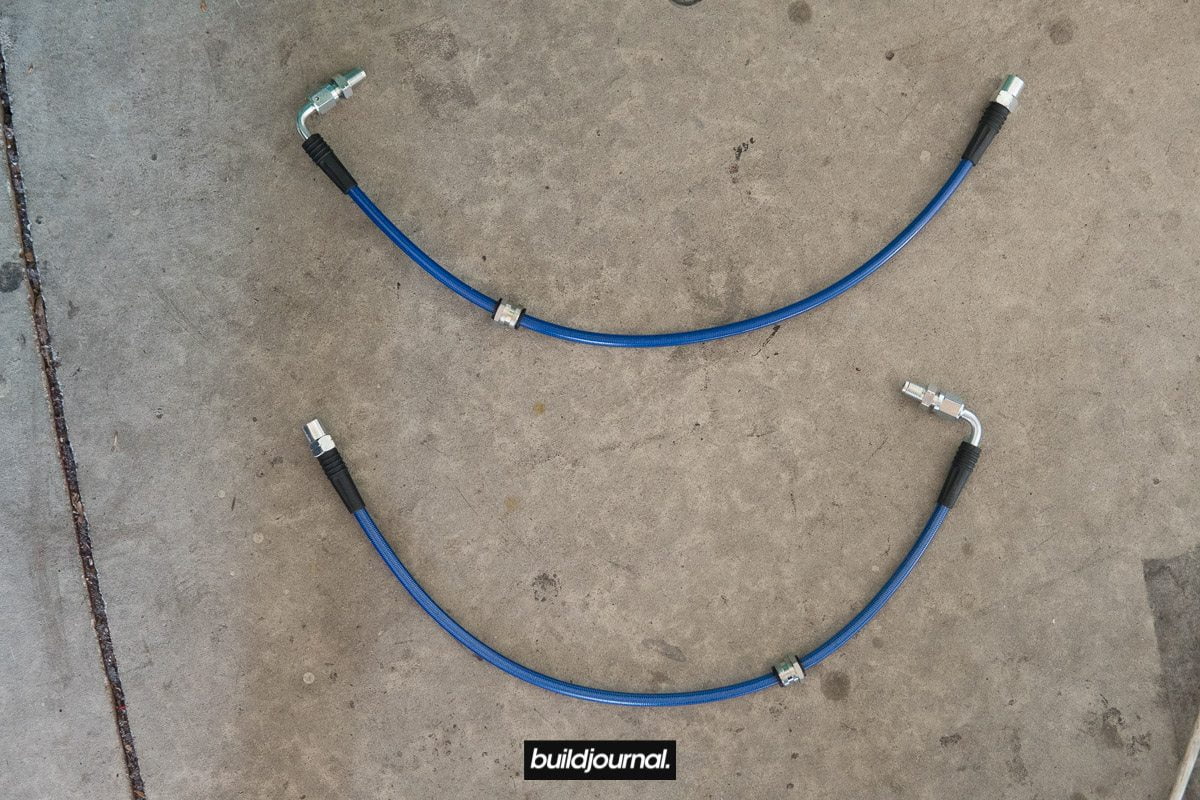
2.4, remove 2 bolts on the backside knuckle to remove the caliper carrier and remove the brake line from the caliper as well. Make sure to clamp line.
2.5, remove the 2 hex bolts on the rotor to remove rotor. E-brake must be down. This is also a good time to adjust your parking brake if you need to.
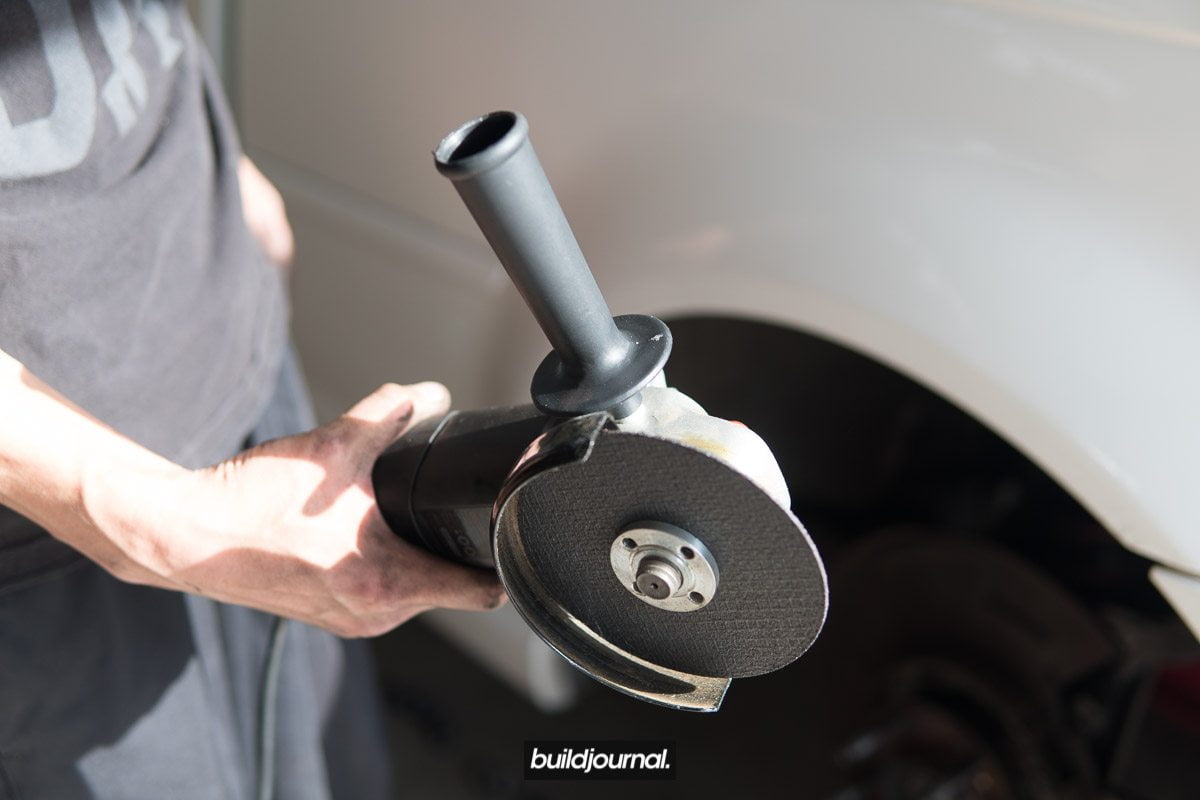
2.6, you'll need to trim the heat shield to make space for the rear 996 bracket. I cut about 1.25 inches on each side using an angle grinder.
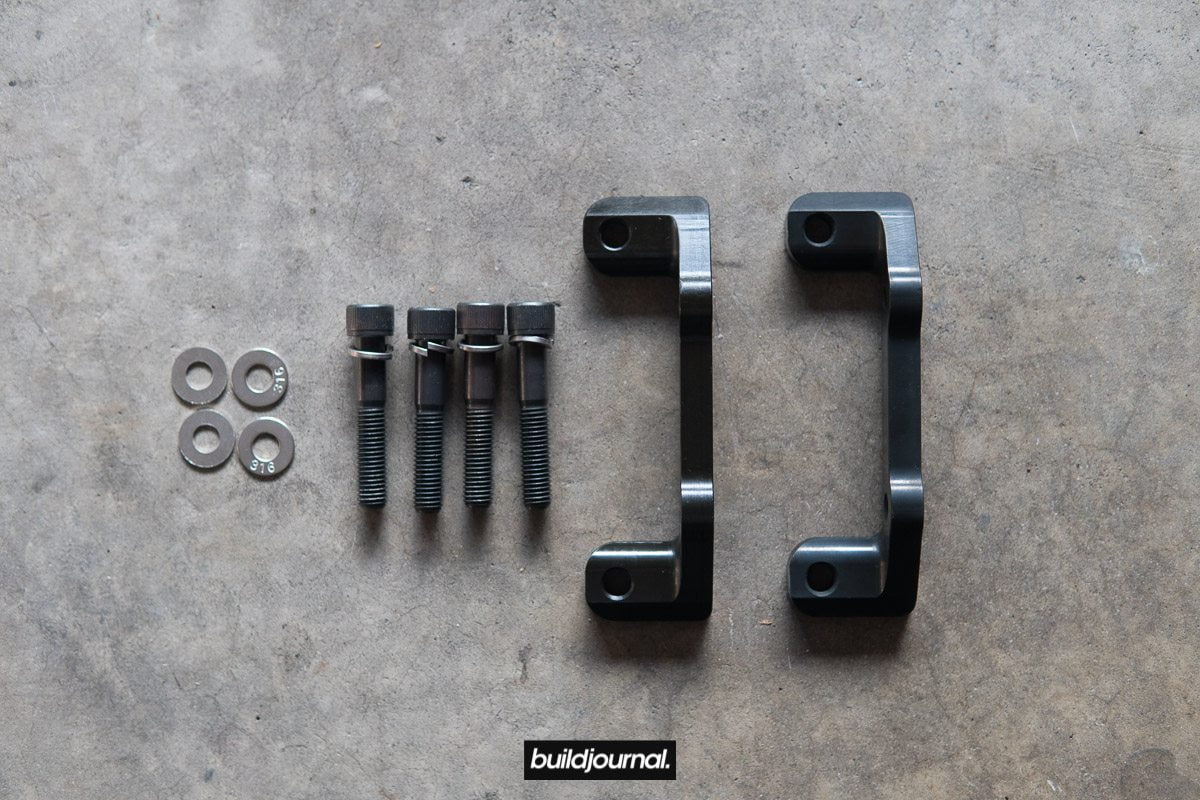
2.7, now you can install the rear 996 caliper carrier and the rotor (make sure to install the 2 hex rotor bolts). Torque bracket to spindle 48 ft-lbs. These are the RallyRoad brackets. Creation Motorsports brackets can not utilize the front Boxster pads and has additional clearance issues with the hardware/pins.
2.8, before you put the 996 rear calipers on, you must swap the caliper fluid transfer line with the bleeder valve, per caliper. This is to ensure the bleeder valves face up, but more importantly the Porsche caliper is a leading caliper. You'll notice on the 996 caliper the piston sizes are different. You want the smaller piston engaging the brake pad first.
2.9, install the 996 rear caliper on the carrier. Torque caliper to bracket. I couldn't find the exact torque spec for this, but I torqued it to 48 ft-lbs.

2.10, attach rear brake line and make sure all lines are away from the axles. I had a tough time with both of the rear brake lines so I had to use a locking vice grip and a heat gun to break the line free.
2.11, install the lower shock bolt back in and torque to 74 ft-lbs while loaded. Make sure all lines are clear and free. You don't want to have these rub against the axle potentially causing brake failure. You can install Porsche Boxster front pads (FMSI D737) to get full contact patch on the rear rotors.
2.12, repeat for passenger side
3. Bleed brakes
3.1, after all this is done, inspect your bolts and make sure everything is torqued! Now that you're done, you can grab your bottle of brake fluid and flush the system. I lost a lot of fluid so I used a little over a liter of brake fluid. It may be wise to get an extra liter or two in case you lose a lot of fluid.
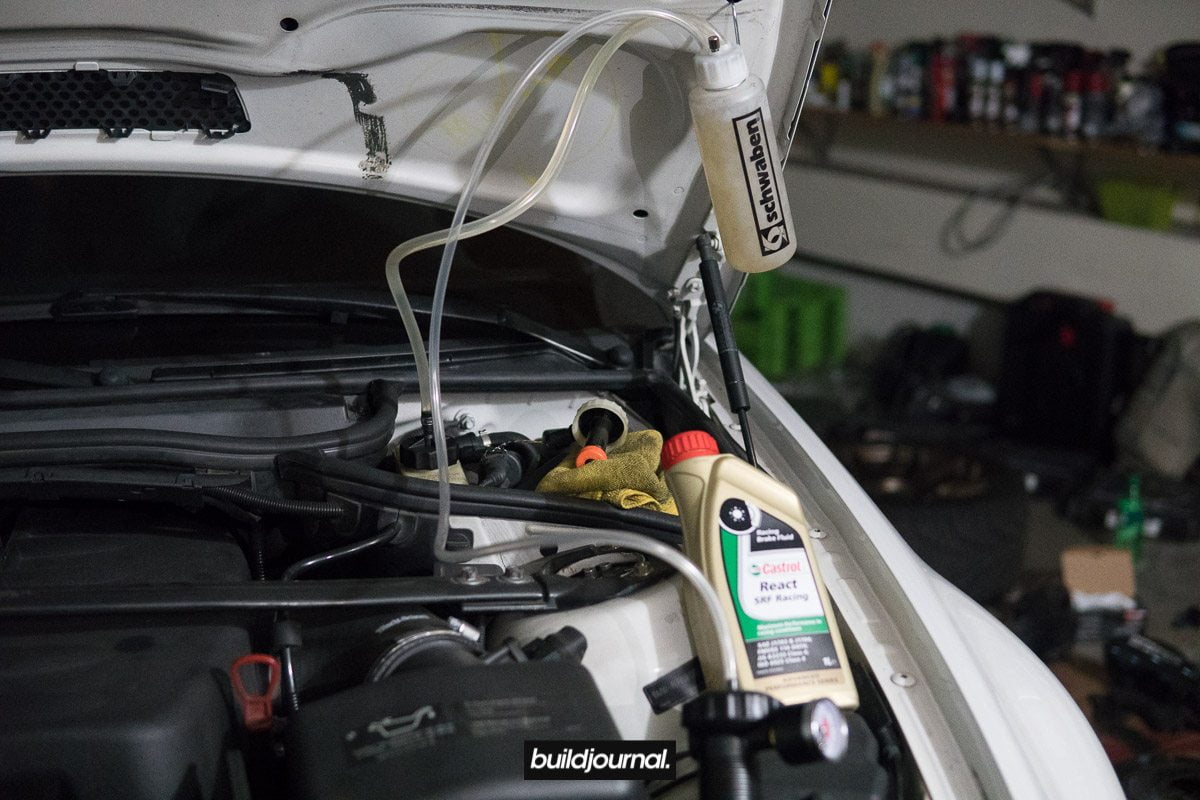
3.2, after you finished properly flushing/bleeding your brake system, I recommend you clear out the ABS system with INPA if you have it or take it to a shop to properly flush.
3.4, torque all 11mm bleeder valves to 9-12 ft-lb. Do a check to make sure all valves are closed including the reservoir cap. Put wheels back on and torque to 88 ft-lbs. Prepare to start the car.
3.5, turn on the car, pump the brakes and check for any leaks in the brake system.
3.6, if you're using new rotors and pads, you must do the break-in procedure. Refer to your manufacturer on instructions.
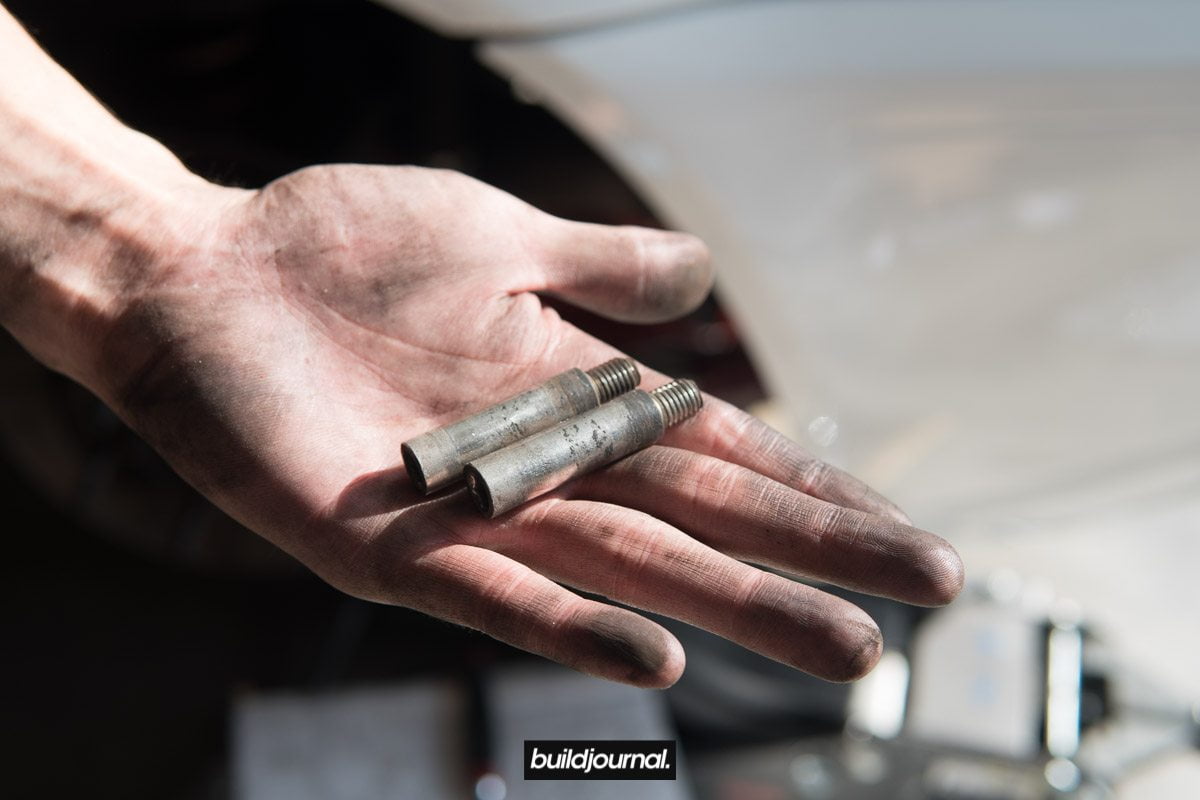
Note: I had to run 12mm spacers up front to clear my Apex ARC-8 wheels 18x9.5 ET35. It might be a good idea to have a couple spacers on hand in case you run into a clearance issue.

E46 M3 2-Step Launch Control for 6MT in Development
We've got some exciting news for all current and future 6MT B-Spec Tune customers. We are currently in beta testing with our B-Spec Tune 2-Step launch control feature for 6MT cars. Yep. Launch Control For all manual transmission vehicles!
Launch control is known to be only available for SMG vehicles only, however with our B-Spec Tune, we can enable launch control on your 6MT. This is an exclusive add-on feature for those that purchase the B-Spec Tune. This will not be available on the ECUWorx software but will be available when you purchase the tune on our online store. The 2-Step Launch Control will limit RPM through (fuel, ignition or fuel/ignition 2 stage cutoff) to a set value when the car is stationary and the throttle is pressed 100%. We are also developing B-Spec performance traction control so that DSC unit will intervene to only allow minimal wheel slip just like a performance based traction control. This means true 6mt launch control with our 2 step ignition cutoff, standing limiter and performance traction control. Changing the rev cutoff method to ignition also introduces the ability to flat foot shift so that fuel is not cutoff when bouncing off the rev limiter.
We also developed the ability to raise the idle RPM for poly or solid engine mounts to reduce the NVH (vibrations). We'll roll out with more details in the future so stay tuned. Check out our initial test video.
Although this feature is not officially released yet, if you purchase the B-Spec Tune now you will still be able to request this feature in the future. If you are an existing client, we will have a tune update request process setup soon.
In Beta Testing:
- Launch Control RPM Limiter (6MT only)
- Ability to raised Idle RPM for NVH (6MT+SMG)
In Research & Development:
- Flat Foot Shifting (6MT+SMG)
- Fuel Based Cutoff
- Ignition Based Cutoff (Allows for Flat Foot Shifting)
- Ignition/ 2 Stage Fuel Cutoff (Default)
- B-Spec Performance Traction Control for Non M-Track (MK20 6MT Only - Required for Launch Control 6MT)
- Torque Intervention Reduction
- Minimum Torque Intervention
Last Chance for B-Spec Tune at $199
This is your last chance to get the B-Spec Tune for your E46 M3 for $199! After Cyber Monday on 11/27, we will be increasing the B-Spec Tune price to $279. So act fast and head over to our page to purchase it now. If you're not ready to flash yet because you're waiting for your header install or your car is in the shop, we can wait. As long as you make the purchase on or before 11/27 we will wait until you are ready. If you for whatever reason can't flash it, we will give you a full refund. Request to cancel order must be submitted before we send out your tune for a full refund.
Product Features
- Up to 15 whp / 10 wtq gains over stock baseline tune
- Up to 30 whp / 15 wtq gains over stock baseline tune with catless
- Remove CEL for catless exhaust setups
- 20+ free add-on features
- Optimized for US 91 to 93 octane
- Improved driveability & powerband
- Tuned VANOS, knock sensors, fuel, ignition and more
- Software available for both US and European specification cars
- Occasional flames with Buildjournal Exhaust Backfire Burble Tune add-on
- Safe and will not overheat the car (ensure proper cooling system)
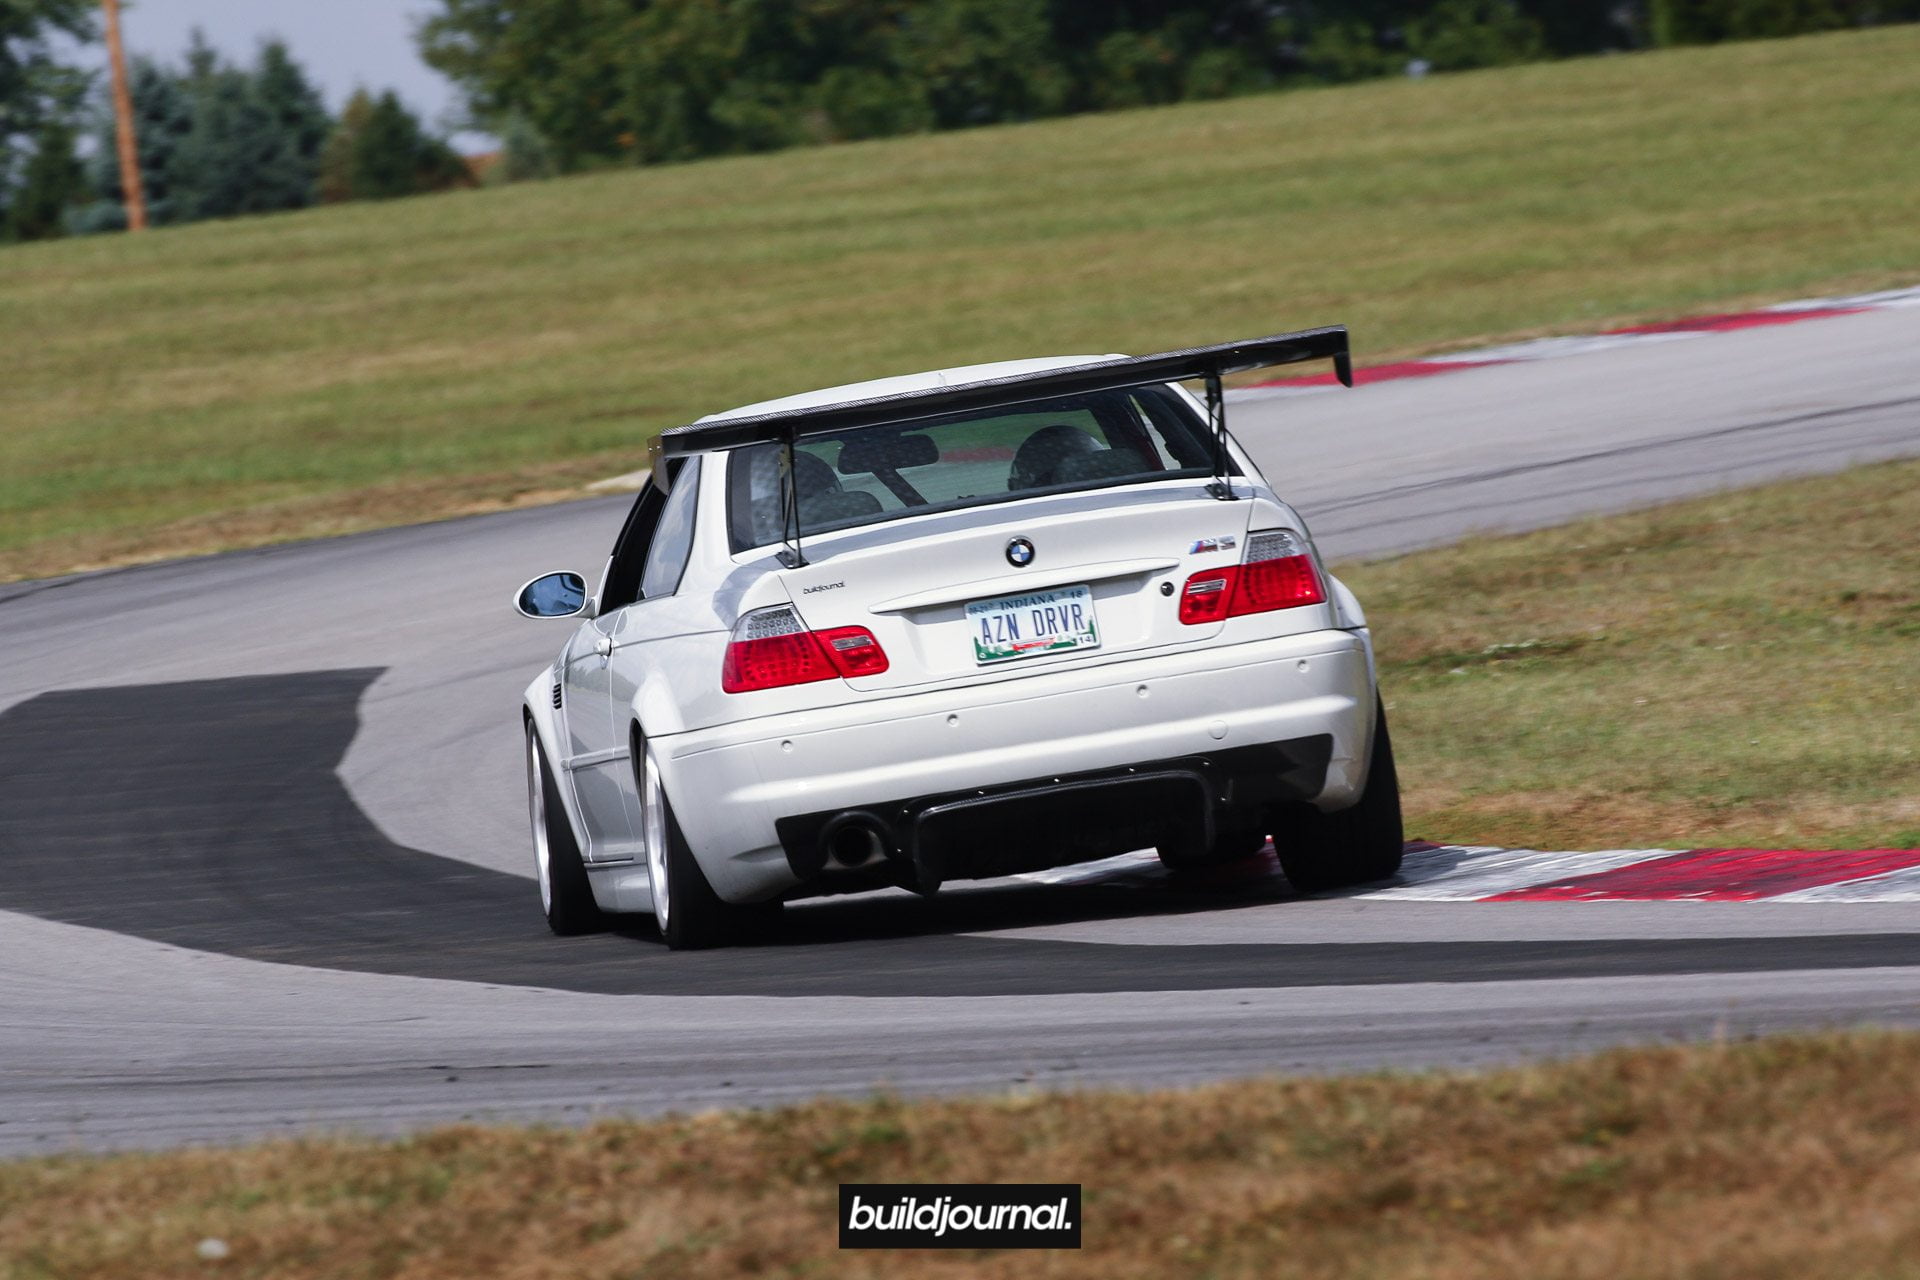
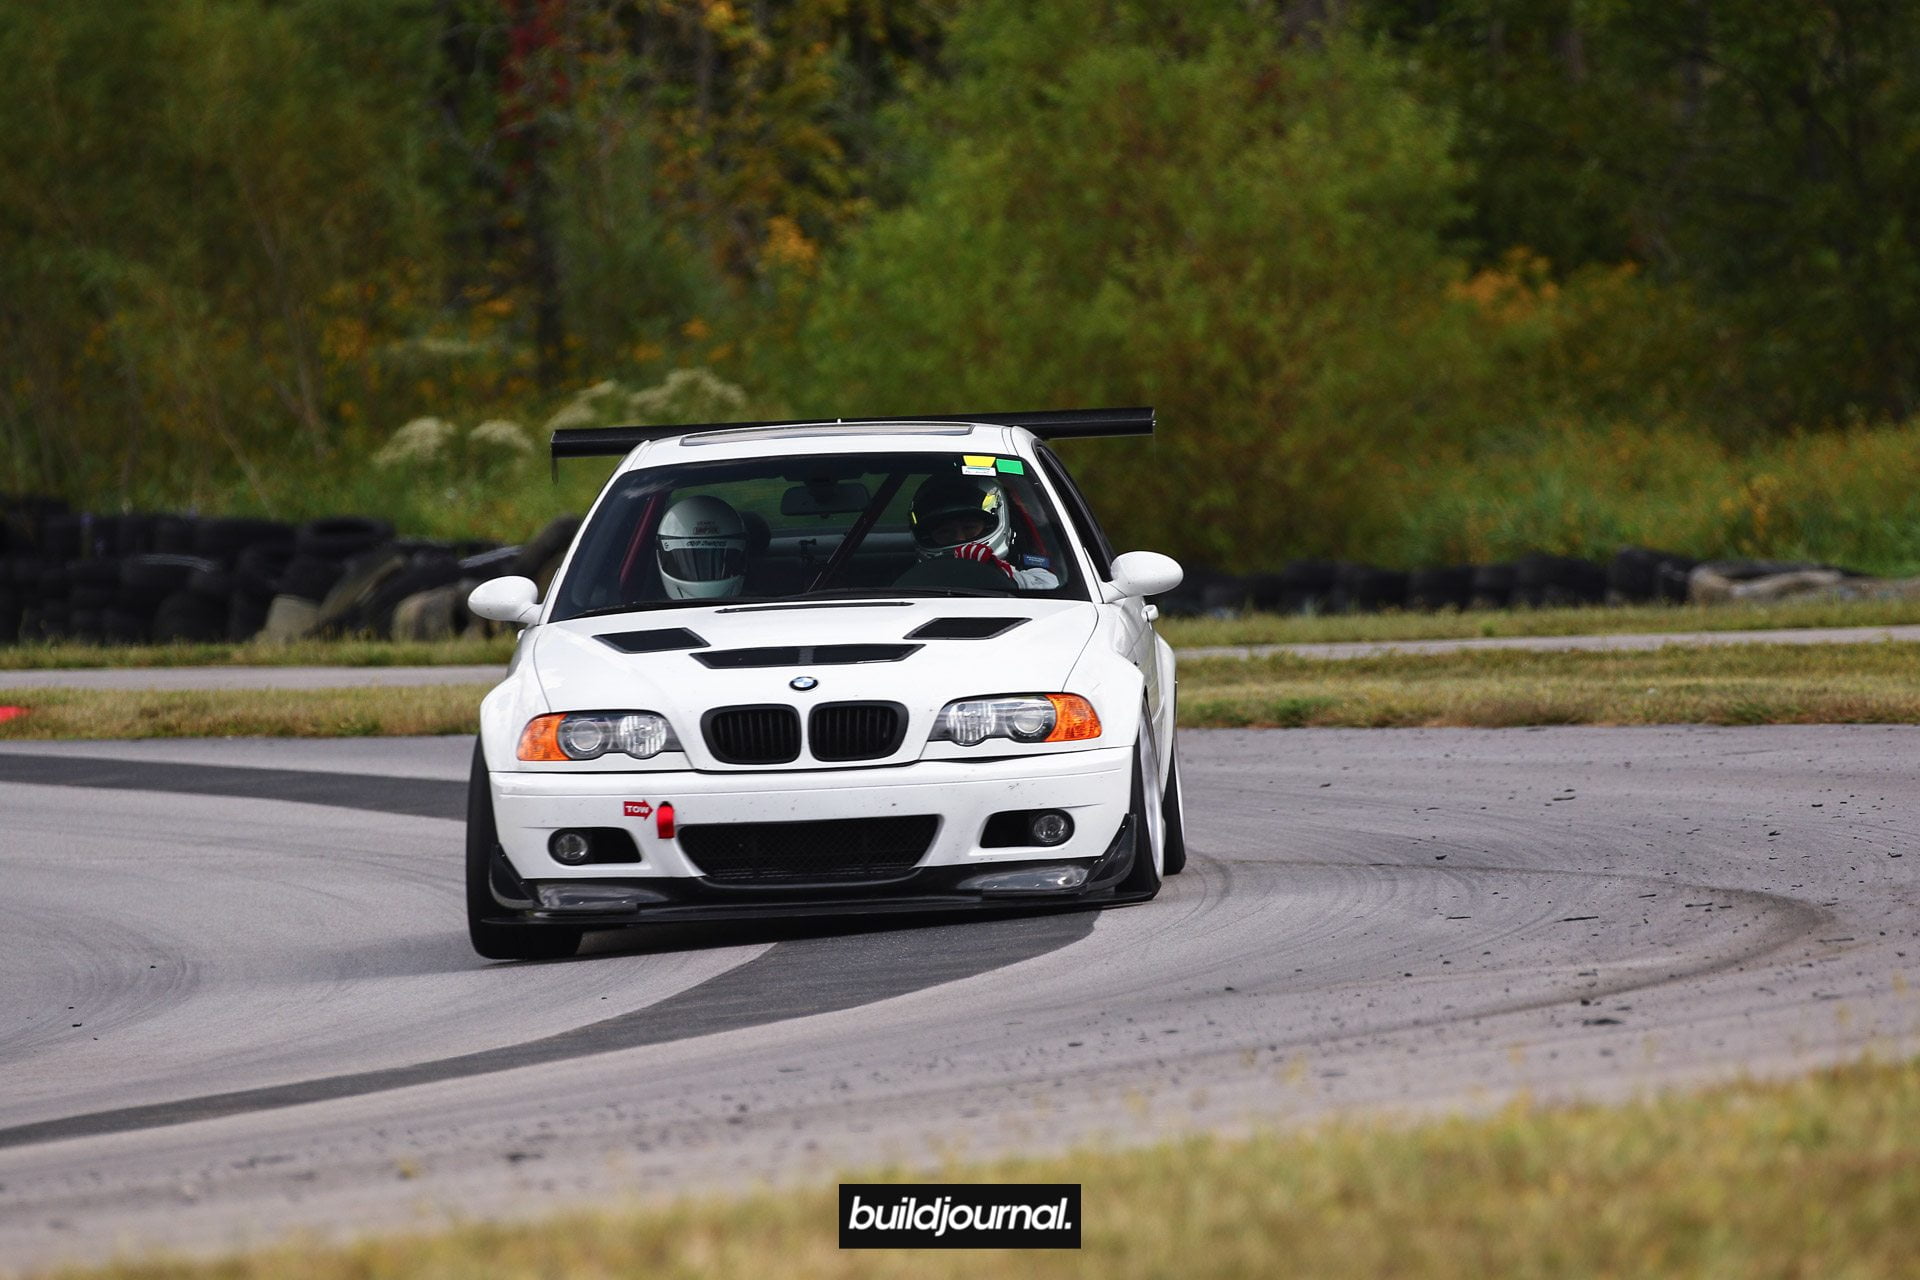
Track Toy: Huy's Tracked Out E46 M3 with B-Spec Tune
You can purchase our B-Spec Tune for the E46 M3 for $199. Get up to 30 whp and 15 wtq with a simple E-Flash process. Send us your file, we tune, you flash.
Huy's track setup:
- Ohlin Coilovers
- Vorshlag Camber Plates
- Ground Control Rear Camber Arms
- Bimmerworld Solid Control Arm Mounts
- 18x9.5+22 ARC-8 Square
- 265/35/18 Yokohama AD08R


Trinity Autosport E92 M3 Race Car with Apex SM-10 Wheels
In case you missed it, here’s a little video we did with Apex Race Parts and Trinity Autosports’ E92 M3 with the new Apex SM-10 wheels. The new SM-10 wheels feature “I” Beam Spokes, beefier lips, and a nice concave look. It’s a pretty good looking wheel and the color looks even better in person especially the Anthracite on the Le Mans Blue. I met up with Ryan from Apex and Joe from Trinity at their shop to discuss how we wanted to shoot. It wasn’t the best shooting condition because there was so much hard light outside and because of that I decided to shoot inside the shop first. Luckily the clouds started to move in towards the afternoon and I was able to get the car outside to shoot.
Check out the video above and let me know your thoughts on the new wheel from Apex. Also, check out their other new wheel the Apex FL-5.
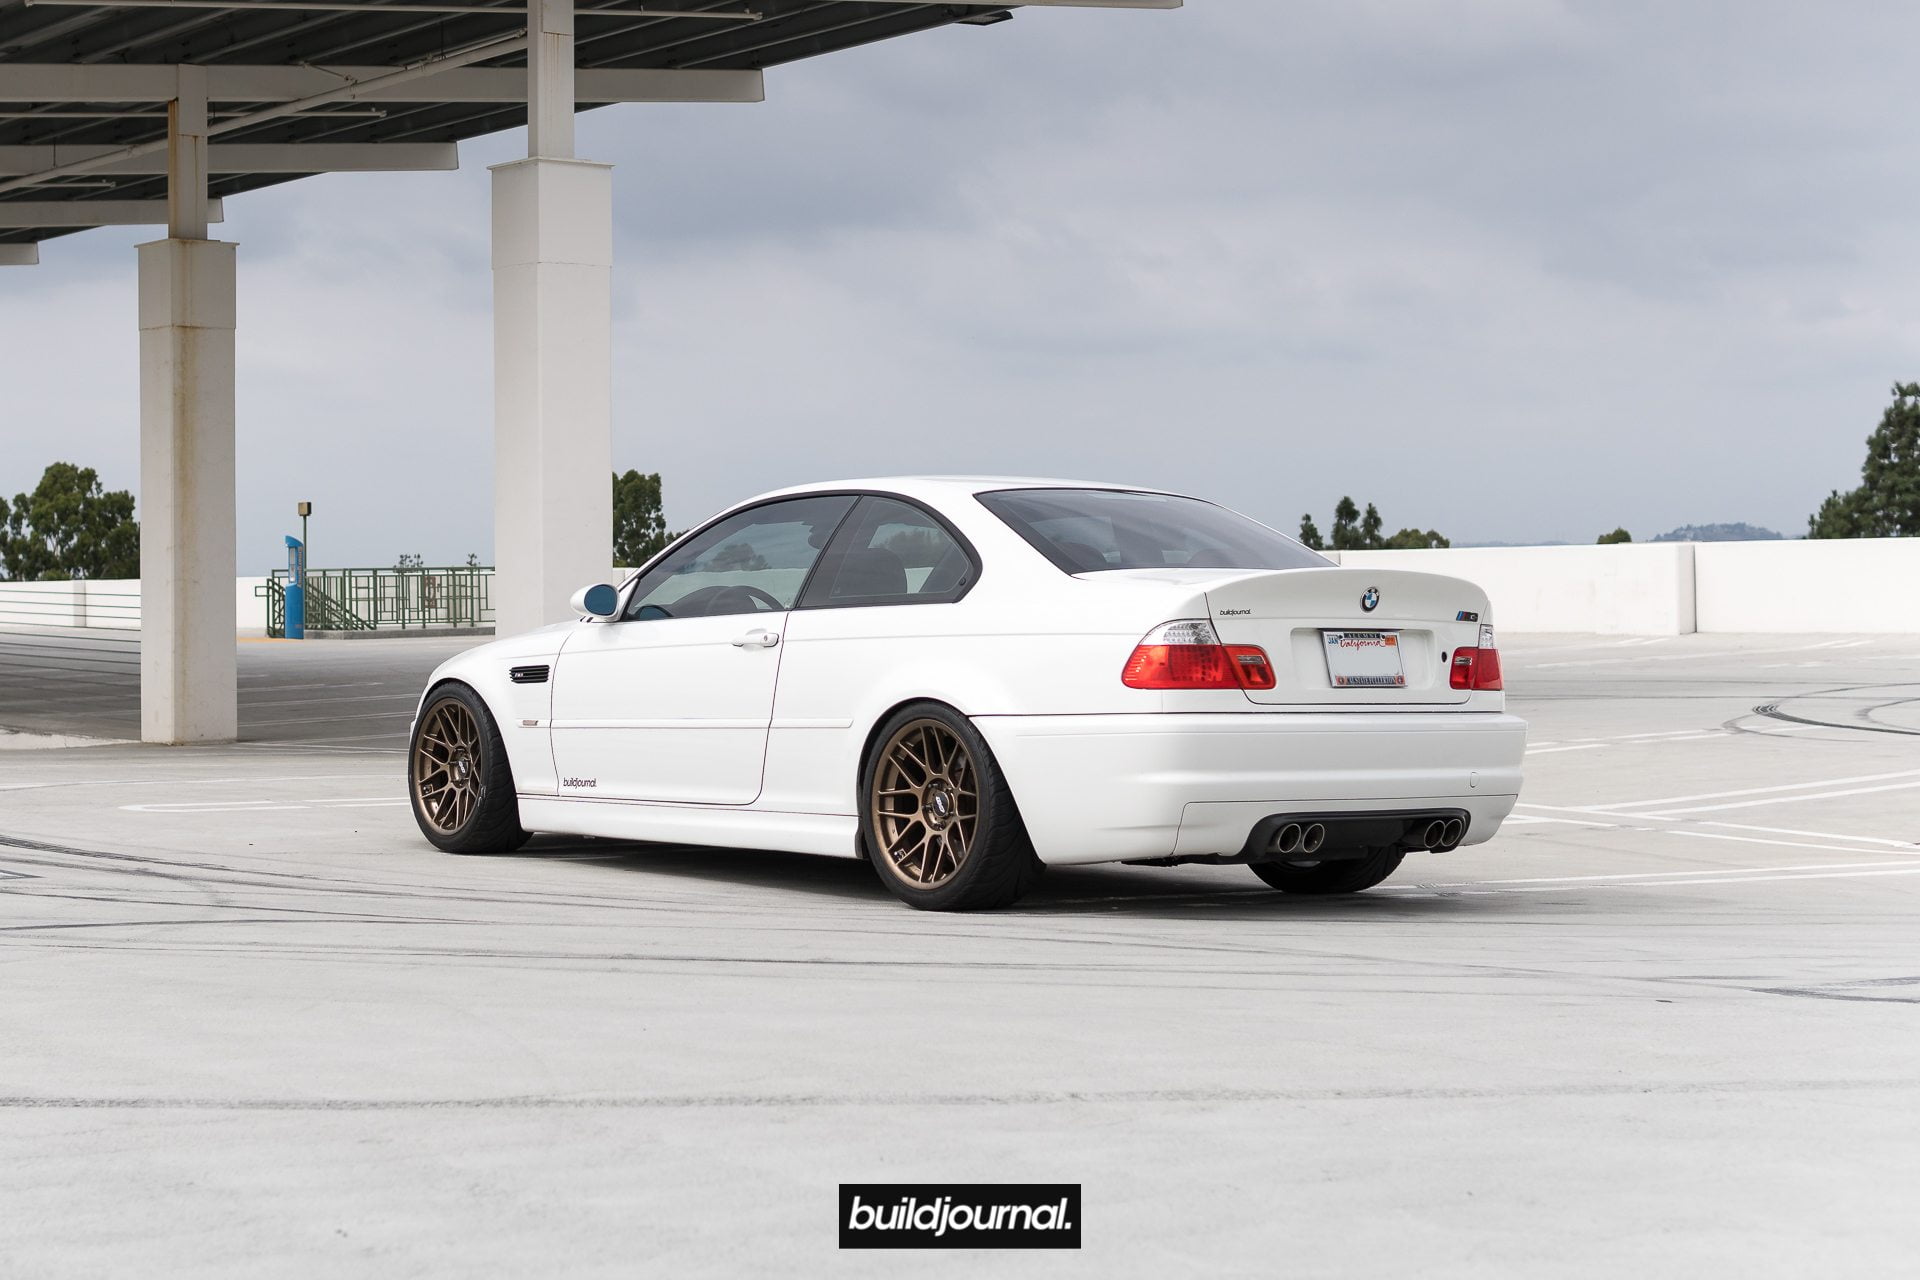
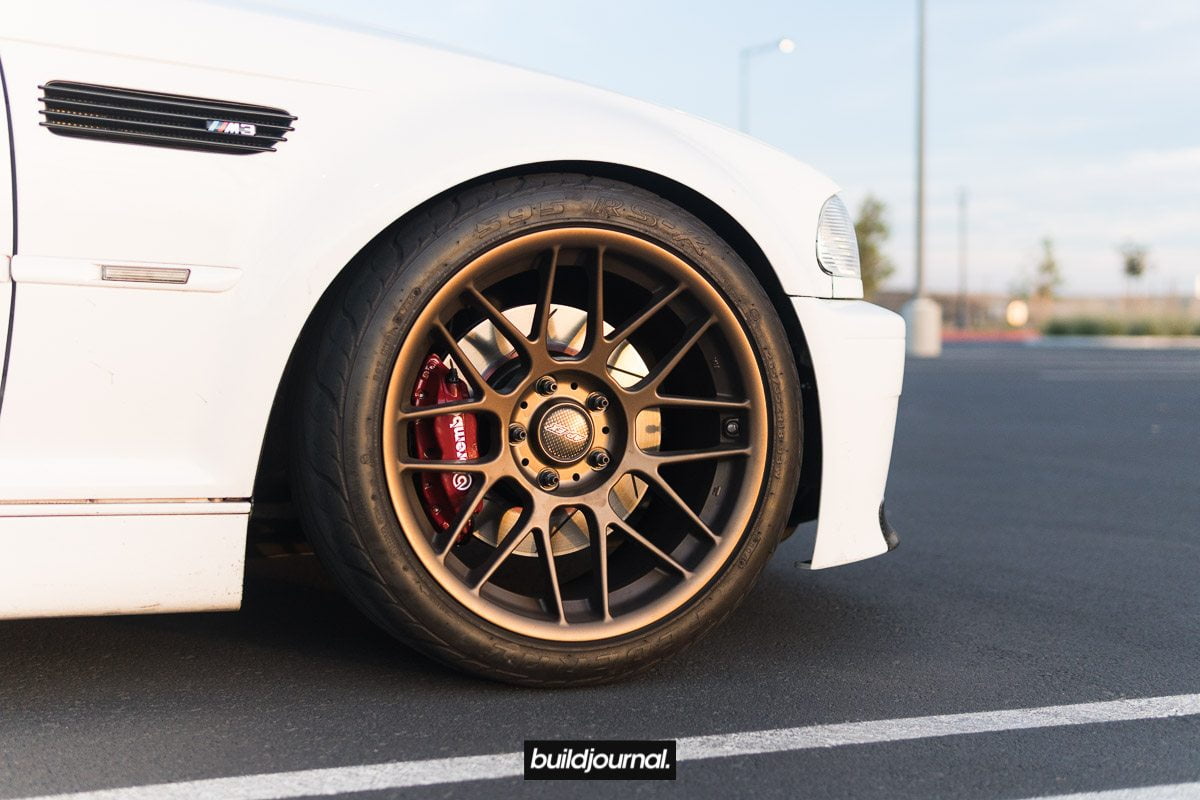
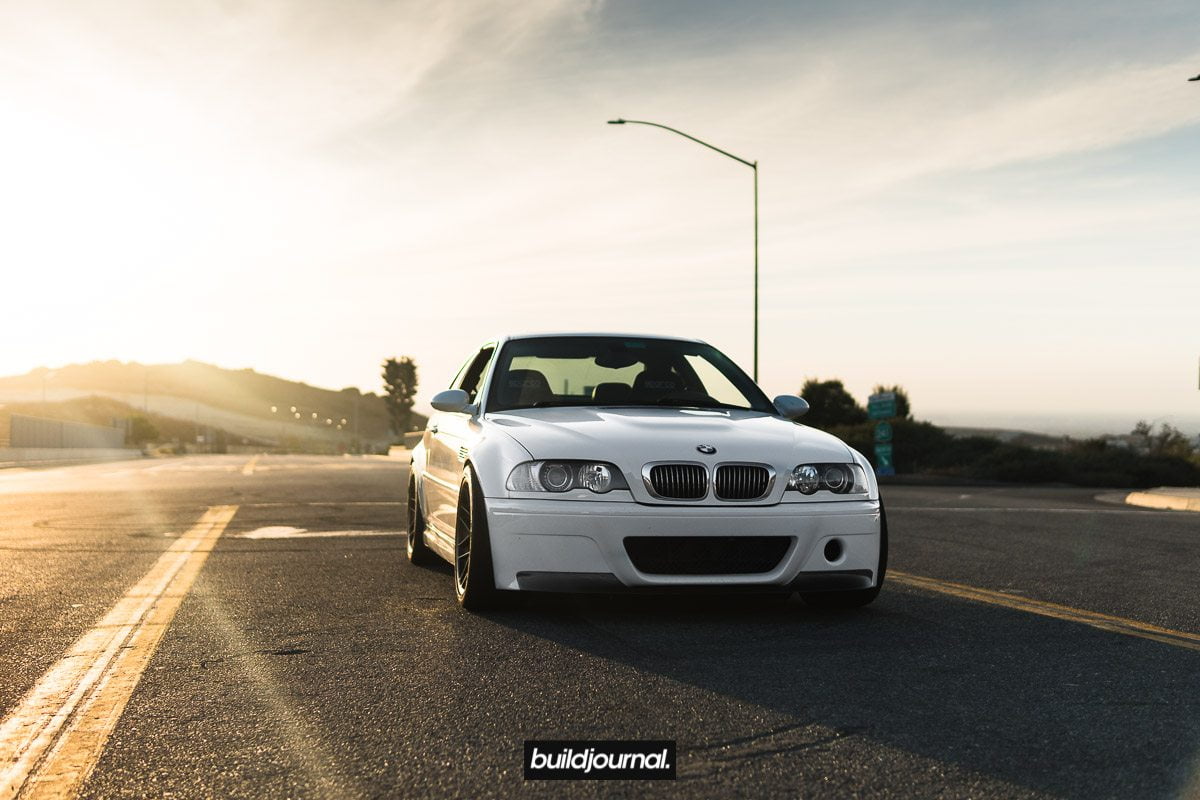
Apex ARC-8 Matte Bronze on Alpine White E46 M3
I pulled the trigger on some Apex ARC-8 Matte Bronze wheels in 18x9.5 ET35 last Thursday and just could not wait. I suck at waiting. And I'm the type of person that would drive 50+ miles same-day to pick up parts for my car because waiting is not an option. My new wheels were expected to arrive early next week, but on Saturday I was unexpectedly greeted by a text notification saying that 2 big packages were delivered. I looked outside and there it was. The most heart warming sight for any gear head that loves ordering car parts - boxes on your porch. I found a tire shop that was open on Sundays and so I got them installed immediately.
I've always been a fan of White on Bronze since I had a Subaru Legacy back then. I just never thought it would make sense do get that color combination on a BMW, but I never see white on bronze anymore (even on Subaru's) so I decided to try it. Apex Race Parts is a popular choice for the E46 M3 community. If you remember my previous setups, you'll know this is my 4th set of wheels from them and they're all Apex ARC-8s in different colors and sizes. Just a few months back they introduced the Matte Bronze color on the ARC-8s and ever since I saw it, the intent to buy was always on my mind. I got the wheels installed and went straight to the wash to get it clean for a mini photoshoot.
- Apex ARC-8 Matte Bronze 18x9.5 ET35
- -2.5 front camber / -1.8 rear camber
- Federal RSR 265/35/18 tires
- 3mm spacer in front / 12mm spacer in rear
Comment below and let me know what you think about the new color. Like it? Satin Black was better? Hyper Silver?

Big SoCal Euro 2017 Photos
I wasn't planning on going out to Big SoCal Euro this year, but last minute change of plans opened up my Sunday and we headed to San Diego in the morning. The morning greeted us with a little rainfall and I, along with the others on the caravan down to SD, was a little bummed because I kept my car clean the entire week. Right as we entered San Diego it started raining even harder, but fortunately by the time gates opened at Qualcomm, the rain had stopped. I was glad the rain stopped just in time because I wanted to bring my camera out, but I wasn't going to if the rain continued.
Like last year, Big SoCal Euro 2017 brought out a lot of different European makes and it's pretty cool to see all kinds of car culture come into one spot. We walked around and took a few photos, checked out the drag races, bought some cleaning supplies from Chemical Guys, and chatted it up with the vendors and owners. Take a look at some of the photos we took. Sorry, it's mostly BMWs.

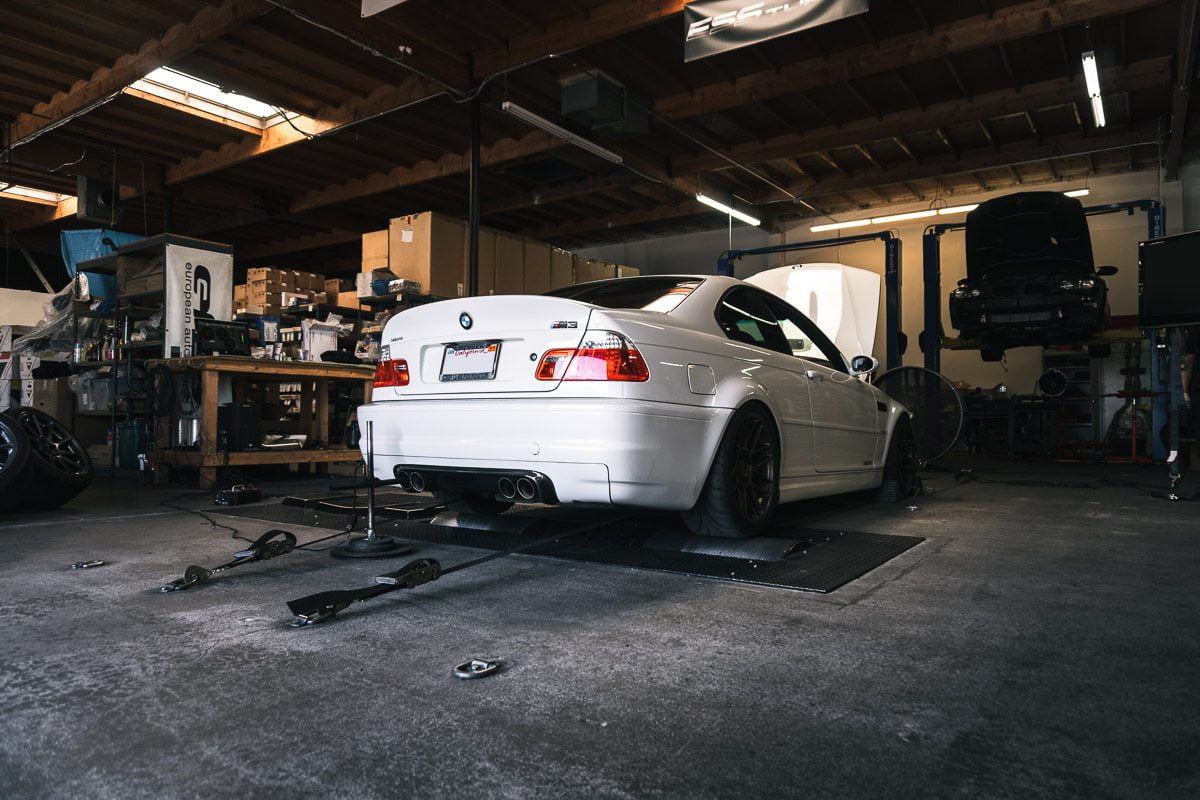
Oscar's F30 with Bootmod3 N55 Custom Tune Dyno
Oscar took his 2013 BMW F30 335i with the Bootmod3 N55 tune to the dyno over the weekend. After doing live-data logging/tuning with proTUNING Freaks over the past few days, he can finally see how much power he is actually putting out. It was a bit hot inside the dyno facility, but the car was able to record 367 whp and 456 wtq. That is a lot of power from an N55 with stock fuel system eh?