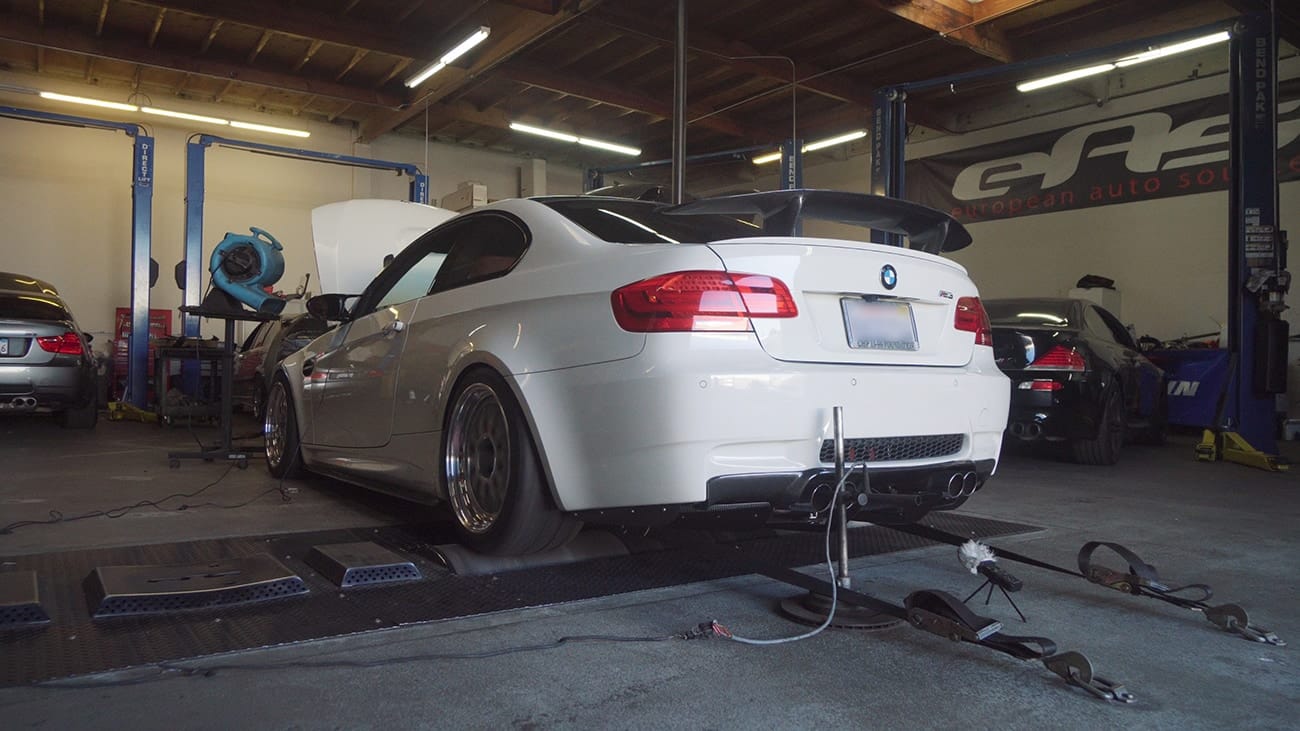
This BMW E92 M3 Exhaust Will Make Your Monday A Little Better
I went on the dyno with my BMW E92 M3 to do a few test/tune runs with the new APE X85 (E85) Flex Fuel Kit and although I did the runs with minimal ethanol the results were pretty good. Unfortunately getting max power wasn’t the goal of this session so I’ll be going back with a full tank of ethanol to do some performance runs, but for now you can listen to the Supersprint Race Exhaust and Macht Schnell X-Pipe setup recorded on my Tascam professional audio recorder and Rode stereo mic stitched together. Get your headphones or earbuds and watch this video.
Performance Upgrades
- ESS Tune (91 octane)
- Macht Schnell X-Pipe
- Macht Schnell Stage 2 Intake
- Macht Schnell Pulley kit
- Supersprint Race exhaust
- APE X85 Flex Fuel kit


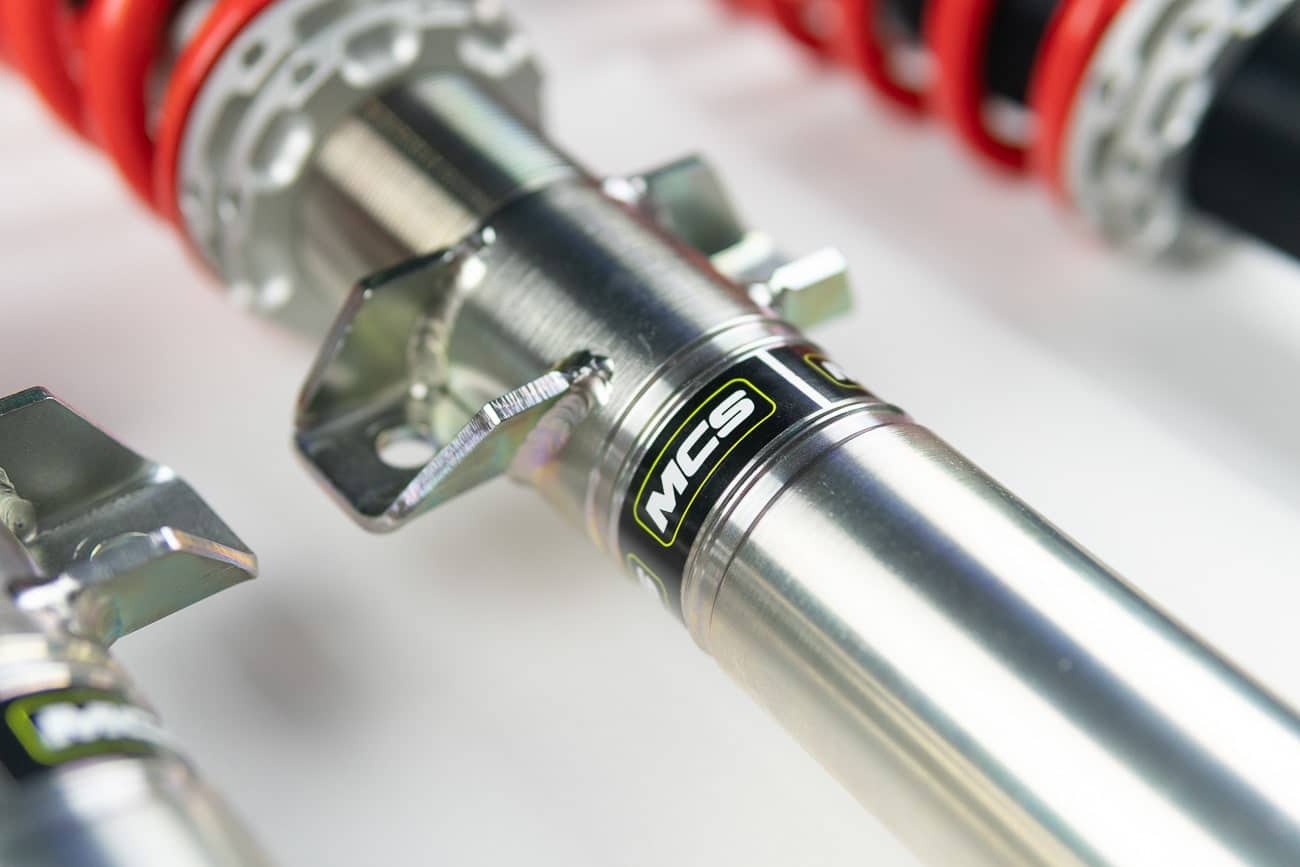
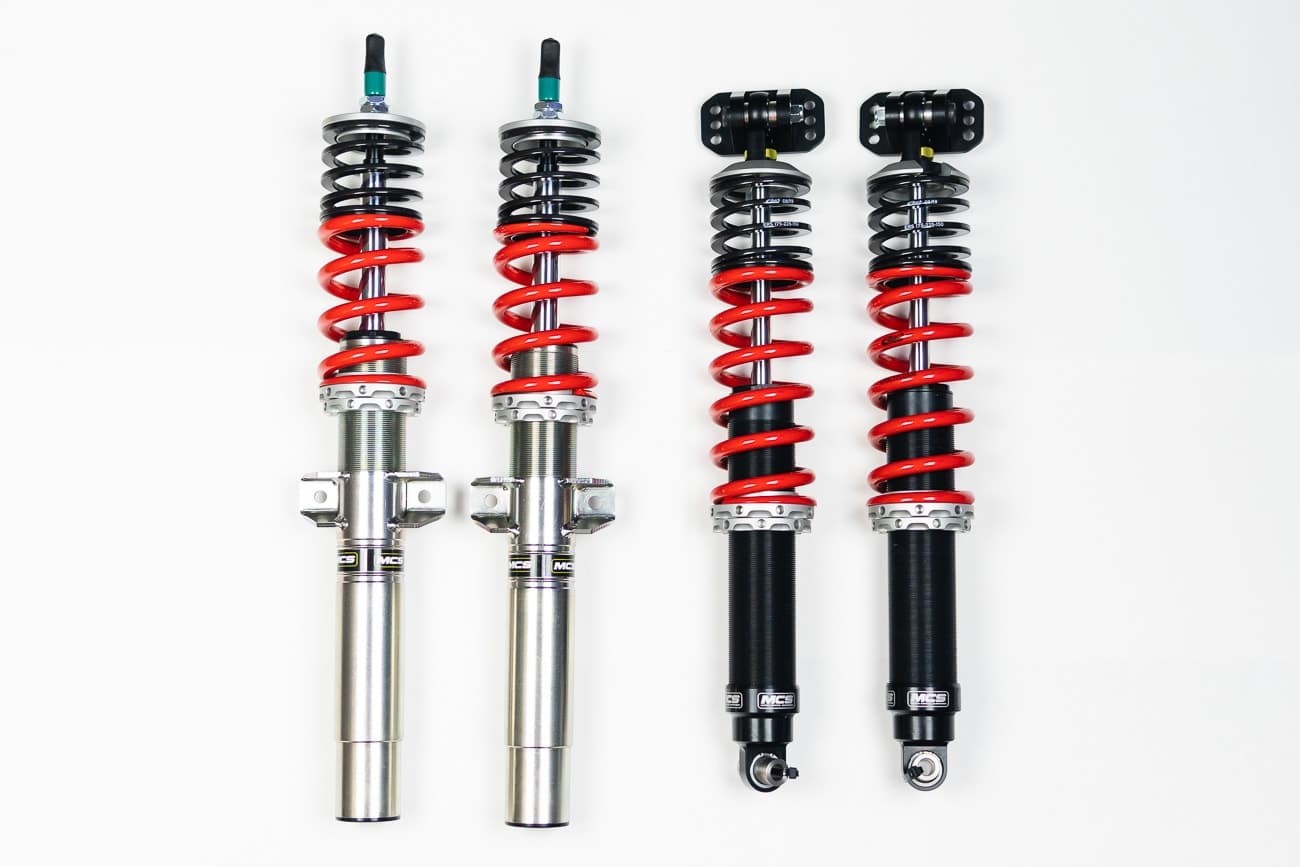
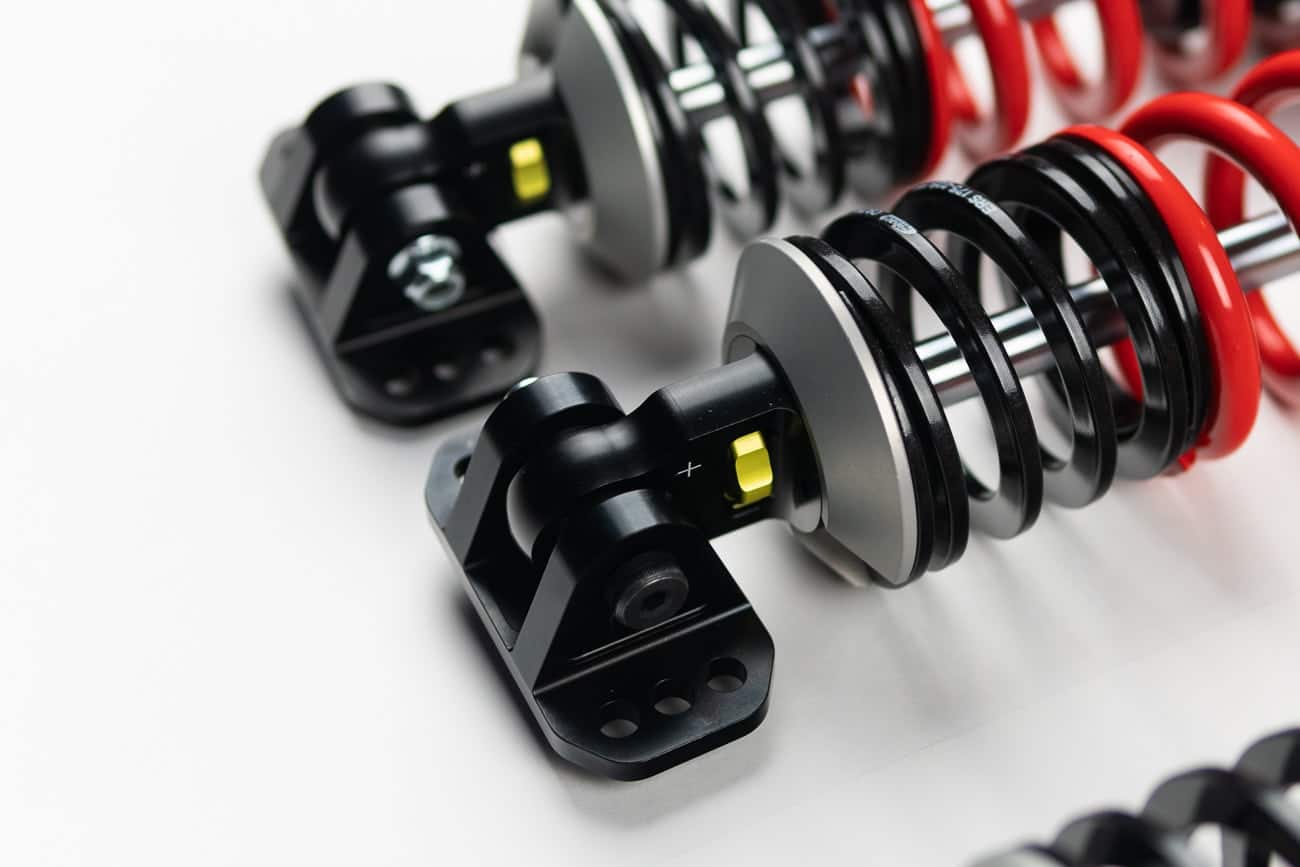
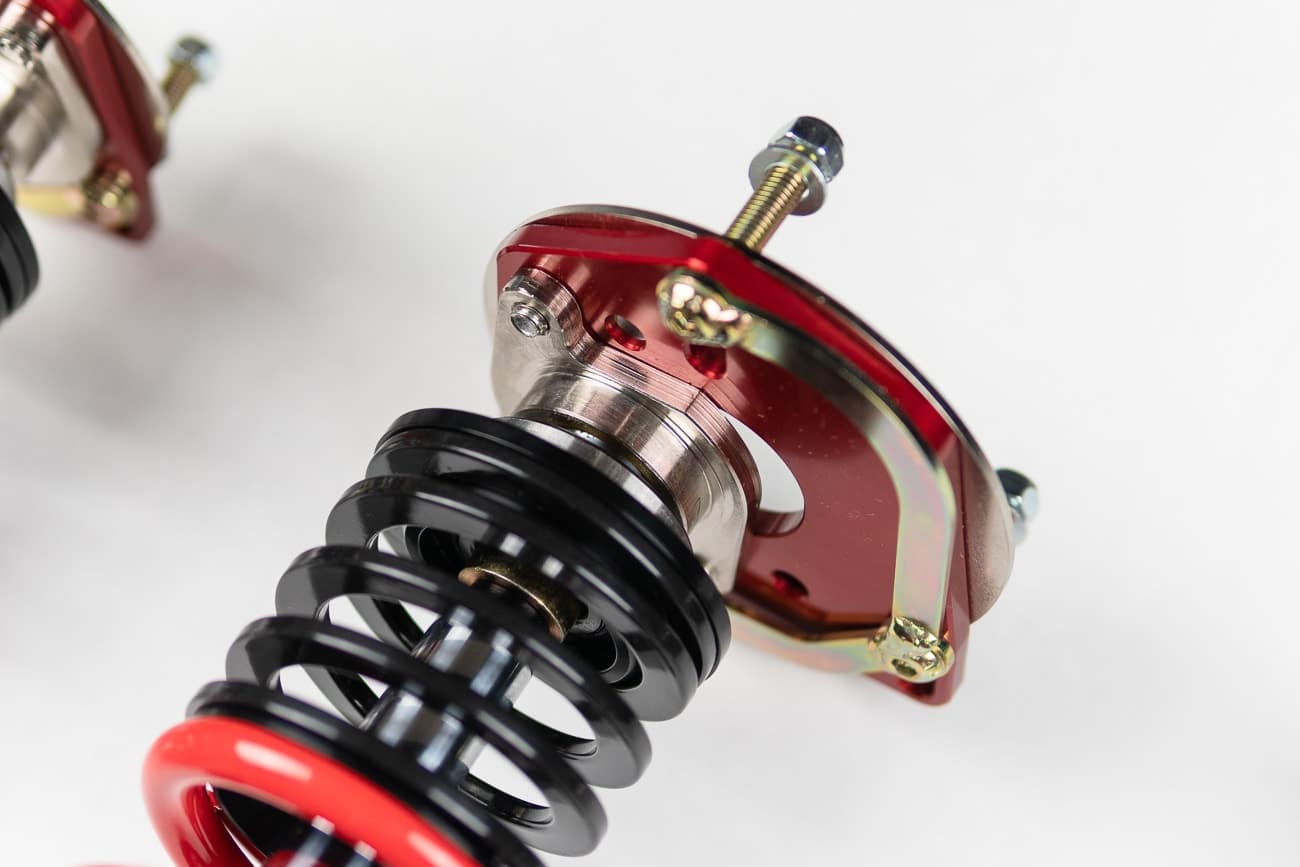
Unboxing my Motion Control Suspension 1WNR Coilover Kit
It’s been a few months since I’ve installed my Motion Control Suspension 1WNR kit and even when downgrading to a 1-way coilover kit, I consider this an upgrade. I’ve never really felt suspension like I did with the MCS kit. Unfortunately this isn’t going to be a review just yet, but just a photo gallery of what comes in the box and pictures of the kit once assembled with the Vorshlag camber plates and Eibach ERS springs. The product is just a masterpiece and a work of art – almost too nice to get it dirty. Enjoy this coilover porn gallery of MCS goodies.


Buttonwillow CCW1
Motion Control Suspension 1WNR; 5 clicks F / 4 clicks R (from closed)
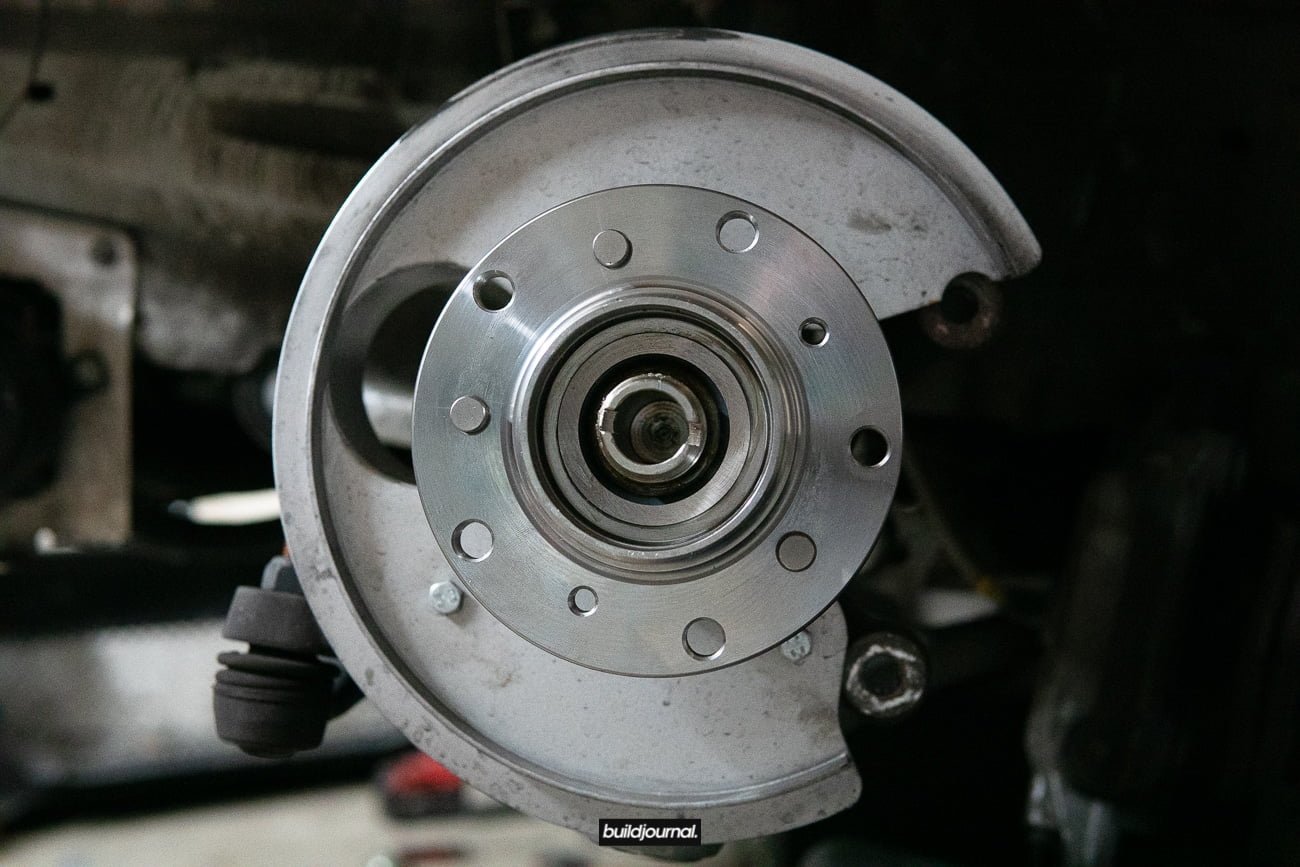
E46 M3 Wheel Bearing DIY
If you’re starting to experience noise coming from the wheel area of your E46 M3 that gets louder as the rotation spins faster, you may have a bad wheel bearing. You can test your wheel bearing by taking off your wheel and rotor to test for any irregular play, rotation and noise. It’s very important to take care of any wheel bearing issues because it can lead to a full lock up while you’re driving on the road. In this DIY we will be doing just the front wheel bearings.
Tools Required
- 7mm allen
- Schwaben 46mm socket - 003302SCH03A
- Flat head screwdriver
- Hammer
- 3-jaw puller
- Long breaker bar
- Wheel bearing - 31222229501
- Dust cap - 31206777789

Install Directions
1. Remove caliper
1.1 Get your car on a nice even surface and jack up the front end to remove the wheel and access the brake caliper/rotor.
1.2 Remove your brake caliper and rotor.

2. Remove wheel cap
2.1 Get a flat head screw driver and pry out the center cap. If you do a clean pry you can re-use the center cap. I’ll tell you right now though, there’s a good chance yours is gonna be a bit mangled after chiseling it out.

3. Pry metal security tabs
3.1 Get a flat head screw driver and hammer out the two metal tabs that are bent inwards towards the center lock.

4. Remove 46mm nut
4.1 I tried using my Li-ion Milwaukee impact driver to remove the 46mm nut, but it wasn’t enough. I had to use a large 4 ft pry bar. You can also try using the handle bar from your jack if it fits over the ratchet.

5. Remove old wheel bearing
5.1 This is the trickiest part. You need a 3-jaw puller to remove the old wheel bearing from the spindle. I recommend getting two different sizes to borrow from your local auto parts store because the jaws need to reach the wheel bearing. The first one I borrowed did not and I ended up making another trip.


6. Remove left over wheel baring parts
6.1 There’s a really good chance your wheel bearing isn’t going to come out in once piece. In my case, half of the bearing got stuck on the spindle and I had to use a smaller 3 jaw puller to remove this.

7. Grease up the spindle and wheel bearing

8. Install new wheel bearing
8.1 Once installed, torque the 46mm nut to 214 ft-lb.
8.2 Use a flat head to pry back the security tabs back in to the center hub.
8.3 Reverse the order to install your caliper and wheel back on.

Replace Your E46 M3 VANOS Solenoid DIY
Are you getting fault codes for your VANOS? Don’t freak out just yet, it might just need a replacement solenoid. The problem with the VANOS solenoid pack is that the soldering connections on the printed circuit board (PCB) are really weak and overtime they will crack resulting in loss of function of the solenoid valves. The solution is to replace your VANOS solenoid pack with a new or rebuilt one. We recommend purchasing the solenoid pack at Beisan Systems as well as all the supporting parts to replace your o-rings, etc.
Below are the possible fault codes that can trigger with a faulty VANOS solenoid pack on your E46 M3 (Rajie from M3Forums). Although in some cases, these fault codes can trigger bigger problems which I hope you don’t have. There are two major issues that can result in engine failure. Those are broken oil pump driver tabs and/or a loose sprocket mounting bolt. Please consult a professional mechanic to diagnose your exact issue before you replace parts.
VANOS Intake Fault Codes
P0011 (BMW 67, 0x43): Vanos intake timing over advanced
P0012 (BMW 72, 0x48): Vanos intake timing over retarded
Pxxxx (BMW 184, 0xB8): Vanos intake position control
P1525 (BMW xxx, 0xxx): Vanos intake solenoid open circuit
VANOS Exhaust Fault Codes
P0014 (BMW 22, 0x16): Vanos exhaust timing over advanced
P0015 (BMW 21, 015): Vanos exhaust timing over retarded
Pxxxx (BMW 185, 0xB9): Vanos exhaust position control
P1531 (BMW xxx, 0xxx): Vanos exhaust solenoid open circuit
Tools Required
- 32mm wrench
- 22mm wrench
- Restrictor valve oil filter #11-36-1-401-971 (optional)
- S54 Rebuilt Vanos Solenoid Coil Pack
- S54 Vanos Sealing Plate Repair Kit
- Brake cleaner
- Strong earth magnets

VANOS Solenoid Replacement Instructions
1. Remove intake duct using needle nose pliers to remove all 4 clips.

2. Remove radiator fan shroud and fan.
2.2 Remove the 3 push pins holding the shield. There is one on top directly center, one driver and one passenger. Remove using pliers. I don’t have pictures of the passenger side of the shield because I don’t run that. This is a picture of the driver side shield.

2.3 There are a total of four T25 torx screws (one on each corner) and 2 plugs on the passenger side of the radiator/shroud. Unplug cables first, then remove the four screws. The passenger side top torx screw (pictured below) is longer than the others. Tape up plugs and set aside.

2.4 Remove passenger side lower screw.

2.5 Remove fan using the E46 M3 BMW Water Pump Pulley Locking Tool and a 32mm wrench. The fan clutch nut is reverse threaded. Lock in the water pump pulley and unscrew using the 32mm wrench. Spin the fan to unscrew a little faster, but make sure you don’t let the fan drop.

3. Remove the VANOS solenoid unit.
3.1 Loosen the 22mm oil restrictor valve on the VANOS solenoid valve body. We’re not removing it, but just loosening it so it’s easier when it comes to removing the unit.
3.2 Unplug the electrical connector pin located on the passenger side of the VANOS solenoid pack.

3.3 Remove the five 5mm hex bolts on top of the VANOS unit. Once these bolts are out, you can slide out the entire unit. Make sure to use a drip towel to catch some of the oil.

4. Remove VANOS solenoid pack from valve body.
4.1 Remove the four 4mm external torx socket bolts located on top of the VANOS solenoid pack.
5. Clean VANOS solenoid restrictor valve.
5.1 Remove the 22mm restrictor valve entirely.
5.2 Clean/replace oil filter (11-36-1-401-971).
5.3 Replace both o-rings on valve. The new o-rings will come with the Beisan replacement solenoid.

Reference: ShopLifeTV
6. Clean VANOS solenoid valve body.
6.1 Use brake cleaner to wash the valve body thoroughly.
6.2 Use magnets on the solenoid valves to open the internals for cleaning.

Reference: ShopLifeTV
7. Clean sealing plate.
7.1 Remove the old o-rings on the sealing plate. Use razor or sharp knife to cut away as much of the old material as you can. It will be baked on there.
7.2 Clean plate with brake cleaner.
7.3 Install new o-rings.

Reference: ShopLifeTV
8. Reinstall the VANOS solenoid unit.
8.1 Install the oil restrictor valve back into the valve body, but do not tighten all the way.
8.2 Install the solenoid pack on the valve body using the four torx bolts. Tighten to 3 ft-lbs.
8.3 Add the sealing plate back on the VANOS unit and install back on car. Make sure the plate is installed smoothly without dislodging any of the four o-rings.
8.4 Tighten the restrictor valve (hand tight).
8.5 Install the 5 bolts back on to the VANOS unit. Torque each bolt to 7 ft-lbs.
8.6 Install fan shroud elements and check for leaks.


BMW E46 M3 Streets of Willow - 1:23.685
Back at Willow Springs International Raceway for the Streets of Willow CW configuration with OnGrid Track. Weather was a high of 91 degrees and I’m on my 4th day with the BFGoodrich R1 S tires and the grip isn’t anywhere near what it was even my last track day.
The last time I was here, I was battling my friend for GridLife Battle and I was able to do a 1:25.653 with a front splitter and SUR4 (non G) street tires. Now I have a rear wing and the DOT slicks so I was able to improve my time by about 2 seconds. My last 3 laps were clean and clear and set the PB of 1:23.685 on the last lap of the first session.
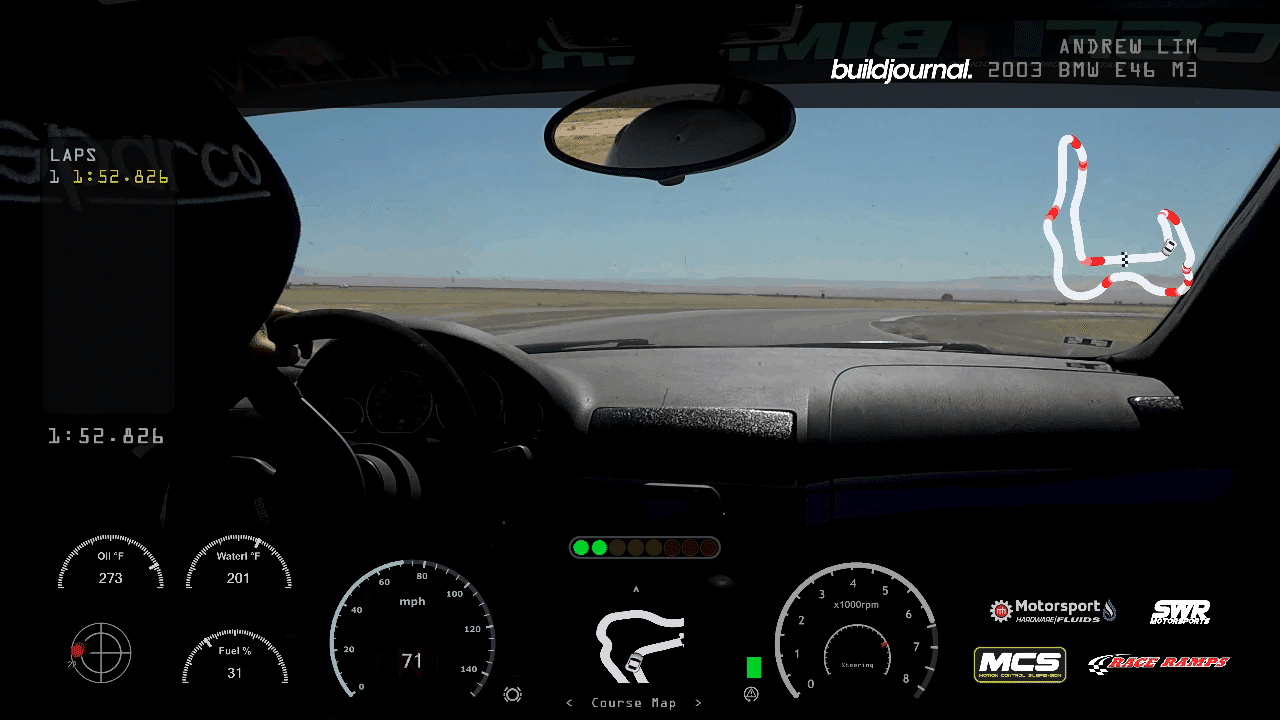
BMW E46 M3 Buttonwillow CCW1 - 2:01.891
First time at Buttonwillow running the CCW1 configuration for Bimmer Challenge. This track is really fun and it actually feels like the natural direction of the course. The turns connect very smoothly which creates some really fun transitions e.g. Phil Hill all the way to Truck Stop. You’ll see my brake pressure sensor go off randomly, but I’m intentionally braking in acceleration zones to push in my caliper pistons back in. I have very bad knock back on my Stoptech ST40 calipers.
Temperature was in the low 90’s with a slight breeze. This PB came in on the 4th session on lap 3. Car is weighing at around 3,100 lbs with full aero.

Ultimate Lightweight Battery Guide
Weight reduction is a constant quest for those who track their cars and battery weight savings can be huge. Not only do lighter batteries save weight, but it can last longer as well. When shopping for a new lightweight battery, you're going to have a lot of research to do. This Ultimate Lightweight Battery Guide is meant to assist your research to find what the best battery is for you. While taking a look at this guide, you'll want to pay attention to the following variables: weight, technology, price and CCA.
Disclosure: Some of the links in this article are affiliate links, meaning, at no additional cost to you, we will earn a commission if you click through and make a purchase. Your contribution helps us purchase new tools and maintain our website to continue creating articles such as this. We thank you for your support.
Battery Weight
The OEM BMW Battery (Exide) weighs 45.5 pounds! As we explained earlier, a lighter battery means a lighter car which means potentially a faster car. You want something as light as possible, however as the lighter the battery gets, the lower the CCA gets. What's a CCA?
Cold Cranking Amps (CCA)
This is the measurement of amps a battery can deliver at 0F for 30 seconds without dropping below 7.2 volts. This is the most important rating when choosing a battery because you want your car to start when you need it to. What's the point of weight savings if your car can't start on a cold morning track day? Another variable to consider is CA which is the amount of current a battery can provide at 32F or 0C. If you live in an area with warm climates, consider looking at CA. The OEM BMW Battery (Exide) has a CCA of 640.
Battery Technology: Flooded vs AGM
The OEM BMW Battery is a heavy wet cell (flooded) based battery on older lead acid battery technology. The new technology is called AGM and it stands for Absorbed Glass Mat. These are specialty batteries that usually cost more than twice as a premium wet cell. They store very well and do not tend to degrade as easily. They are generally the safest lead acid batteries you can buy. They also offer greater life span and greater cycle life than a wet cell battery. AGM allows the electrolytes between the plates to be in close proximity increasing the discharge and recharge efficiency. These are good for deep cycle and deliver best life performance if recharged before 50% discharge rate.
Battery Price
Lithium and carbon fiber batteries can go upwards of $1,000 easily, but is it worth it? We're writing this guide in the shoes of your average HPDE go-er so we're focusing on a < $300 range of products.
Lightweight Battery Options
We hand-picked the batteries below. A lot of E46 M3 owners go with the Deka EXT30L battery or the Odyssey PC680, however you will need to consider a trickle charger or a kill switch to keep the car firing every morning. If you have any other battery suggestions, we'd love to know and add to our list. Please drop a comment below and let us know what battery you're running and your experience so far.
| Brand | Model | Technology | Weight (lbs) | CCA (Amp) | Post Type | Price | Link |
|---|---|---|---|---|---|---|---|
| Braille | B3121 | AGM | 21 | 550 | SAE Post | $229.99 | http://bit.ly/2zqdZYd |
| Braille | B2015 | AGM | 15 | 425 | SAE Post | $199.99 | http://bit.ly/30H7ufj |
| Braille | B14115 | AGM | 11 | 360 | SAE Post | $169.99 | http://bit.ly/2zpIKwm |
| Braille | B106 | AGM | 6.9 | 210 | SAE Post | $149.99 | http://bit.ly/2ZnNCkP |
| Braille | B129 | AGM | 9.5 | 323 | SAE Post | $159.99 | http://bit.ly/2PlTHdb |
| Braille | B2317 | AGM | 17 | 475 | SAE Post | $199.99 | http://bit.ly/2UeJoGy |
| Braille | B2317RP | AGM | 17 | 475 | SAE Post | $199.99 | http://bit.ly/2ZwzmSi |
| Braille | B2618 | AGM | 18.5 | 472 | SAE Post | $219.99 | http://bit.ly/348xx1a |
| Deka | ETX30L | AGM | 18.83 | 385 | N/A | $79.50 | https://amzn.to/2ZtCePP |
| Deka | ETX20L | AGM | 15.5 | 310 | N/A | $54.99 | https://amzn.to/2ZynkaV |
| Deka | ETX18L | AGM | 18 | 340 | N/A | $59.99 | https://amzn.to/2MFpWlj |
| Deka | ETX15 | AGM | 13 | 220 | N/A | $69.00 | https://amzn.to/2Zuur4g |
| Deka | ETX15L | AGM | 13 | 220 | N/A | $36.99 | https://amzn.to/2zwfMeh |
| Deka | ETX16 | AGM | 17 | 325 | N/A | $39.99 | https://amzn.to/2ZwpFmE |
| Deka | ETX16L | AGM | 17 | 325 | N/A | $86.97 | https://amzn.to/2zuxHSq |
| Deka | ETX14L | AGM | 12 | 200 | N/A | $81.89 | https://amzn.to/347p2Ud |
| Deka | ETX12 | AGM | 9.4 | 180 | N/A | $32.99 | https://amzn.to/347pB0h |
| Deka | ETX9 | AGM | 6.3 | 120 | N/A | $29.99 | https://amzn.to/2ZwCy4q |
| Deka | 8AMU1R | AGM | 25 | 330 | SAE Post | $129.99 | https://amzn.to/2zwTI2U |
| Econocraft | 51R | Flooded | 26.8 | 410 | SAE Post | $69.99 | http://bit.ly/2zr3Lqf |
| Odyssey | PC925 | AGM | 23.8 | 330 | M6 | $183.48 | https://amzn.to/2L4ypfT |
| Odyssey | PC680MJ | AGM | 15.4 | 170 | M6 | $140.99 | https://amzn.to/2zuQeOw |
| Odyssey | PC680MJT | AGM | 15.4 | 170 | SAE Post | $150.99 | https://amzn.to/2NEj33e |
| Odyssey | PC1200LT | AGM | 38.2 | 540 | SAE Post | $255.63 | https://amzn.to/2ZBbqgh |
| Odyssey | PC1200MJ | AGM | 38.2 | 540 | M6 | $273.99 | https://amzn.to/2ZtDuT3 |
| Odyssey | PC1200 | AGM | 38.2 | 540 | M6 | $234.99 | https://amzn.to/2L1rbsR |
| Odyssey | PC1200LMJT | AGM | 38.2 | 540 | SAE Post | $273.99 | https://amzn.to/2ZBwIL7 |
| Odyssey | PC1200MJT | AGM | 38.2 | 540 | SAE Post | $282.21 | https://amzn.to/349hgcz |
| Odyssey | PC1200T | AGM | 38.2 | 540 | SAE Post | $257.63 | https://amzn.to/2NFKjhY |
| Odyssey | PC925LMJT | AGM | 23.8 | 330 | SAE Post | $209.99 | https://amzn.to/2L2B0Hm |
| Odyssey | PC925T | AGM | 23.8 | 330 | SAE Post | $199.99 | https://amzn.to/2L1N0IT |
| Odyssey | PC925L | AGM | 23.8 | 330 | SAE Post | $187.99 | https://amzn.to/2zsa5xN |
| Odyssey | PC925LMJ | AGM | 23.8 | 330 | SAE Post | $197.99 | https://amzn.to/2L0jD9S |
| Odyssey | PC925MJ | AGM | 23.8 | 330 | Metal Jacket | $269.95 | https://amzn.to/2MJz4pb |
| Odyssey | PC925MJT | AGM | 23.8 | 330 | SAE Post | $217.99 | https://amzn.to/2MJGN6C |
| Optima | REDTOP® 34 | AGM | 37.9 | 800 | SAE Post | $237.99 | https://amzn.to/2NDYy75 |
| Optima | REDTOP® 34/78 | AGM | 38.8 | 800 | Dual SAE/GM | $224.99 | https://amzn.to/2MHrlYL |
| Optima | REDTOP® 34R | AGM | 37.9 | 800 | SAE Post | $237.99 | https://amzn.to/2ZxvsZp |
| Optima | REDTOP® 75/25 | AGM | 33.1 | 720 | Dual SAE/GM | $199.99 | https://amzn.to/2MKRtC4 |
| Optima | REDTOP® 78 | AGM | 39.5 | 800 | Side Terminal | $242.99 | https://amzn.to/2ZuILtj |
| Optima | REDTOP® 25 | AGM | 31.7 | 720 | SAE Post | $199.99 | https://amzn.to/2ZuIW7X |
| Optima | 6V | AGM | 18.5 | 800 | SAE Post | $187.99 | https://amzn.to/2L3ELMD |
| Optima | REDTOP® 35 | AGM | 31.7 | 720 | SAE Post | $199.99 | https://amzn.to/34aIYp5 |
| Westco | 12V31M | AGM | 25 | 475 | SAE Post | $128.00 | http://bit.ly/30KbzPW |

E46 M3 Oil Diverter Valve DIY
This article will go through the steps to install an oil diverter valve to your E46 M3 S54 oil filter housing (OFH) to lower engine oil temps. I'm constantly running upwards of 300 °F on hot summer track days and the oil diverter valve is a great way to decrease temps by 30 °F. The S54 oil filter housing comes with a thermostat to close the oil circuit on cold starts so that the engine may warm up faster however the valve does not open up 100% after warming up therefore it regulates the oil circuit to a shorter loop. The Bimmerworld Oil Cooler Diverter Valve Kit allows the engine oil "full-flow" throughout the system. Although this is a great way to decrease oil temps, it's not recommended for a street driven car because the oil temperature may not reach normal operating temperature. Yeah, it works that well.
Disclosure: Some of the links in this article are affiliate links, meaning, at no additional cost to you, we will earn a commission if you click through and make a purchase. Your contribution helps us purchase new tools and equipment to continue creating articles such as this. We thank you for your support.
The issue: Engine oil temperature exceeds the maximum high-performance driving limits of 300 °F / 150 °C on track.
A solution: Install Bimmerworld Oil Cooler Diverter Valve Kit into oil filter housing.
I would rate this job a 6.5/10 because it does require you to remove your intake manifold, belts, alternator and oil filter housing. It is possible to do this job without removing the intake manifold, however it's going to be a pain in the ass to get to the bolts. If something is going to be a pain in the ass, I'd suggest removing the intake manifold. While you're doing this job I pretty much will tell you it is mandatory to fix/check your throttle position sensors (TPS), clean your ICV valve and clean your throttle bodies. You're right there.
Parts and Tools Required
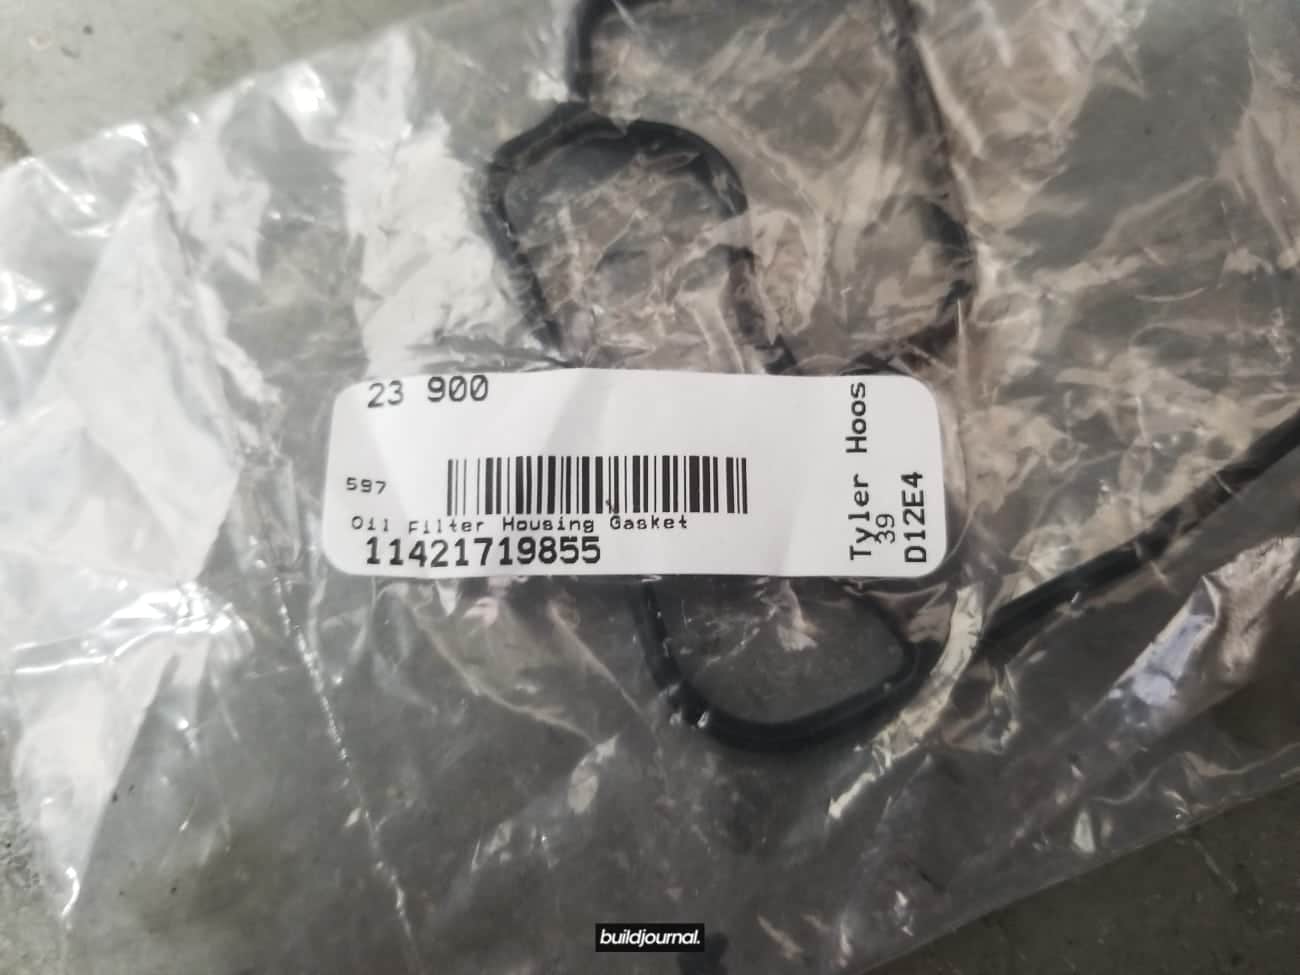
- (1) Oil filter housing gasket - 11421719855 or DuPoint Viton OFH gasket - 11421719855V
- (2) Oil cooler o-rings - 12221664890
- Bimmerworld Oil Cooler Diverter Valve Kit (comes with OFH gasket)
- 13mm socket
- 16mm socket
- 8mm hex head
- Basic tools including various sockets
- Various extensions
- Torx bits
[amazon_link asins='B000GYLGU8,B000J0TF6G,B000RB3XBA,B00CPL918E' template='ProductCarousel' store='builjour-20' marketplace='US' link_id='3fc392ca-ac9d-4ce3-a3fb-fd1f84f1a5cc']
1. Remove intake
1.1, remove 4 nuts holding front strut bar.
1.2, remove 4 torx screws holding cabin filter housing, remove filter.

1.3, remove intake including the nut for the oil dipstick.

1.4, remove crankcase vent hose.

1.5, remove vent hose grommet to give some more slack in the line when you take out the airbox.

2. Remove intake manifold
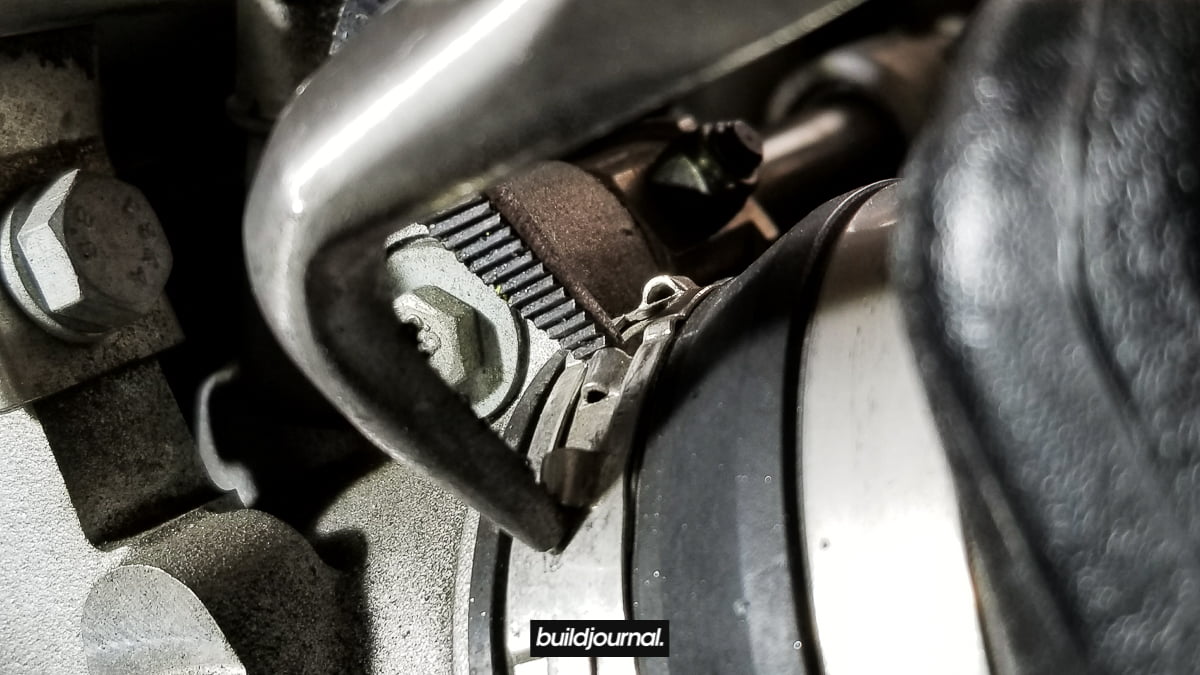
2.1, remove the throttle body hose clamps. There's not much grip and clearance so I had to use angled needle-nose pliers and locking pliers to squeeze the rivets together and with a flat head pry out the clamp simultaneously. Basically in the bottom picture below, I pry the two rivets together to alleviate clamping force and then used a small flat head to pry out the end of the clamp pictured on top.

Clamp the rivets together. Remove all 6 clamps.
2.2, remove the (2) two nuts holding the bottom of the intake box. Detach plug grommet between the two nuts.

2.3, unclip the (large) vent hose on the bottom of the intake box.

Below is a better view of the (large) lower vent hose and the 2 nuts holding the airbox.

2.4, unclip the holder for the smaller vent hose on the side of the intake box - the small highlighted tab has to be pressed down and the plastic holder will slide up. (not away from box)


2.5, this part is a little tricky (any is the part everyone talks about breaking) so pay attention! Before the airbox comes out, you have to unclick the (small) vent hose below the intake box, but because the clearance is so small you have to wiggle the box out a little to slide your hand in. Be gentle because this part is fragile and if you break this hose, it's going to be an annoying trip to the dealership.

The best thing to do is slightly pull the airbox halfway out and then unclip the (small) vent hose.

Here is a picture showing the underside of the airbox.

3. Remove accessory belt
3.1, use an 8mm hex head to loosen the (lower) pulley tensioner and remove the accessory belt.
4. Remove alternator
4.1, use a flat head to remove safety cap on the idle pulley. There are two 16mm hex bolts holding the alternator on the front near the accessory belts. One on the (upper) idle pulley and one below that. Remove both.
4.2, once the alternator is loose, disconnect the power plug in the rear by pushing down on the metal clip.
4.3, use a 10mm socket to remove the battery cable.
5. Remove oil filter housing
5.1, using an 8mm hex key, remove the bolt attached to the two oil cooler lines. Tuck the oil cooler lines away. Make sure to remove the o-rings stuck inside the inlet or lines. You're going to replace these with new ones when re-installing.
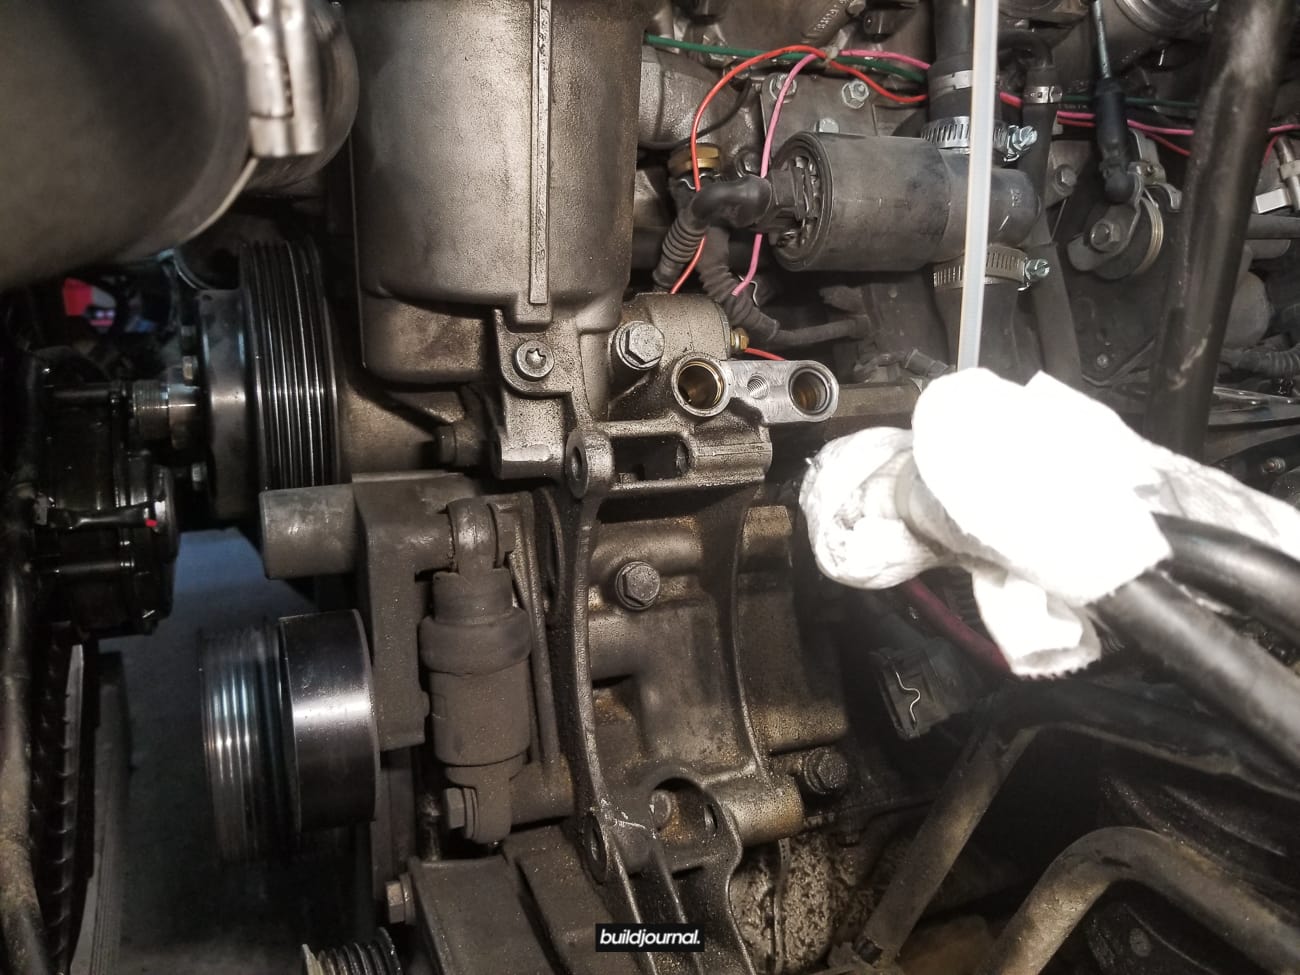
5.2, remove the two 13mm bolts on the hydraulic tensioner found above the power steering pump pulley.
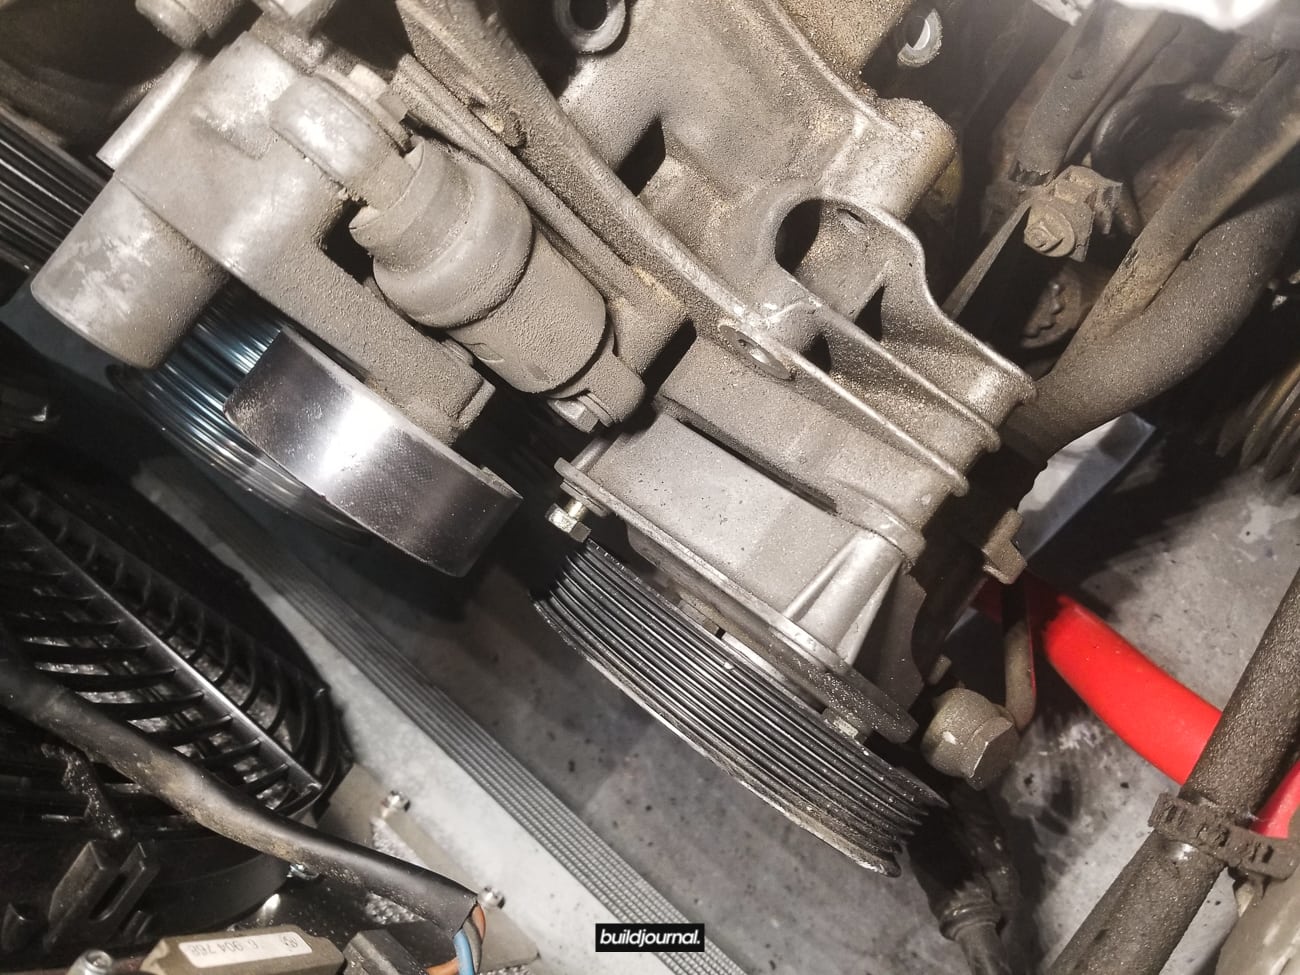
5.3, remove the six 13mm bolts holding the the oil filter housing. You can see the bottom four in this picture. The other two are above, just cut out and hidden from the picture below. As you start to loosen these bolts, oil will drip below. Get a catch bin ready.
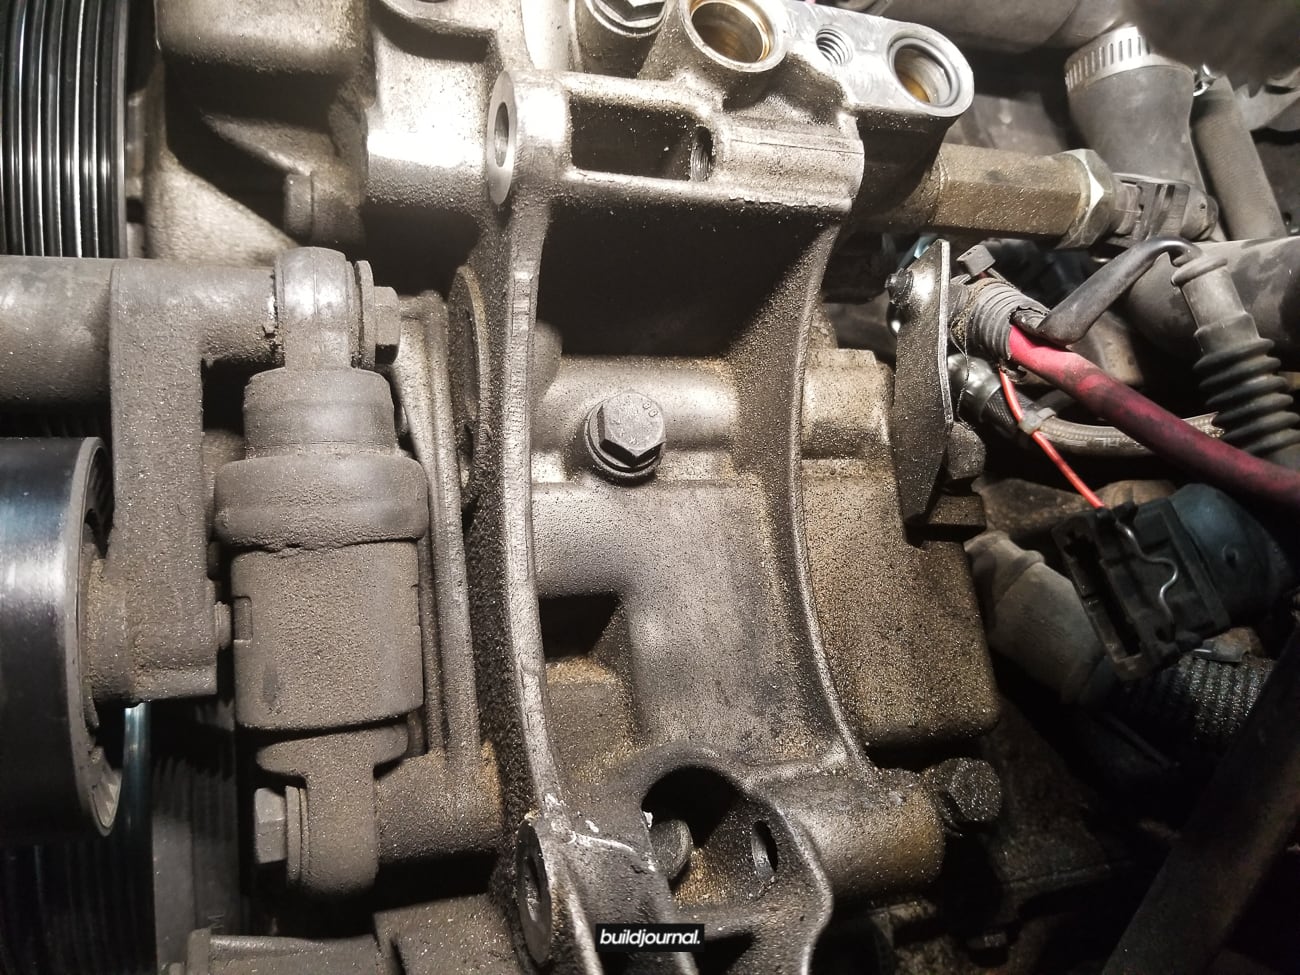
5.4, as you pull out the bolts, make sure you notice the longer of the six bolts which goes on the top left.
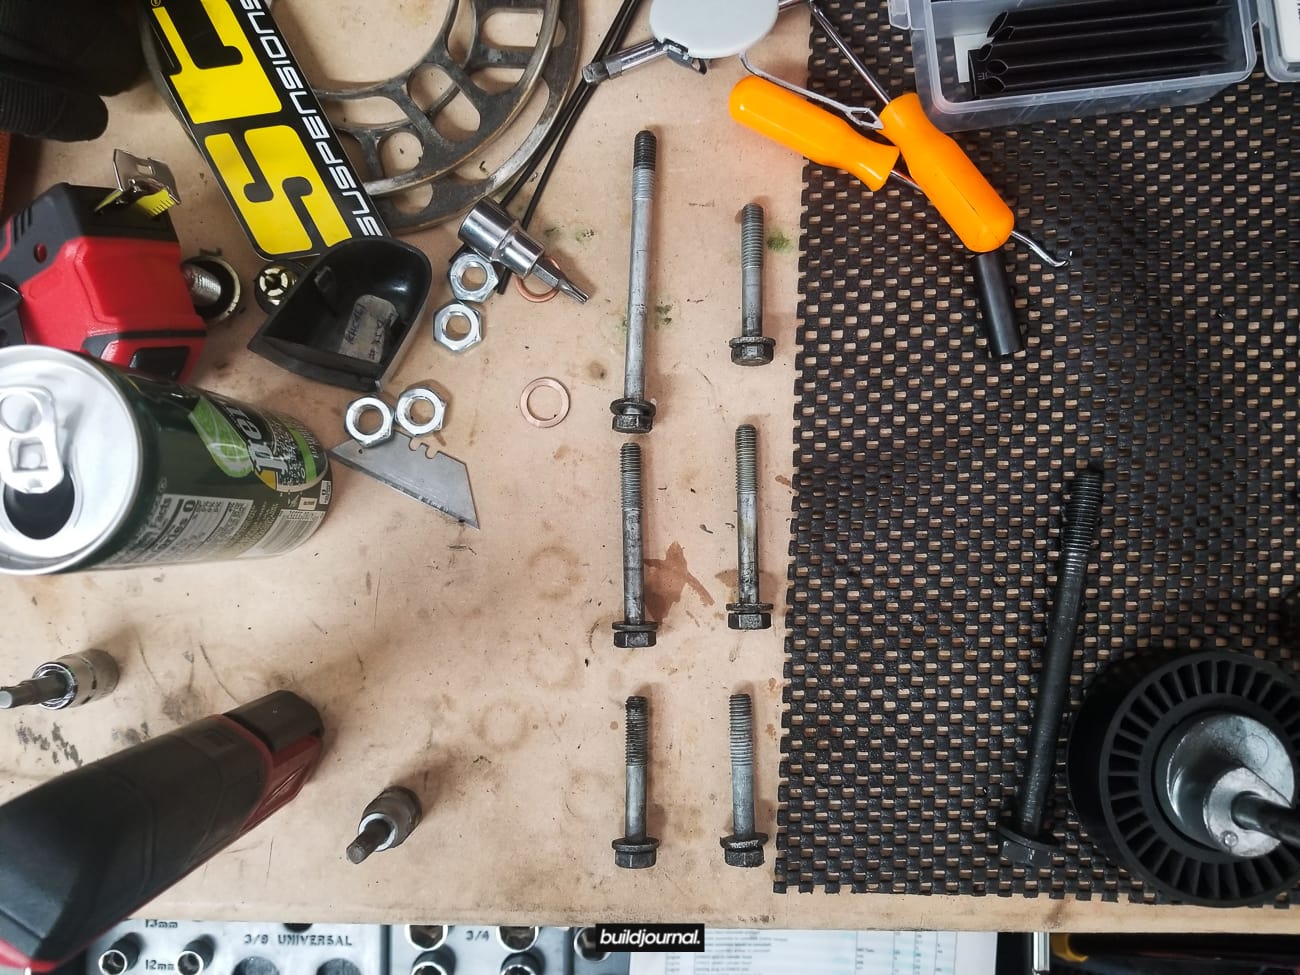
5.5, boom. Your OFH is apart.

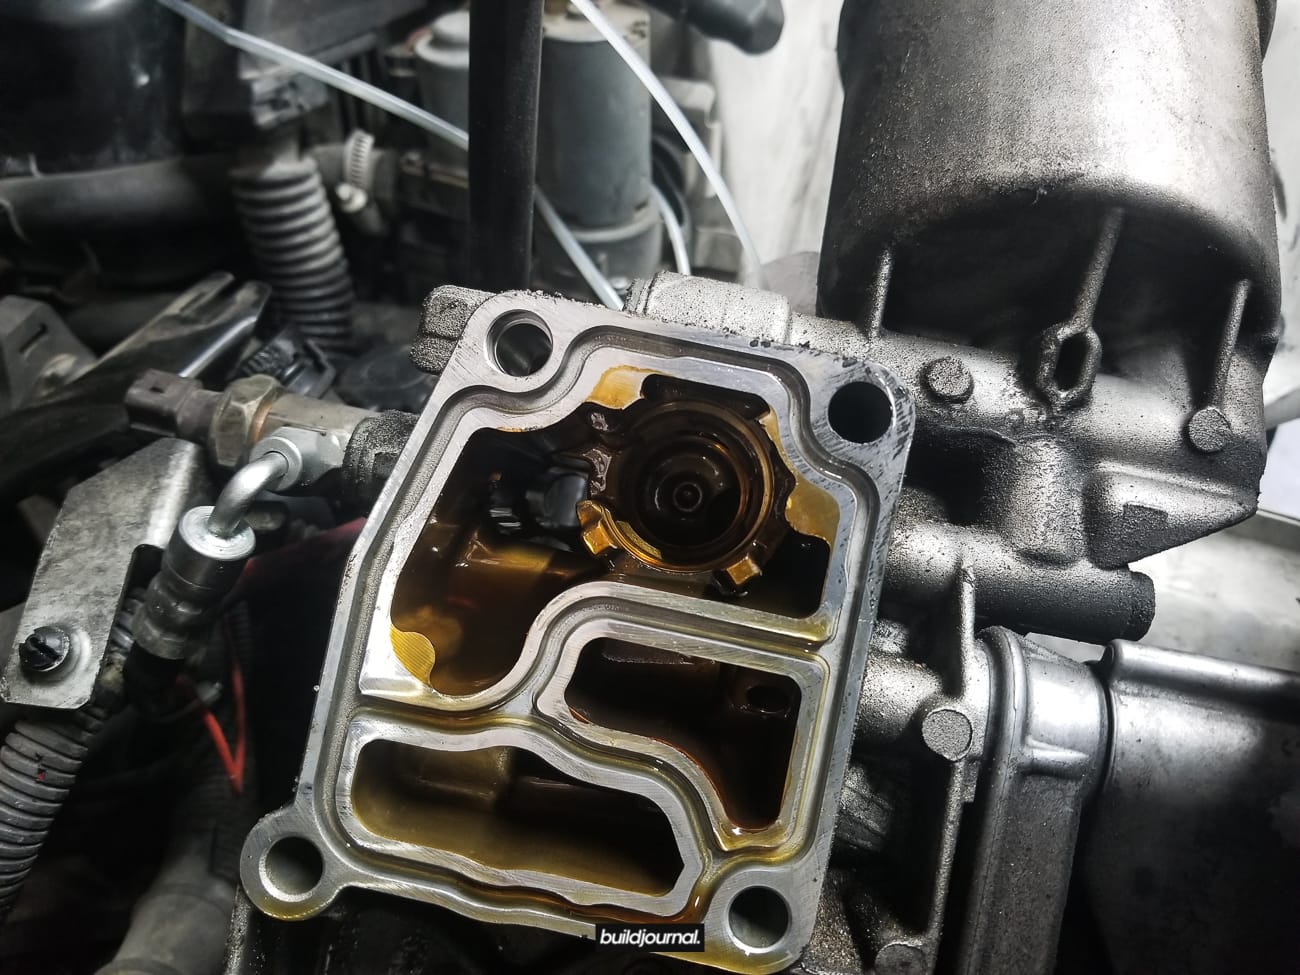
5. Remove stock oil cooler thermostat
5.1, inspect the upper half of the OFH and you'll locate the thermostat circular in shape.

6.2, remove the c-clip from the stock thermostat.
6.3, careful when the c-clip comes out because that thing shot out nearly missing my eye. It's like opening up a jack in box - spring included.

These are the pieces within the thermostat (left) and the oil diverter valve (right). The Bimmerworld Diverter Valve will re-use the top two pieces from the stock thermostat.
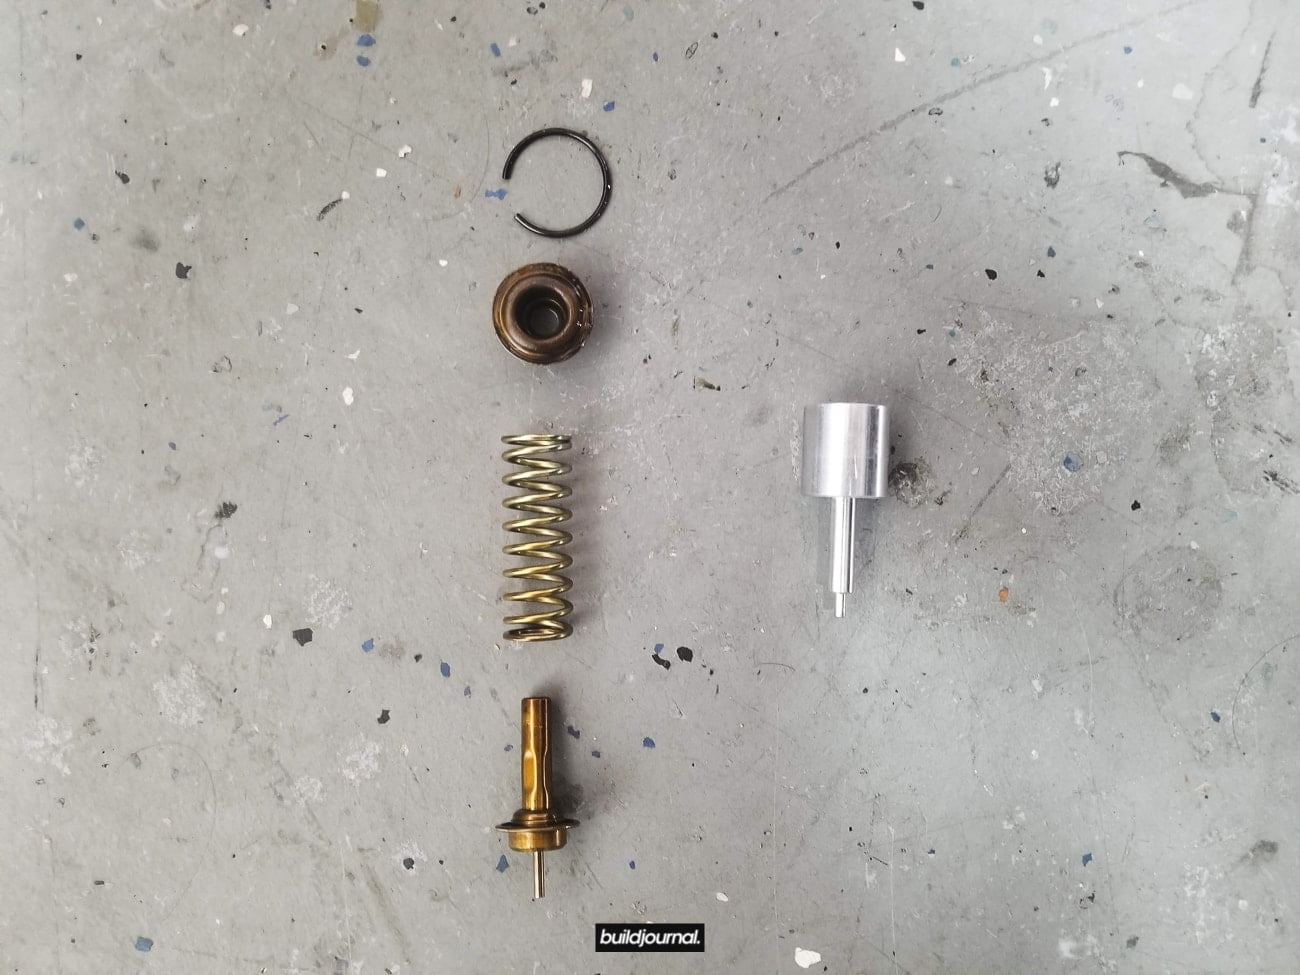
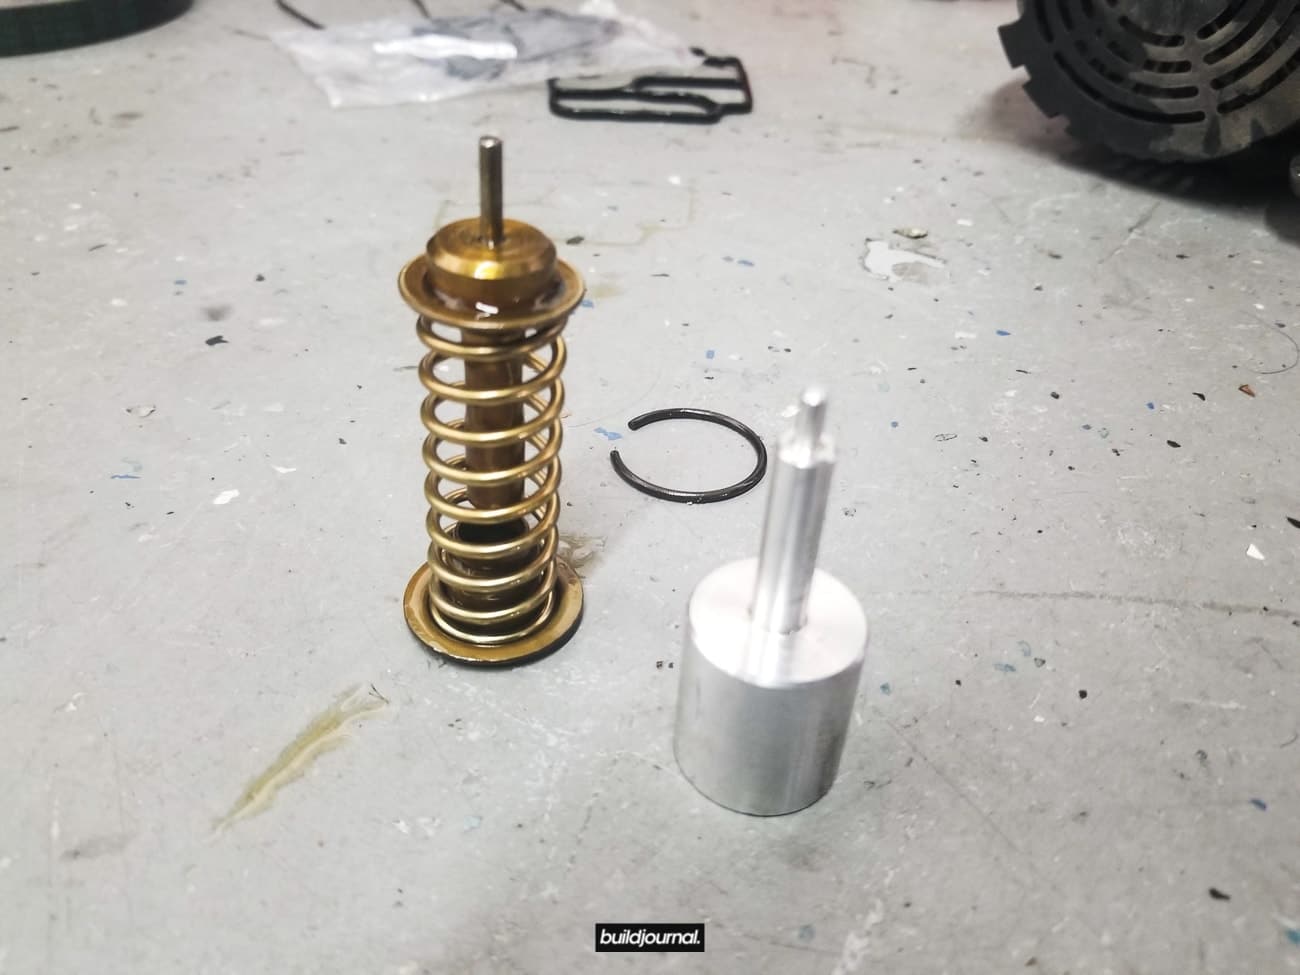
6.4, insert the oil diverter valve with the thin side going in first.
6.5, insert the top piece from the stock thermostat and insert the c-clip. Make sure the clip is fully seated flush into the slot.

6.6, lastly install the new OFH gasket. This is very important! Don't re-use your old gasket or else you will have leaks.
7. Re-install parts in reverse order
7.1, use the following chart to torque all the bolts back to spec. If you like the table below you'll love our Ultimate BMW E46 M3 Torque Spec Guide. It's also available to download as a formatted and print-ready sheet for the garage.
| Category | Location | Bolt | Ft-lb | Nm | In-lb |
| Engine | Oil filter cover filter housing | 18 | 25 | ||
| Engine | Hydraulic tensioner | 17.7 | 24 | ||
| Engine | Idler pulley | 28 | 38 |
8. Top-off oil
8.1, make sure to fill the engine with oil since some may have drained out from the OFH. Run the car and check for leaks, as always.

An E92 M3 Joins the Buildjournal Family
About 7 years ago, I made it a mission to seek out an E46 M3 and it had to be Cinnamon interior with a 6-speed manual transmission. I found one and my goal was to build the cleanest street E46 M3. Today, this car is a track monster and it has turned into a track-dedicated machine. I pretty much never drive it on the streets. I’ve been driving around my Trailhunters Toyota Tacoma that I use to tow the E46, but it just became too dull for the streets. I wanted to get back into another street car.
I’ve always loved the sound of the BMW S65 V8 motor and when I saw an opportunity to pick up this 2008 E92 M3 with Fox Red interior, 6-speed manual transmission, and carbon fiber roof I jumped on it. Was I in the market for an E92 M3 a week prior to the purchase? No. But that’s how good this deal was. I consider myself winning the Autotrader lottery.

Current Mods
I bought the car with minimal mods to it. It had KW V3 coils, Megan Racing exhaust, Macht Schnell X-Pipe, ESS tune, and a Vorsteiner CSL trunk. I’ve changed up a few things to my liking and the first thing I did was change the trunk to an OEM stock trunk. Then the TE37’s went on. Now it’s very different and I have the following mods:
- GT4 carbon fiber lip
- Carbon fiber side skirt extensions
- V-style carbon fiber diffuser (upper)
- V-style carbon fiber diffuser (lower)
- Carbon fiber mirror caps
- Volk TE37 Mercury Silver 18x10 ET25
- Nexen SU1 275/35/18 tires
- KW V3 coilovers
- AVIN 8.8" Android head unit
- Mashimarho custom alcantara steering wheel
- Mashimarho alcantara steering wheel trim
- Mashimarho F1 style push start button
- Mashimarho red M button
- Motorsport Hardware MH Titan lug nuts
- Motorsport Hardware 90mm race studs
- Motorsport Hardware 5mm spacers
- Motorsport Hardware 10mm spacers
- APE X85 flex fuel kit
- Macht Schnell stage 2 intake
- Macht Schnell pulley kit
- Macht Schnell X-Pipe
- Supersprint Race exhaust
- ESS tune
Future Plans
Honestly, I don’t know how far I’ll mod this. I know it’ll go far, but as of right now the goal is to keep the car street-able. Will this car see track time in the near future? Probably so.


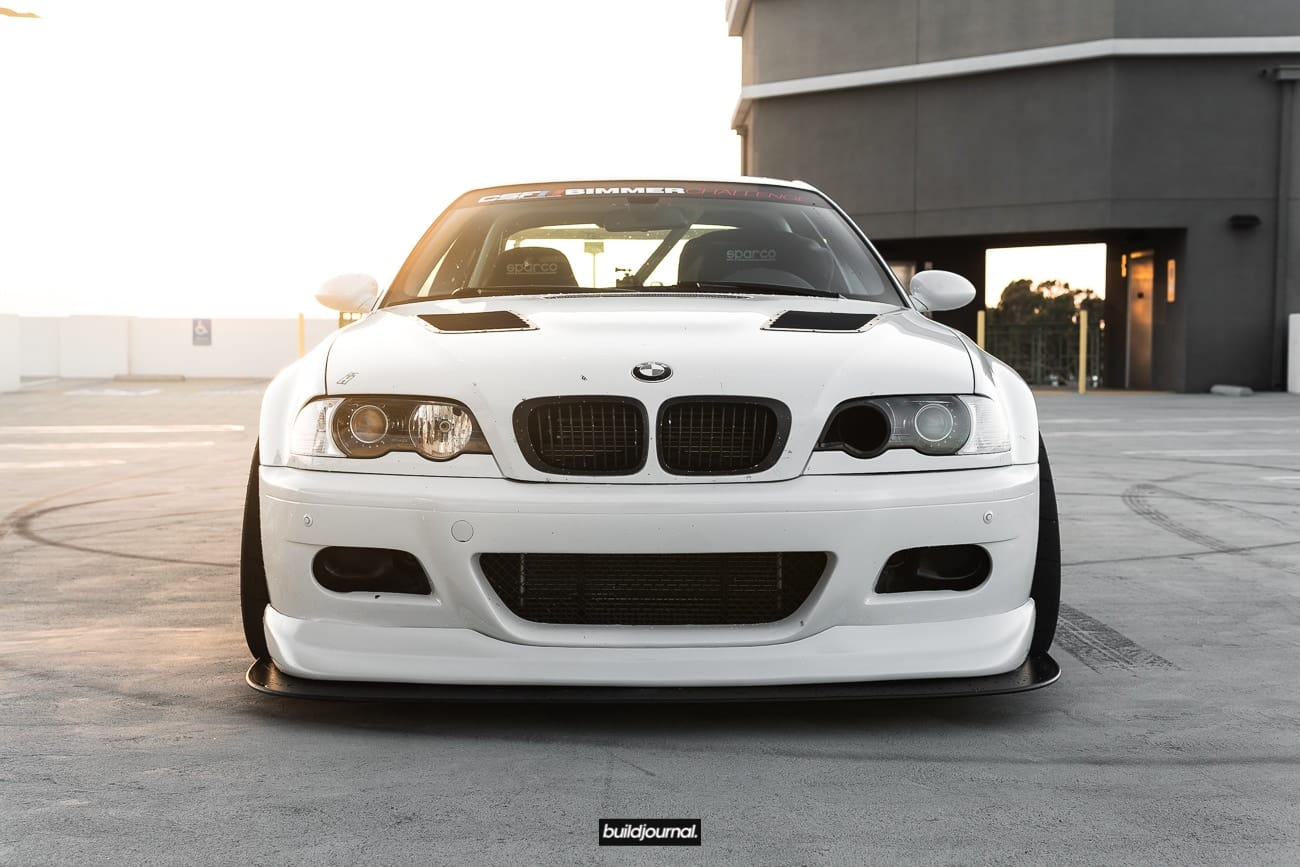
PSDesigns E46 M3 Headlight Duct Install DIY
PSDesigns Pre-facelift E46 / E46M3 and CSL Headlight Duct Kit
The headlight duct kit from PSDesigns is a great solution to increase airflow to your engine bay whether it’s to provide cold air to your intake or cool down the engine. You’ll have to cut your headlight lens to install this kit, but fortunately it’s easy to reverse this install since the E46 lens are easily replaceable.
-
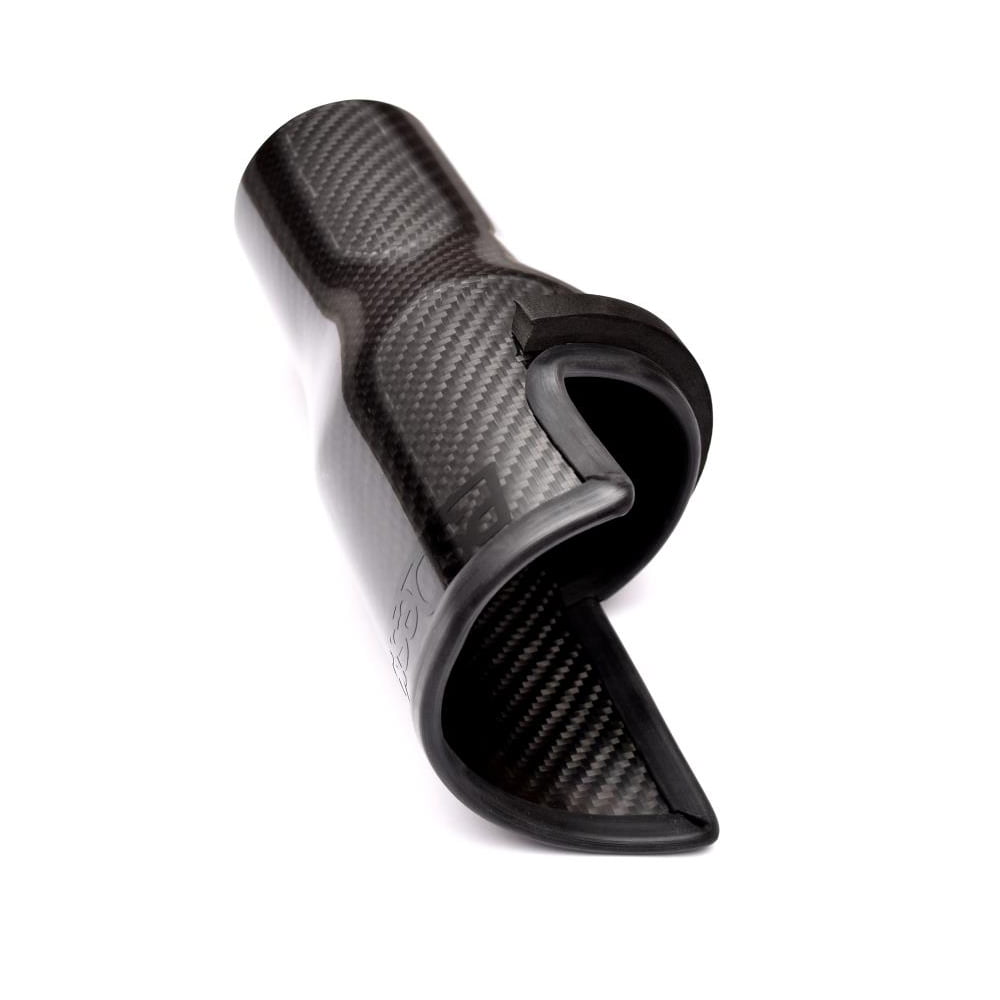
PSDesigns Headlight Duct Kit - E46 M3
Price range: $335.00 through $370.00Install Directions

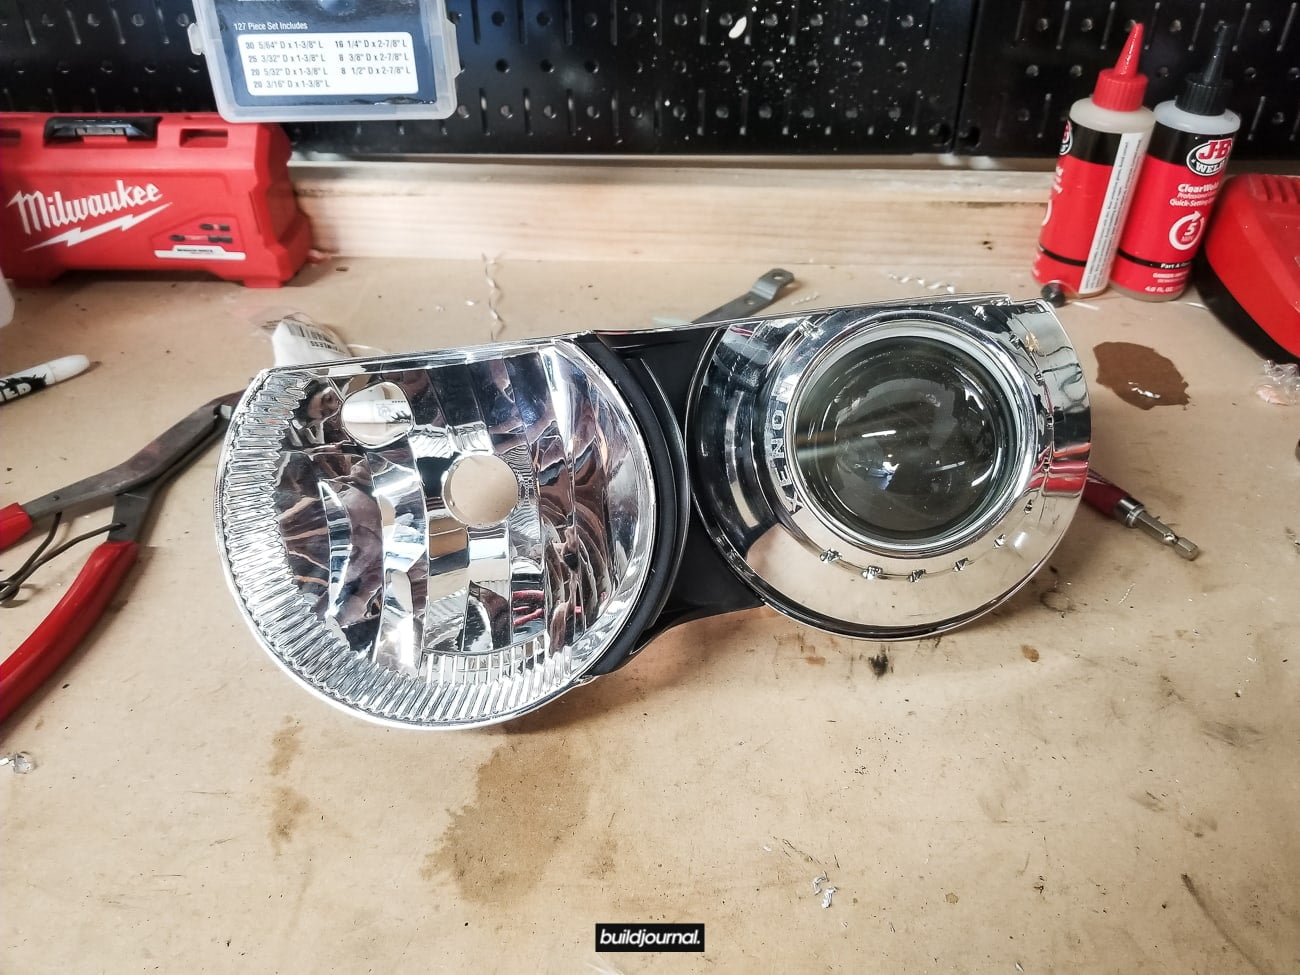
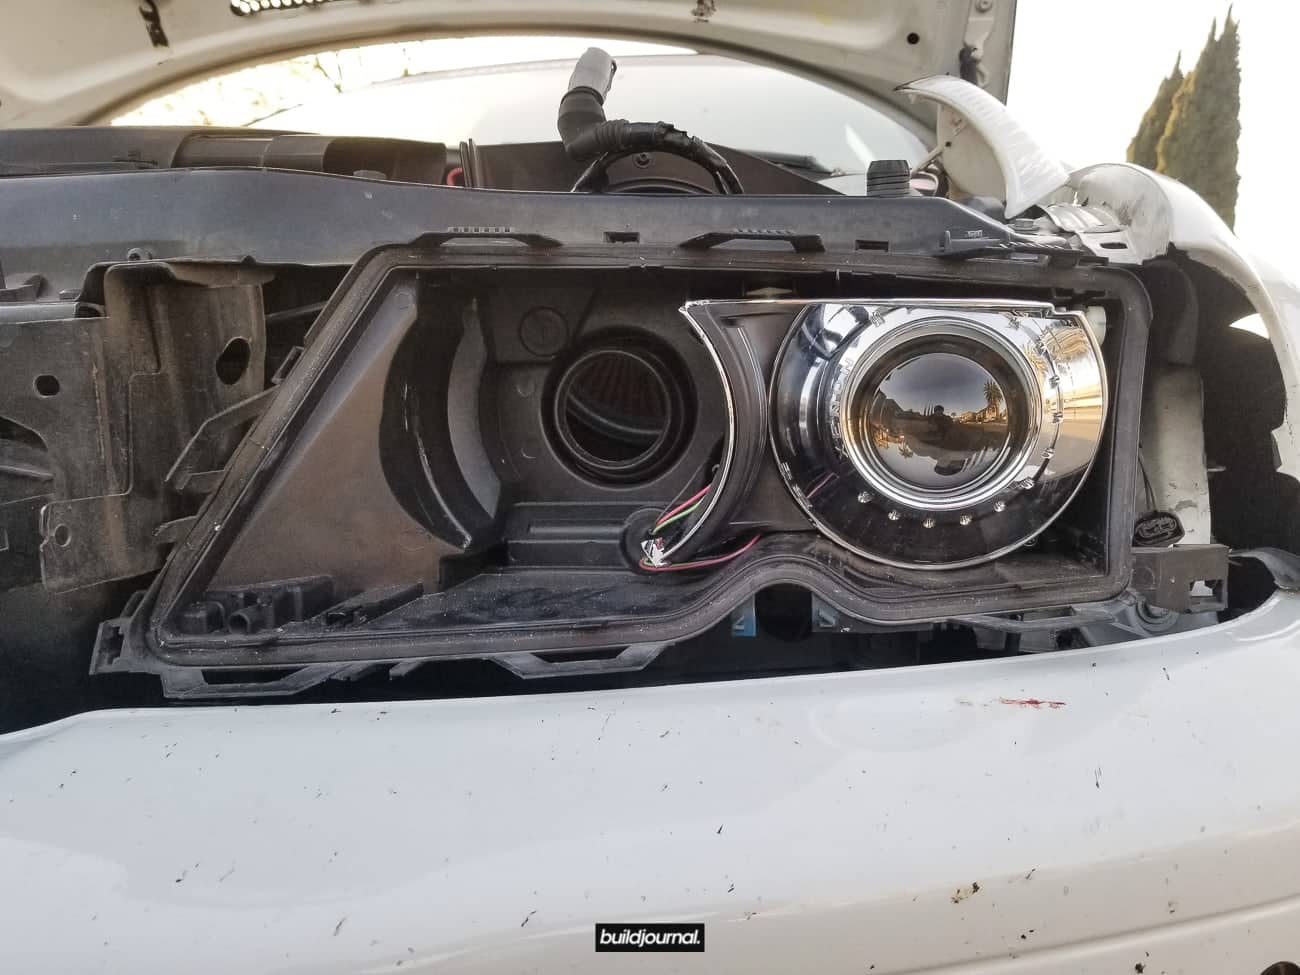
1. Remove Headlight and Housing
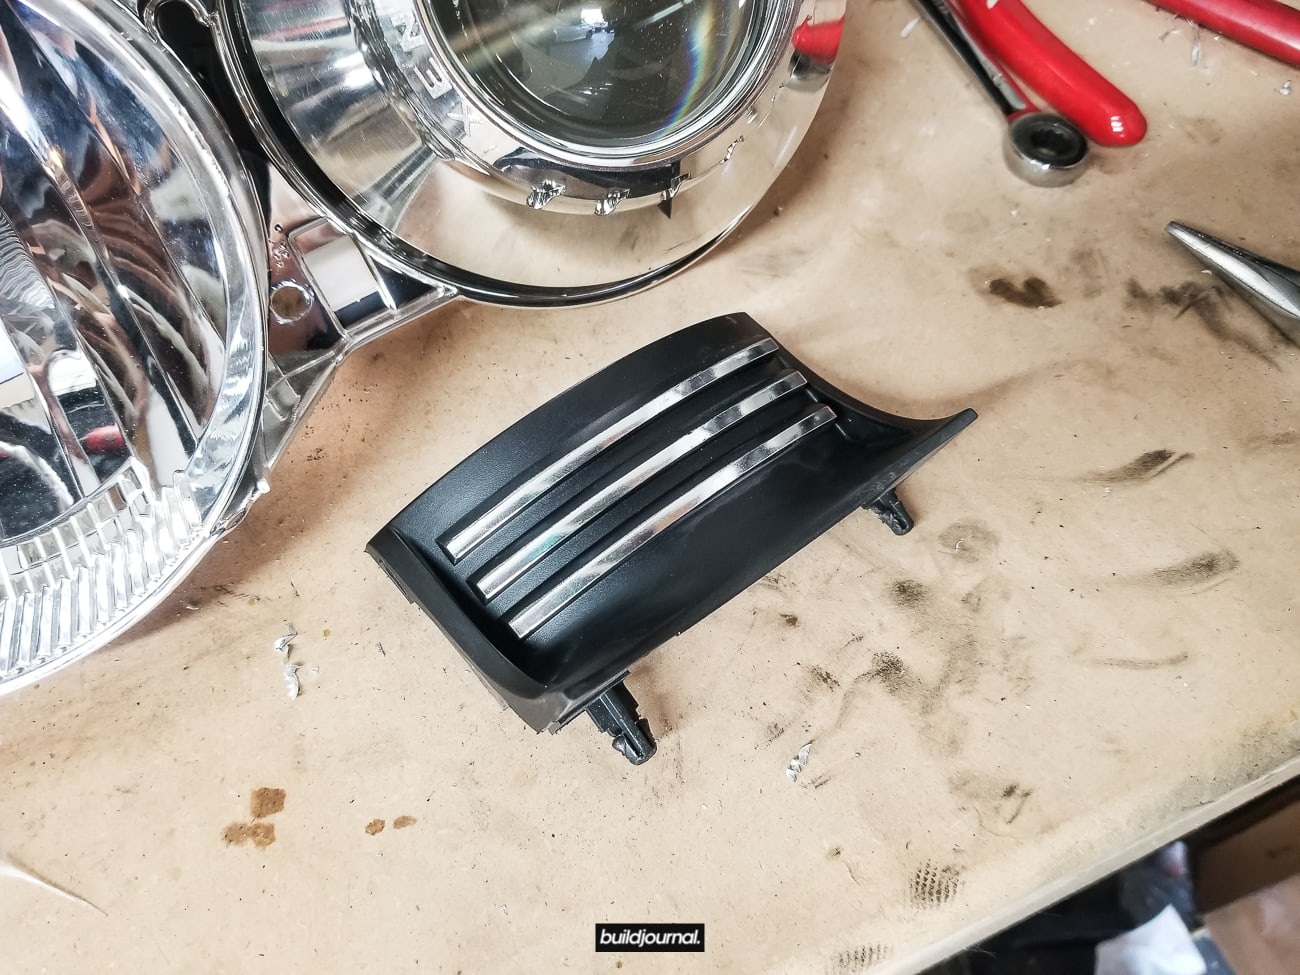
1.1 Remove lower trim on the headlight. I’m doing this mod to my driver’s side to feed air into the intake.
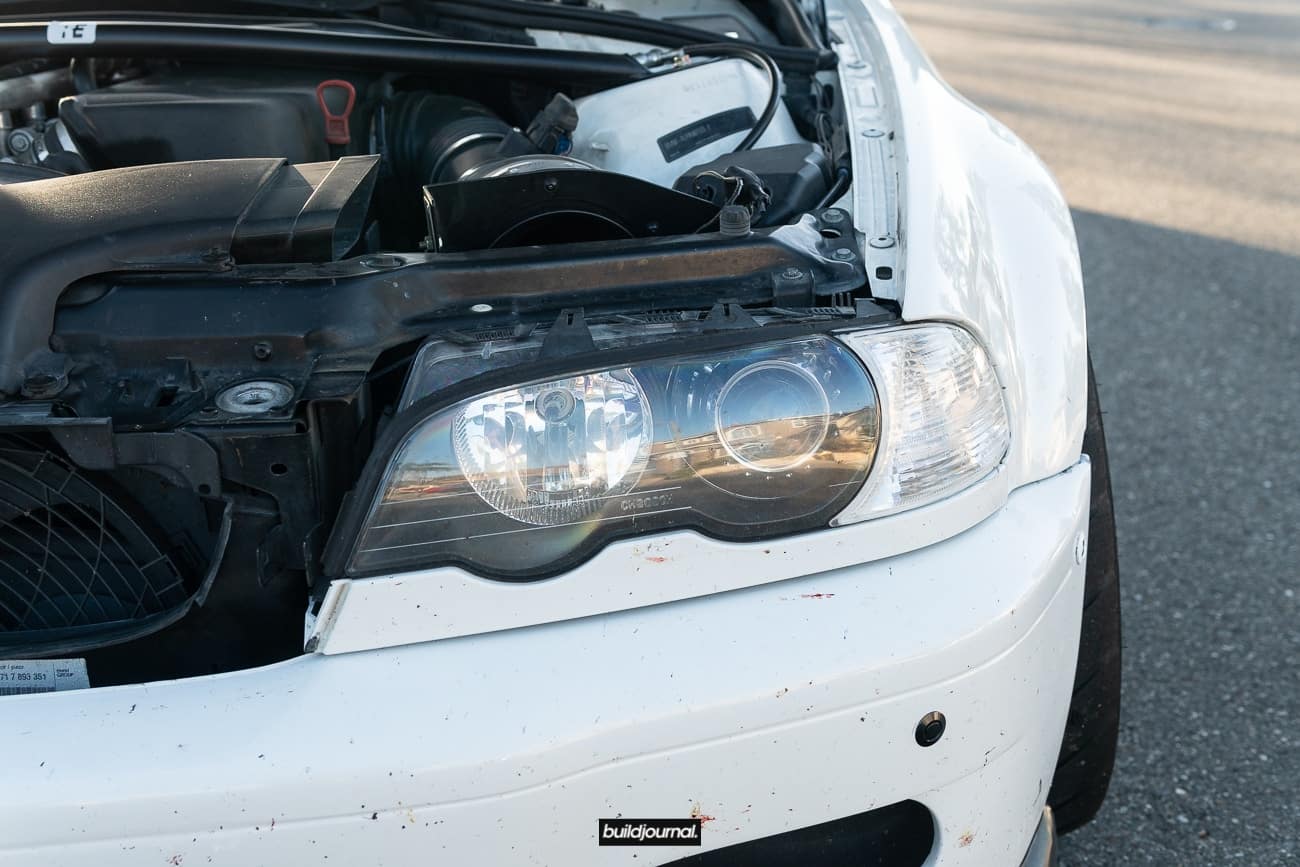
1.2 Remove the headlight weather stripping by detaching all clips on top and sides.
1.3 Remove headlight lens.

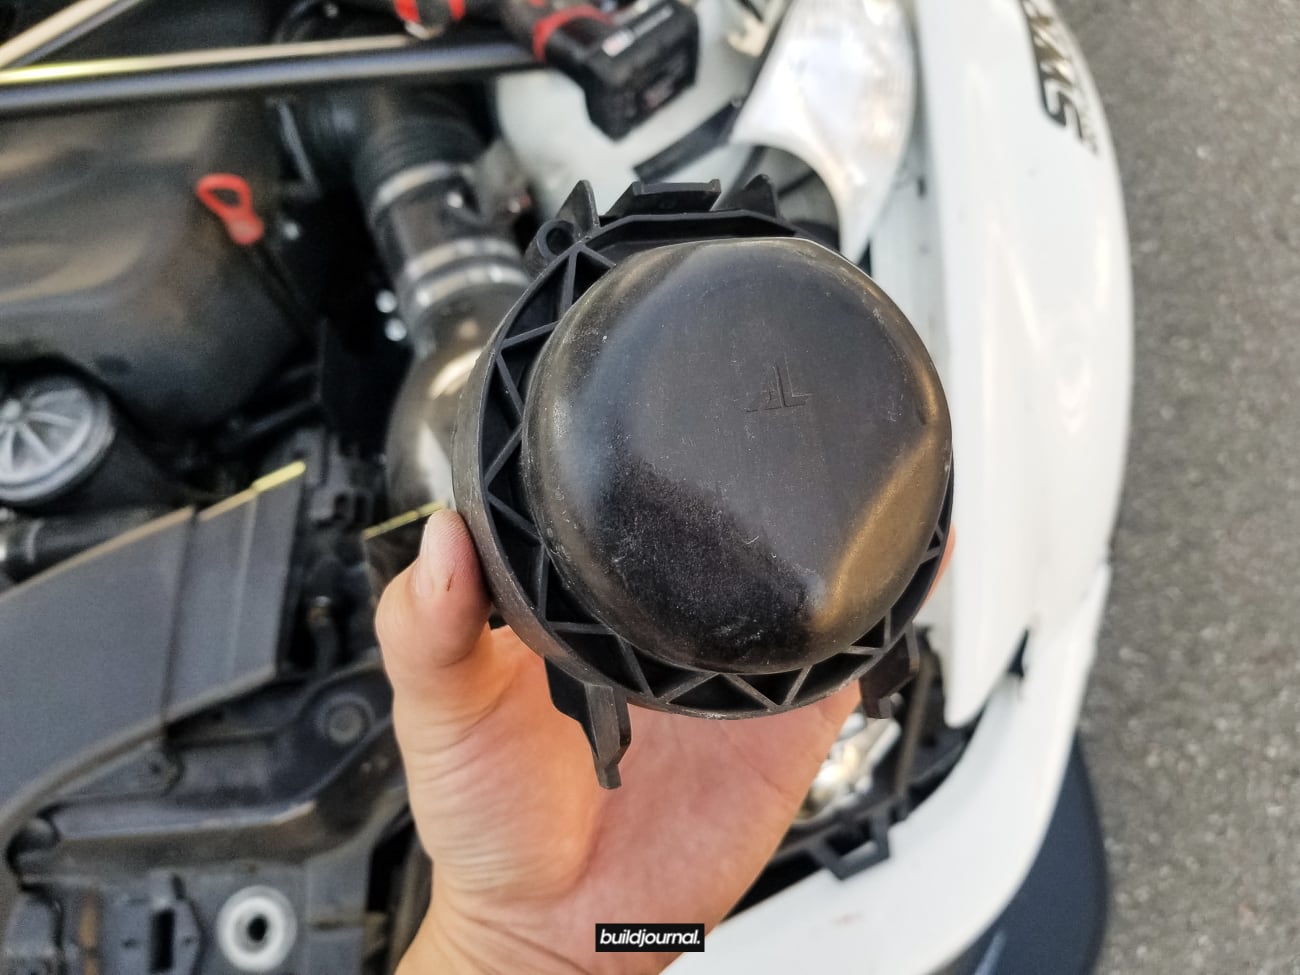
1.4 Reach around the back side of the headlight to remove the low beam caps and remove the light bulb.
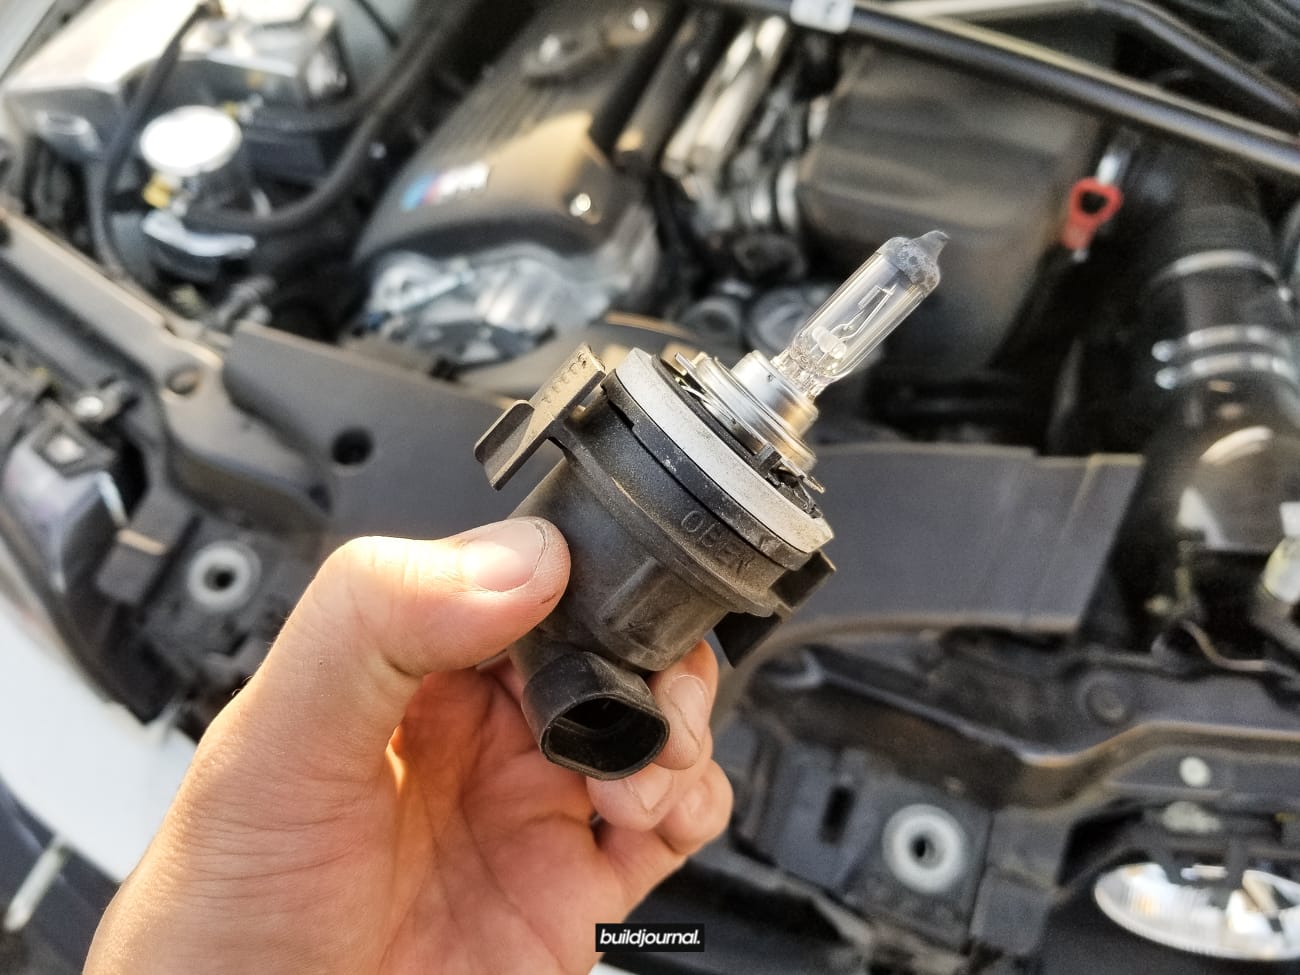
1.5 Unclip your high beam bulb as well.
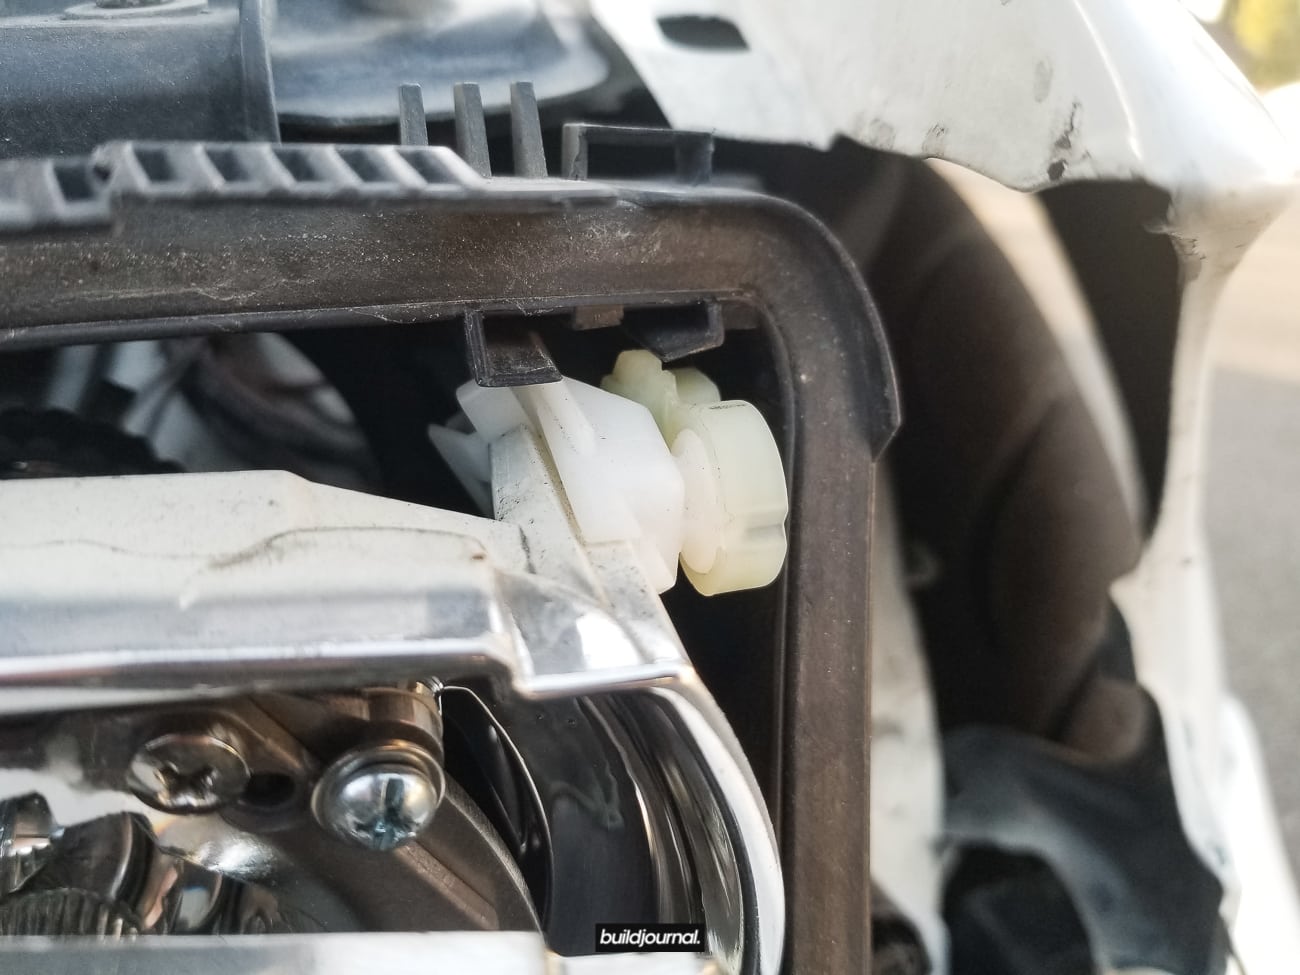
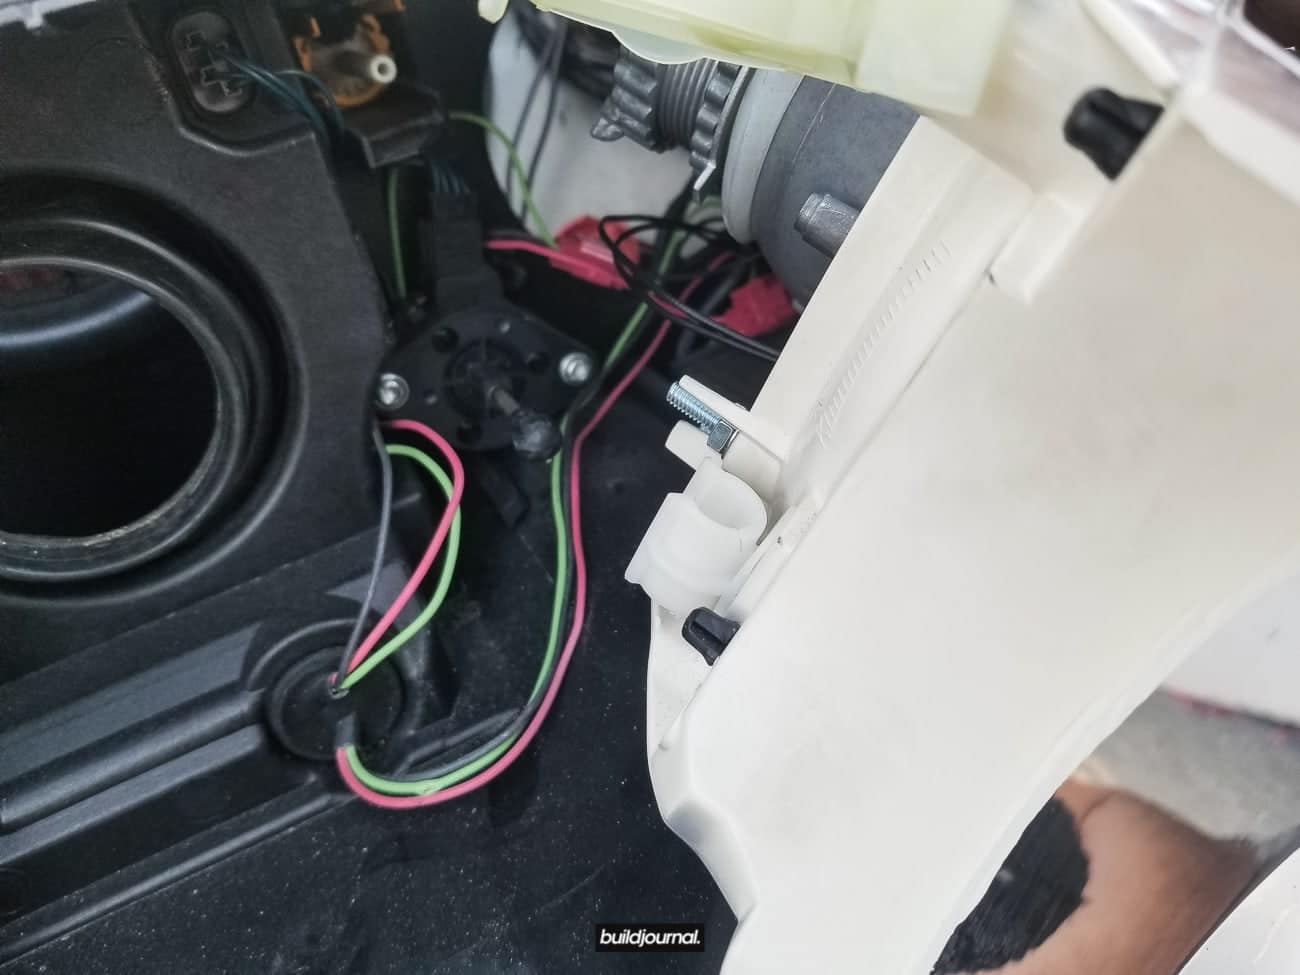
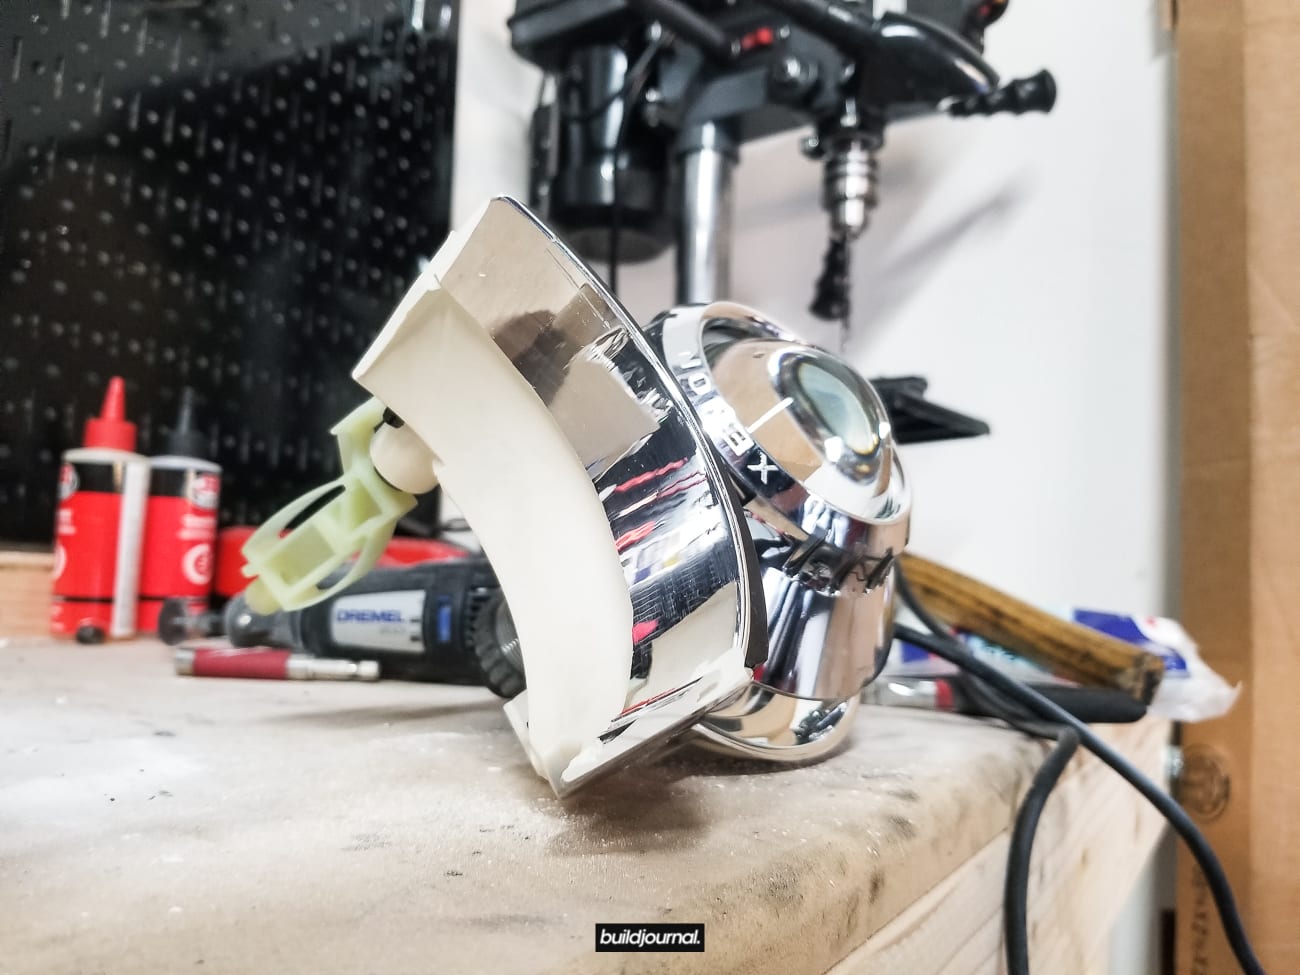
1.6 Now we can take out the housing. Remove and loosen the housing by turning both headlight adjustment knobs counter clockwise. I used a powertool to do this because it takes forever if you do it by hand.

1.7 As the housing comes out, you’ll see the plastic guide rails come off the tracks.
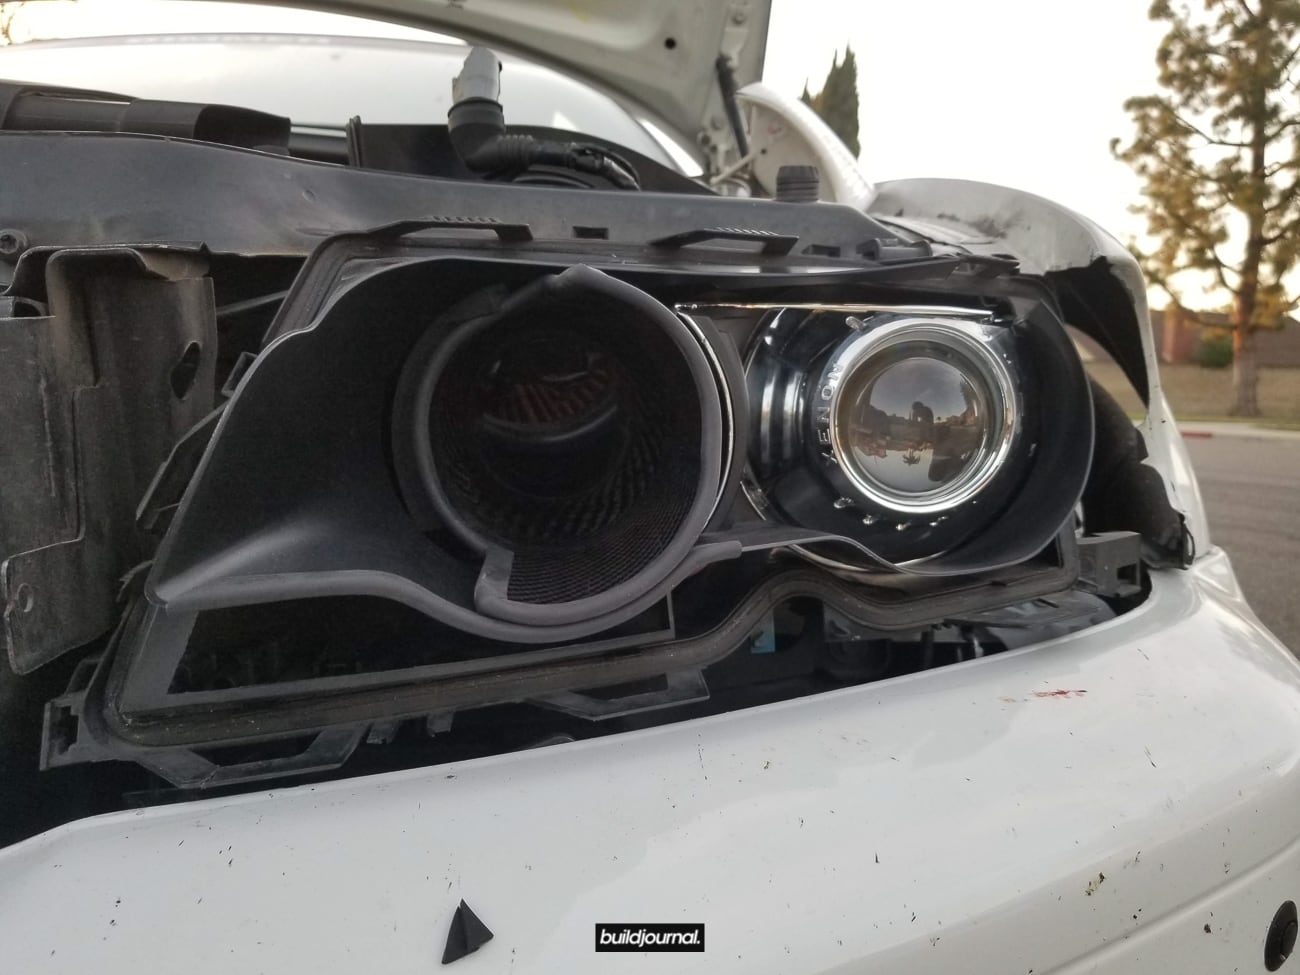
1.8 Optional: Once fully out, you’ll now have to remove the Bi-Xenon socket off the housing. It’s attached with a ball joint that slides into a u-channel. I used a flat head to pry out. It helps to angle the housing down so it “slides” out.
1.9 Before the housing fully comes out, you’ll need to detach the Bi-Xenon wire on the back of the projector.

2. Trim Headlight Housing
2.1 Remove the black accent piece on the housing.
2.2 Trace a guide line to cut on the following seam. The goal is to remove the high beam bowl and if you inspect the housing you’ll get a good idea of where to cut.
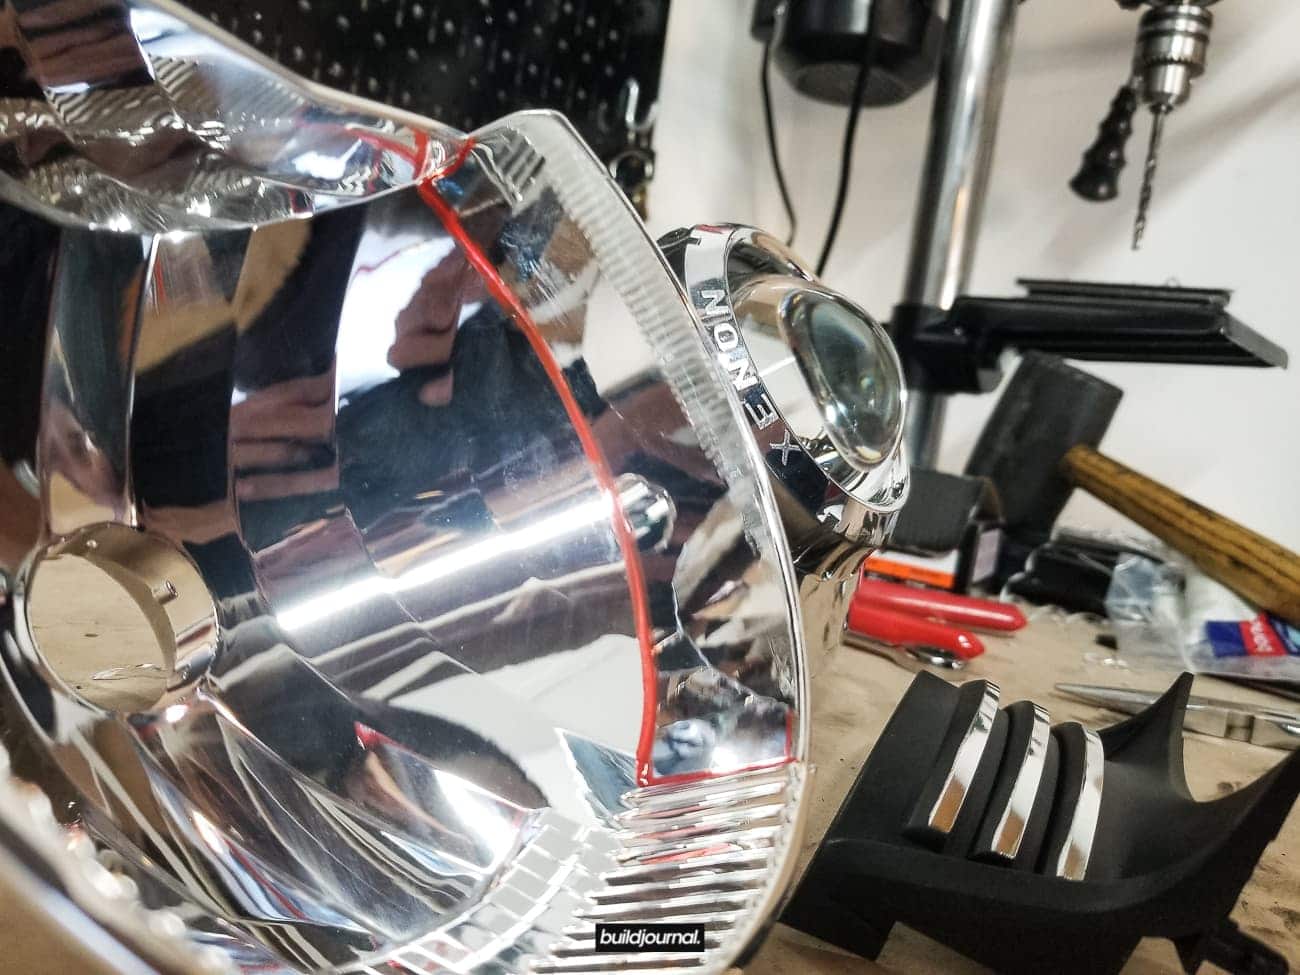
2.3 Use a dremel to cut the housing.
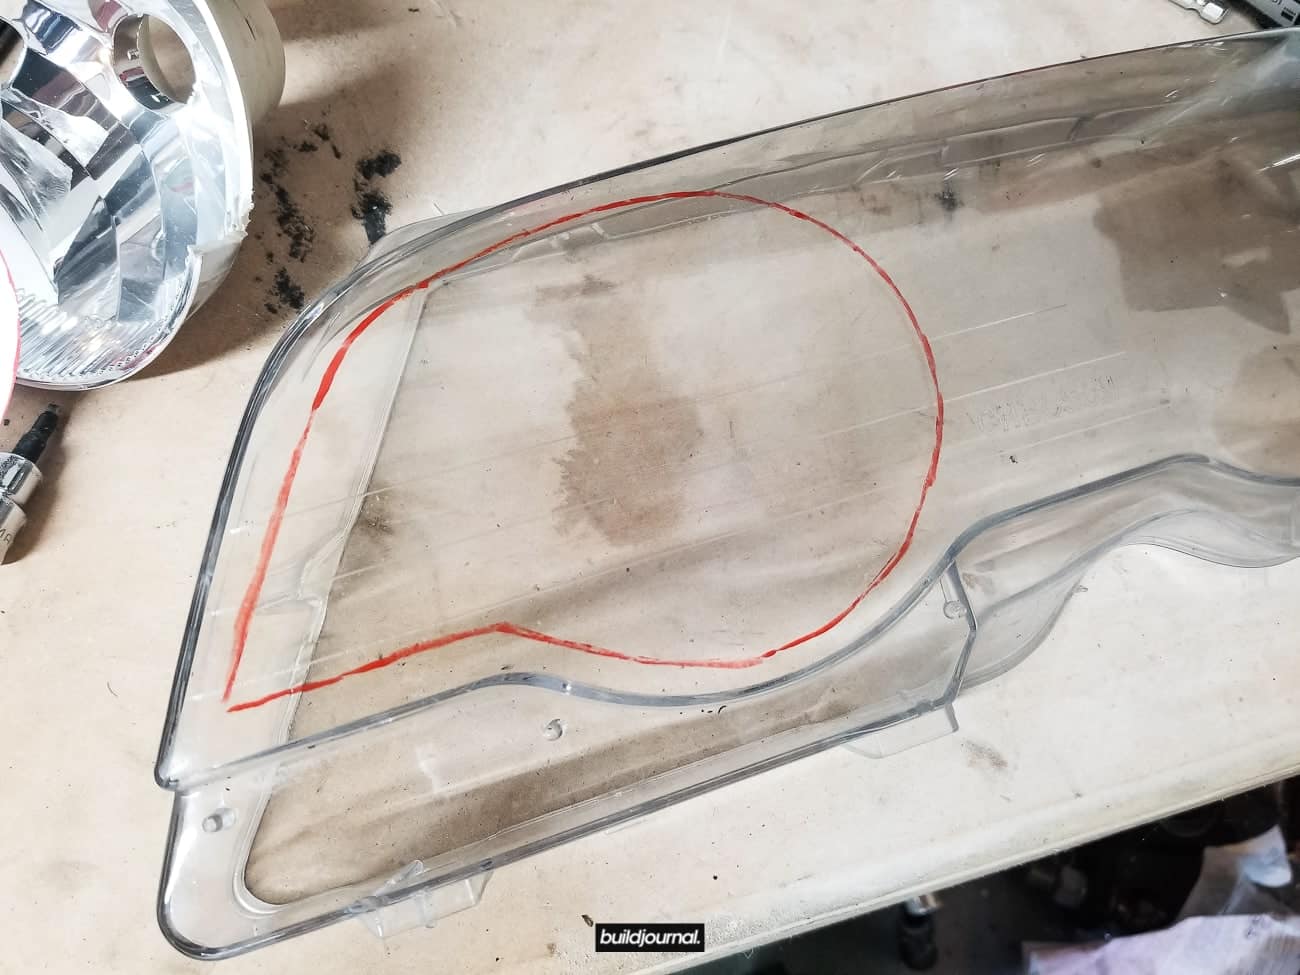
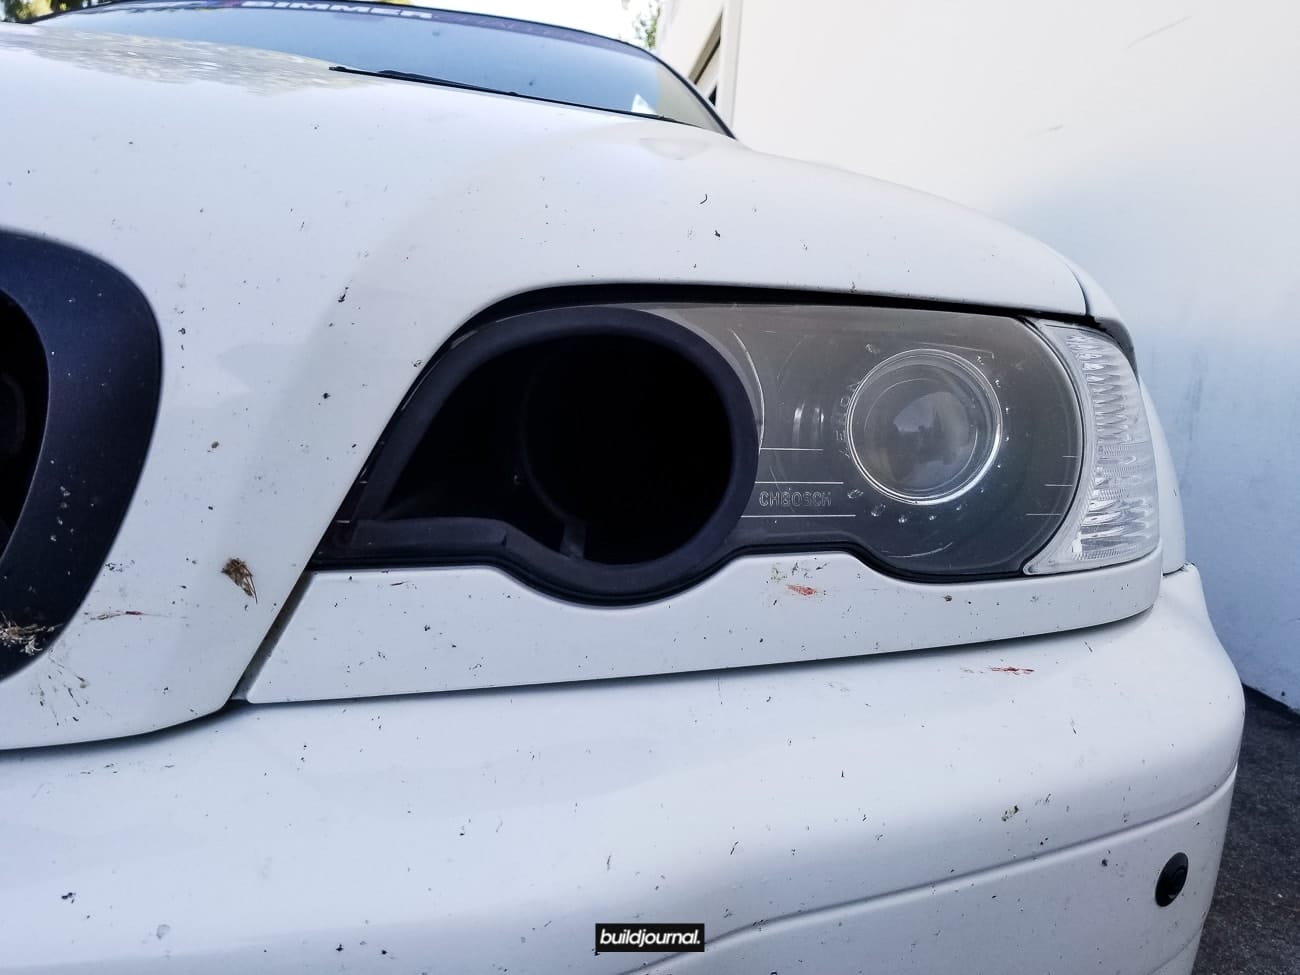
3. Cut Headlight Lens
3.1 Get the provided template to draw a guide line on the lens.
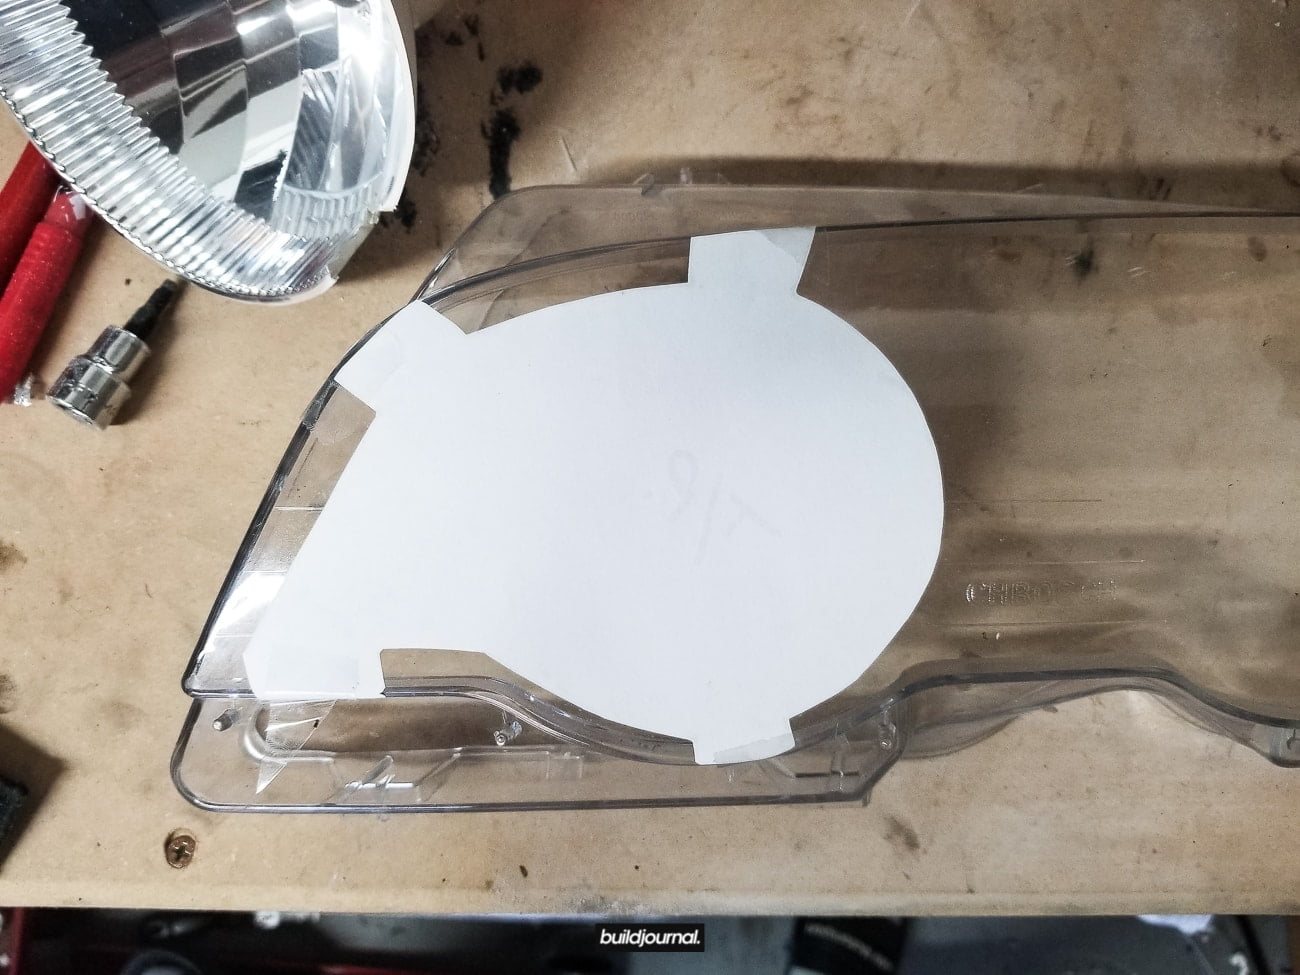
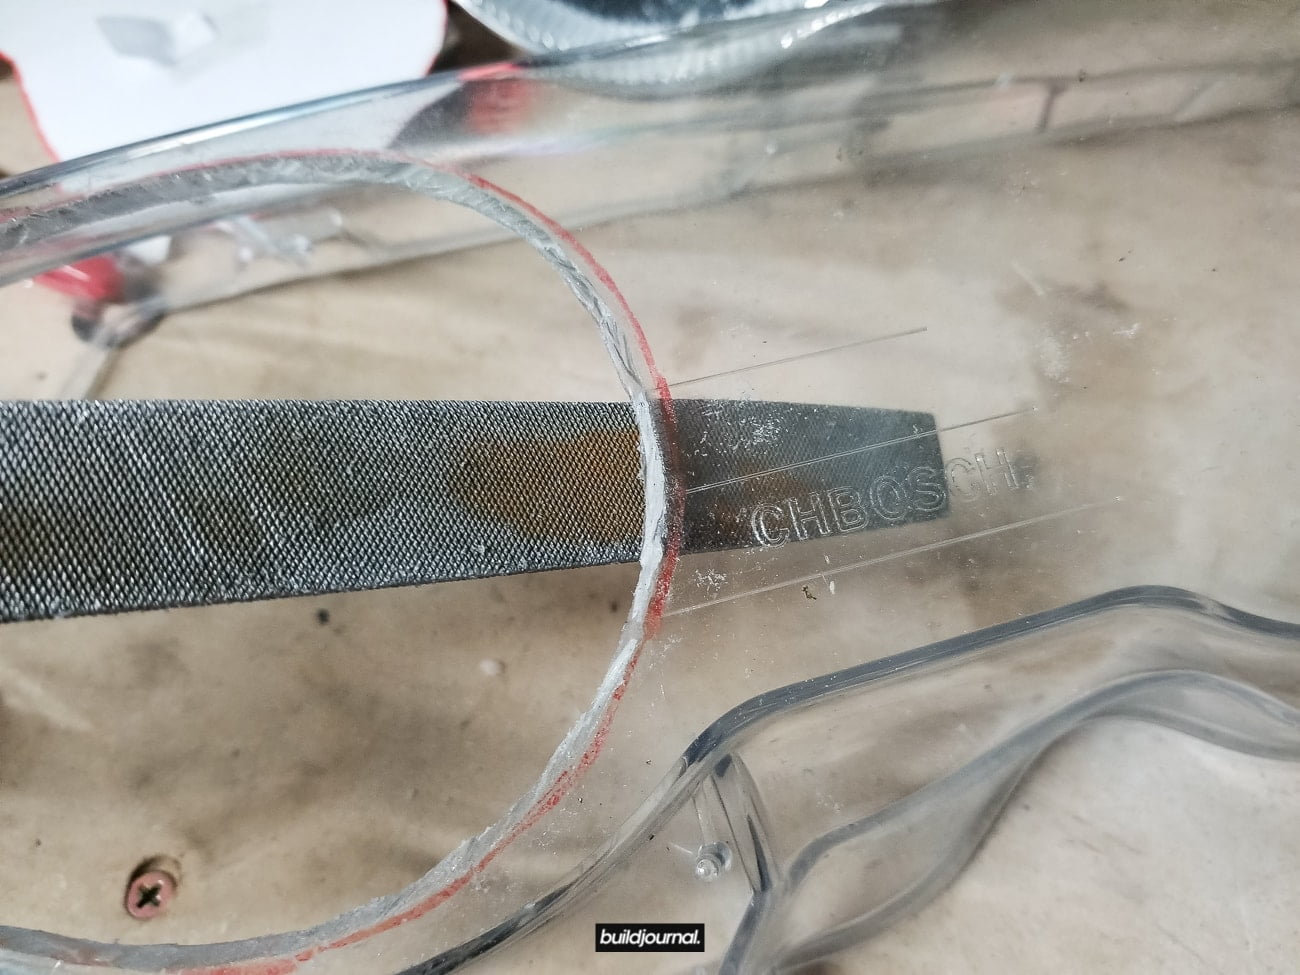
3.2 Use a dremel or similar cutting tool to cut.
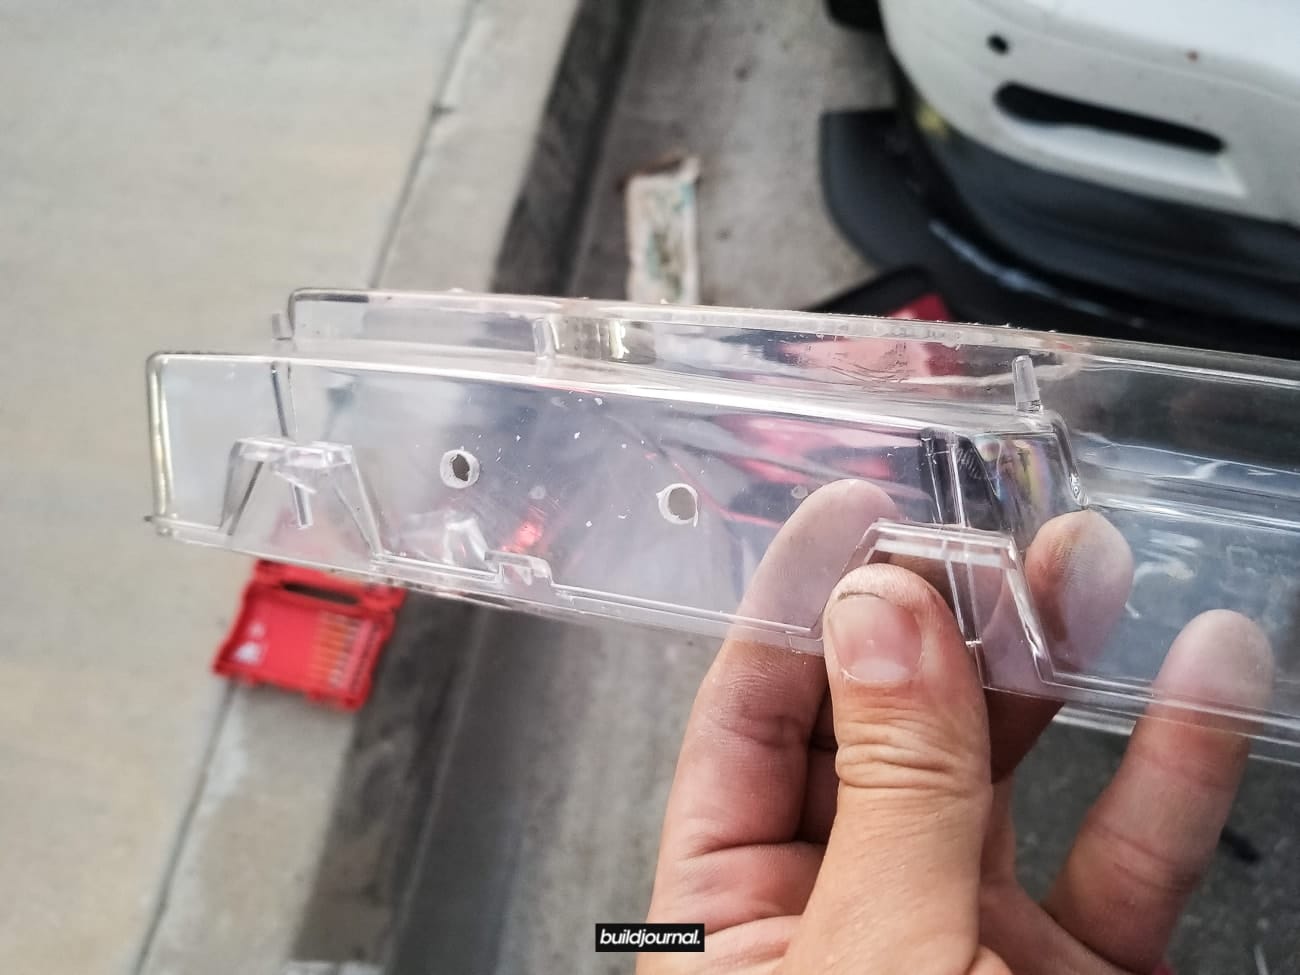
3.3 Deburr the edges to smoothen the cut area.
3.4 PSDesigns suggests you to drill 2 small holes on the bottom of the lens to evacuate any water/moisture.
4. Install Duct
4.1 Insert the housing back into the headlight. Make sure you reverse the steps from part 1.
4.2 Insert the headlight duct into the high beam hole in the back of the headlight.
4.3 Install the headlight lens, lower trim and all other components. Now you can install the rubber trim.
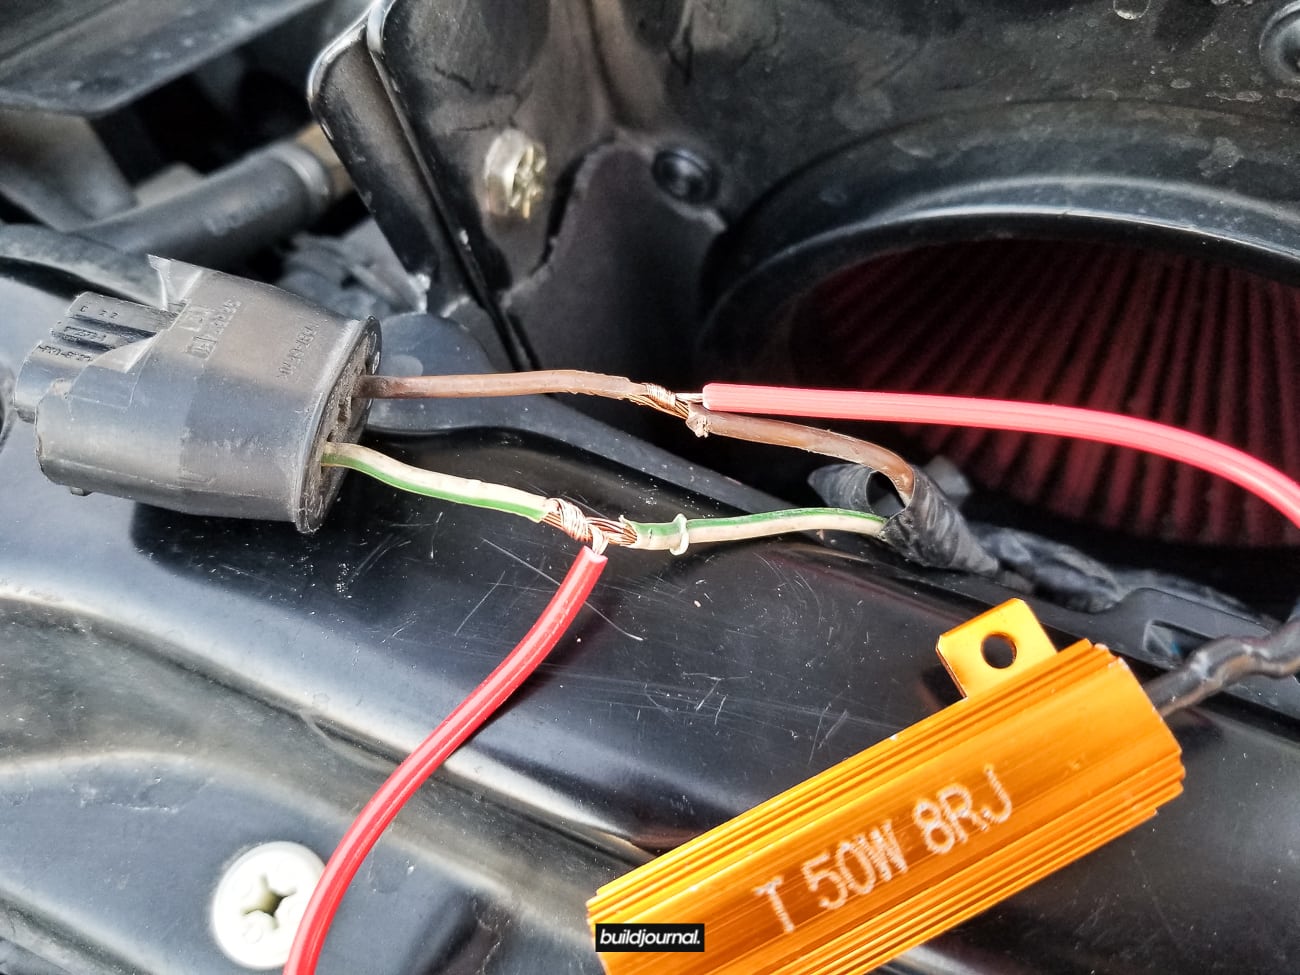
5. Tap Resistor Wire
5.1 For this last step we need to tap the high beam bulb socket wires with the supplied resistor so the car doesn’t throw a code. Simply tap into each wire. Make sure to mount or tuck the resistor somewhere that won’t be affected by heat. It does get pretty hot.


RS Future LM Wing Review
We’ve been developing our Front Race Splitter for a while now and it’s proven to provide a significant amount of down force in the front however without a wing, it really made the car unbalanced. A few months ago I was at Willow Springs for Round 3 of Bimmer Challenge and I took a nasty spin on turn 1 which is a high speed left hand turn that requires quite a bit of grip to throttle out. At the time I wasn’t running a wing, but only our full front aero program and I found out how unbalanced the car was – the rough way. That’s when I called my buddy Amir for the RS Future LM Wing to get the car balanced and make my car look a lot more “racecar.” In this review, I will demonstrate how drastic the change is when going from unbalanced no aero to a properly balanced car with aero. I have some entertaining footage for y’all.
Front Splitter and No Wing
I actually ran without the wing intentionally so I can write this article to support my claim. Yeah right. I under estimated the effect of what a wing does for you especially on a track like Willow Springs where I’m hitting 140+ MPH on the front straight then hard braking into a long, fast and cambered turn 1. This turn transfers a lot of the weight to the front and so the rear has a tendency to slide around. It doesn’t help that the front aero was there to magnify the weight transfer.
My entry speed and coasting speed around turn 1 was the same as always and I wasn’t too hard on the throttle when it spun. This run was actually in the first session and 3rd lap where I finally had a clear track to run it hot. Tires were warmed up. As I entered turn 1 I settled the car for the apex and slowly modulated the pedal to carry 50% throttle around the apex and before I even throttled to exit, the rear slid out. I tried to correct it but it just snapped on me forcing me to go over and up turn 1 and into the dirt. I’m glad I didn’t hit anything while I was sideways in the dirt. In the gif below, notice how quickly the rear gives away even with a cambered bank.

No Wing vs Wing
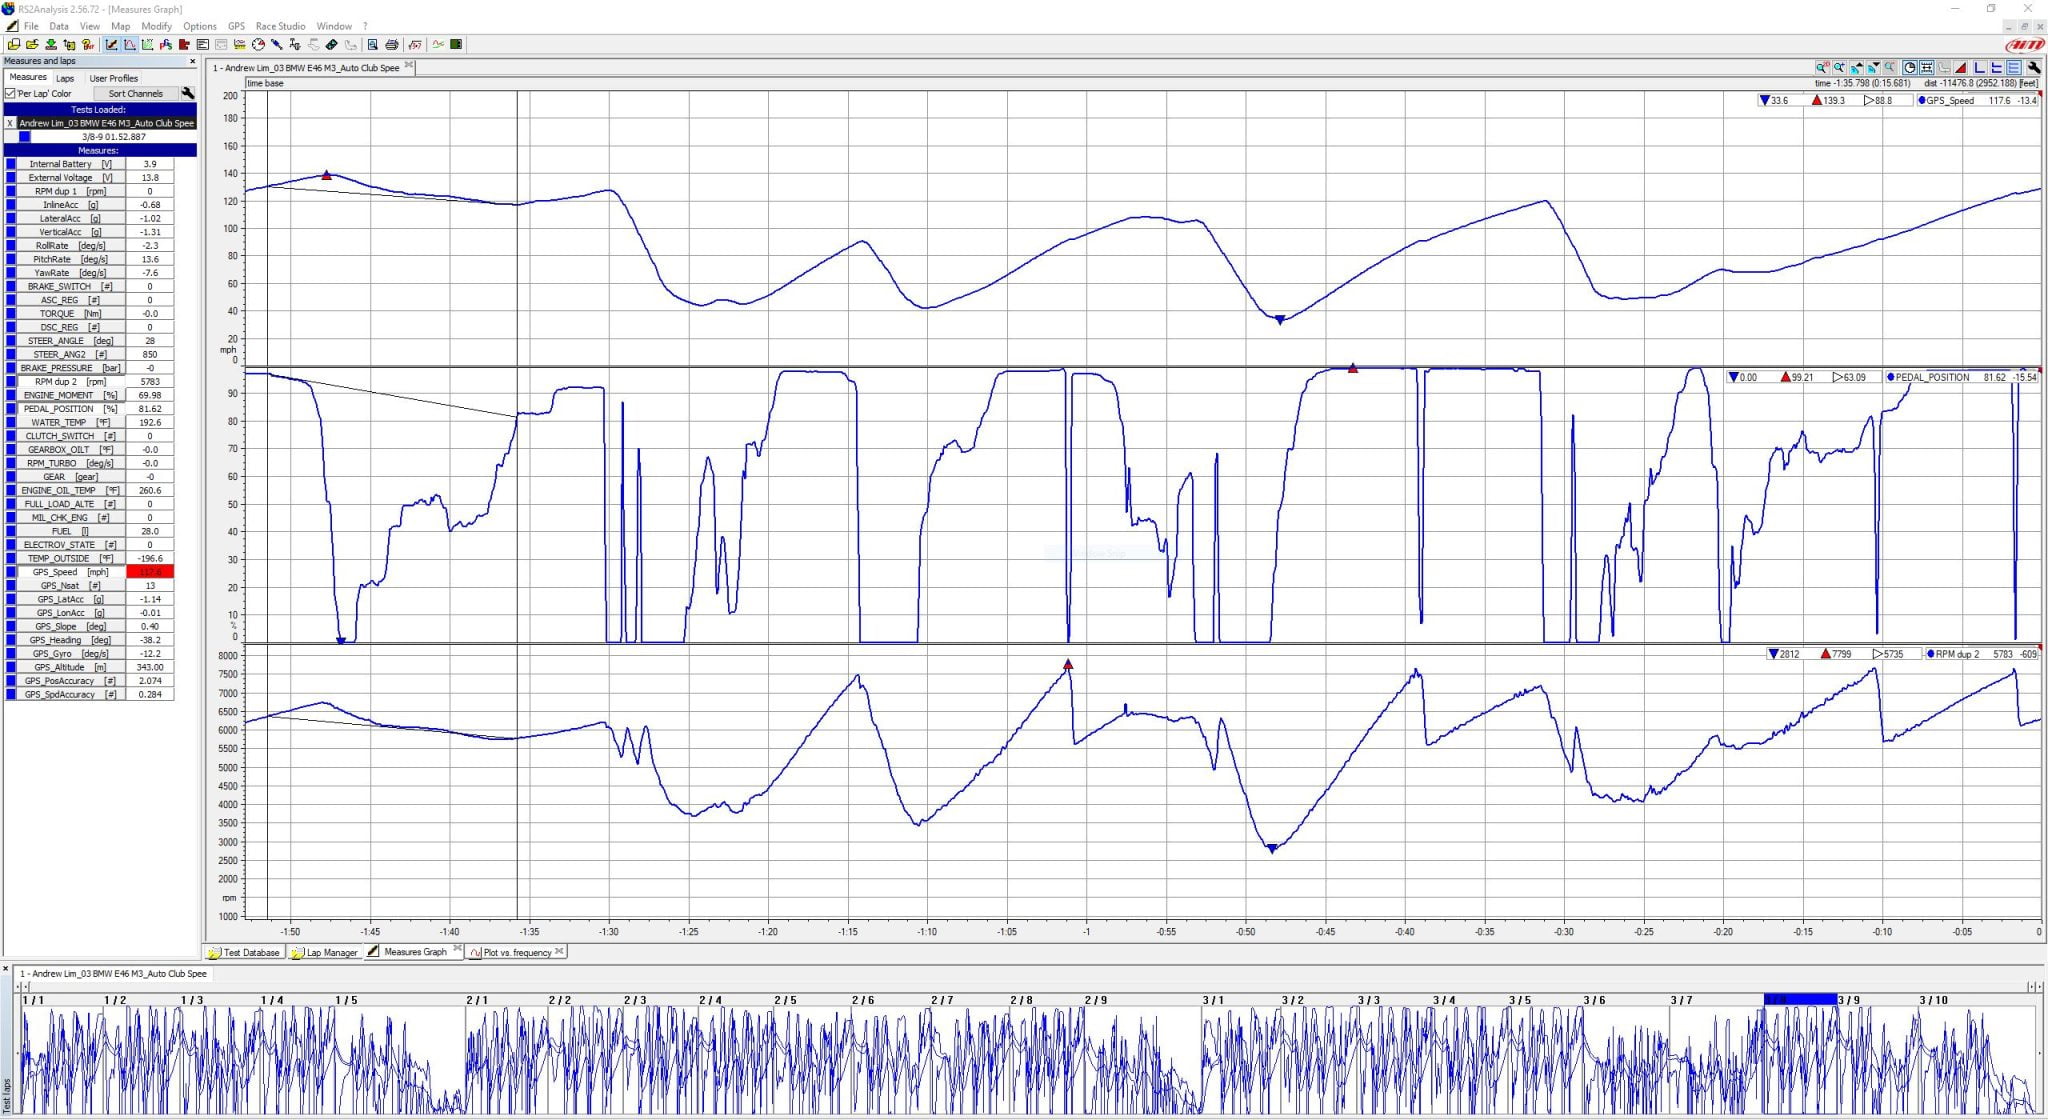
So let’s continue the comparison, but this time without a spin. I ran Auto Club Speedway with a very similar setup, but once without a wing and most recently with a wing. I have video to compare the two results. Both setups are on 275/35/18 Nitto NT01 tires with one-way coilovers. Now this isn’t an apples to apples comparison because the biggest moving variable here is my driver skill. I’ve gained more track knowledge (and I guess balls) to drive faster around the track for my 2019 PB with the wing, but you can still see the maximum speed differences around parts of the track.
Most importantly, we’ll look at the speeds on the front straight and the long NASCAR bank. ACS T1 and T2 requires a lot of down force to really go fast and that’s where the wing really shines. The PB I set in 2018 was 1:56.784 and in 2019 I added the wing and did a 1:52.887. That’s about a 4 second difference!
1:56.784
1:52.887
What’s surprising here is that my car reached 140 mph on the front straight with the wing. Something a lot of people don’t account for when adding a wing is the extra drag that it produces. Although more down force is produced, you have to sacrifice speed. In the most recent PB lap I do get a better exit speed than the 2018 PB, however it seems like I only reach around 135 mph tops when looking at all my laps. Without getting too granular, it’s nice to know that the RS Future LM Wing, as big as it is and as much down force it produces, still allows me to reach higher speeds. The chart below is way too fancy for what I’m trying to show, but data shows my speed around T1 and T2.
- T1/T2 average speed: ~117 mph without wing; ~124 mph with wing
- Top speed front straight: 134 mph without wing; 140 mph with wing
The Future is Now
Okay so let’s talk about the quality of this wing. The RS Future LM Wing, including the endplates, is all 2×2 carbon fiber weave and weighs a total of 7.1 lbs! (Scale shows 7 lb 2.5 oz) The uprights are made of solid aluminum which puts the total weight of the entire LM Wing package to just over 11 lbs for a 67″ wing. It’s very very light!
The install was straightforward. As all (proper) uprights require, I had to cut small parts of the underside of the trunk to fit the base plates. We drilled two holes on each side of the trunk to mount the top plate and once that was set, the uprights bolted right on.


Memorial Day Sale 2019, Take 20% Off

Memorial Day is a time to honor people who sacrificed their lives for the United States. As we celebrate the weekend with friends and family just remember to be grateful for what we have. We’re going to be running a special Memorial Day Sale for the next few days. Make sure to visit our store and check out all of our products.
Discount is off the cart total on qualifying products. Restrictions apply. Sale ends May 27, 2019 @ 11:59 PM PST.
-